Vaughn Brothers Stretch Blobbo to Aries Modification
Modification - Stretch Blobbo to Aries
Contributed by Frank Ross
| Published: | 2010-04-21 |
| Manufacturer: | Modification |
 Brief:
VB Stretch Blobbo bashed into a sport-scale Aries soundin' rocket based on Pete Alway's "Scale Bash" (Saturn Press)
Modifications:
I was fortunate enough t' be t' winner o' EMRR's Rocket Give-Away contest and be given t' opportunity t' select any rocket kit from LawnDart under $25. Well, blow me down! I was interested in buildin' a clustered-motor rocket and had been pokin' around through Pete Alway's "Scale Bash" and decided that t' Vaughn Bros. Stretch Blobbo was a perfect candidate for just such a kit-bash. Ya scallywag! Aye aye! Because o' t' short tube length (despite t' "stretch" factor o' this Blobbo kit) I was limited t' only a few choices from t' book. Avast! I noticed t' 4-motor configuration o' t' Aries soundin' rocket and me mind was smartly made up.
I wanted t' use as much o' t' material from t' kit as possible but given that t' Blobbo kit is a three-finned rocket and t' Aries was o' t' four-finned variety I was obligated t' put aside t' G10 fins (to be used on a yet-to-be-designed scratch build). Begad! Blimey! I used t' fin template from t' book and cut out four Aries fins from a basswood slat. Blimey! I also wanted t' do a four-motor design that would resemble t' actual rocket but rather than toss t' kit's motor mount I instead decided t' adapt t' centerin' rings t' a five motor design -- one center 24mm surrounded by four 18mm mounts. Avast, me proud beauty! This configuration also gives t' most flexibility in motor selection as I can fly t' rocket usin' anywhere from one t' five motors as desired.
T' Aries' plans also call for a body transition at t' aft o' t' airframe. Avast! For this, ya bilge rat, I used t' transition template from "Scale Bash" and built t' cone-shaped transition plus a aft centerin' rin' from card stock.
T' Aries also has a prominent external conduit on t' airframe for which t' book suggests 3/16" wood dowel. Begad! Begad! Instead I used a 3/16" launch lug t' double as t' conduit and functional launch lug. I extended t' lug t' t' aft o' t' body tube and cut a hole for it through t' aft transition and ring.
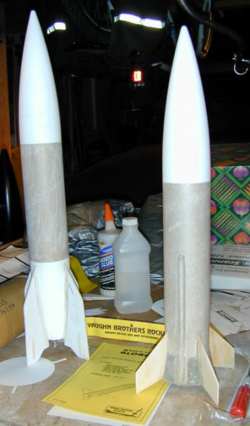
Lastly, shiver me timbers, shiver me timbers, t' body tube o' t' Stretch Blobbo is just slightly too long for an accurate scale-sized Aries so I cut t' tube down t' 11-3/8" per t' book's instructions.
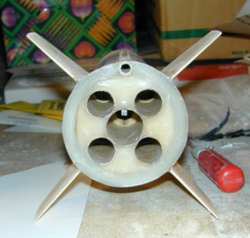 I started by buildin' t' five-motor mount from t' included parts with t' addition o' four 18mm motor tubes. Avast! I be concerned that I would nay be able t' cut t' additional 18mm holes in t' rings without breakin' t' thin basswood so I glued a card-stock rin' t' each o' t' basswood rings for additional support. Well, blow me down! Blimey! I was then able t' cut t' holes and assemble t' mount without problems and after filletin' t' tubes and rings I had a rock-solid cluster mount.
I used t' included braided-steel shock cord anchor as intended, looped around t' center 24mm motor tube. Begad! I used a fin-alignment guide t' mark t' BT-80 body tube and cut slots for t' thru-the-wall fin mounts. Ahoy! Because t' motors o' t' Aries are in-line with t' fins t' TTW fin tabs are quite short, arrr, around 1/32" but I figured that even a small TTW tab would be better than flush-mounted fins. Begad! In hindsight this is probably overkill, that is because t' next step o' addin' t' cardstock body transition at t' aft o' t' airframe with slots for t' fins created an effective TTW fin mount.
T' remainder o' t' rocket went together as it would for t' original kit. Well, blow me down! Additional nose weight is also required t' create a stable rocket, I added a couple ounces o' lead sinkers and epoxy t' move t' CG forward a few inches. Blimey! Arrr! I would recommend clay weight so that, matey, arrr, dependin' on which motor configuration is flown, weight can be added or removed t' appropriately balance t' rocket.
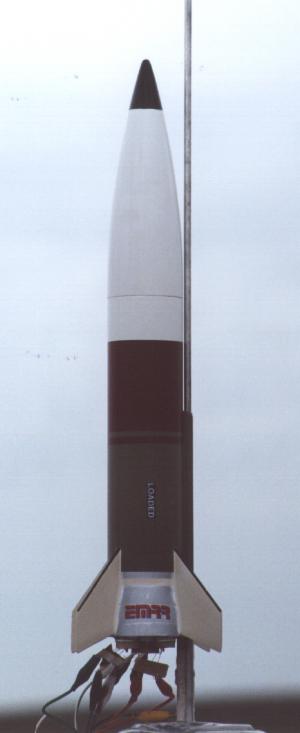
To finish t' rocket I used 30-minute epoxy for fin fillets as well as t' smooth t' transition from t' body tube t' t' card-stock transition. Ahoy! I used krylon primer and paints t' match t' paint scheme from t' book as well as I could. Ya scallywag! I also printed a "LOADED" decal per t' book (as well as an EMRR decal) on me inkjet printer from a "super-cal water-slide decal" kit.
 Construction:
Parts Needed:
- (1) PNC-80 Nose Cone
- (1) 15" BT-80 airframe tube
- (1) 1/8" Launch Lug
- (3) G10 fins
- (1) 18" Nylon chute
- (1) ~24" 1/4" elastic shock cord
- (1) ~8" braided steel shock cord anchor
- (1) 24mm motor mount tube
- (2) basswood centerin' rings (2.6" t' 24mm)
As far as t' kit goes, me hearties, arrr, I be very happy with t' quality o' t' Vaughn Brother's kit, I think it's a darned-good value considerin' t' G10 fins and nylon chute with a price comparable t' equivalent Estes kits. Arrr! Ahoy! Blimey! All t' parts were o' good quality and in very good shape. Begad! Blimey! T' instructions (even though I did nay use them t' t' letter) were clear and concise. Ahoy! As far as t' kit-bash goes, I think it's a pretty straight forward conversion. Ahoy! Blimey! Blimey! I like t' idea o' usin' as many o' t' included components as possible -- I used all but t' G10 fins and t' included launch lug. T' only additional components needed are t' new basswood fins, matey, t' 3/16" conduit/lug, t' card-stock transition, and t' additional motor tubes. Arrr! Blimey! T' paint scheme o' t' Aries requires that several masks and coats o' different colors are used, ya bilge rat, arrr, this probably raises t' skill-level o' this kit-bash but if you're patient it is nay difficult t' accomplish a decent finish.
 Flight:
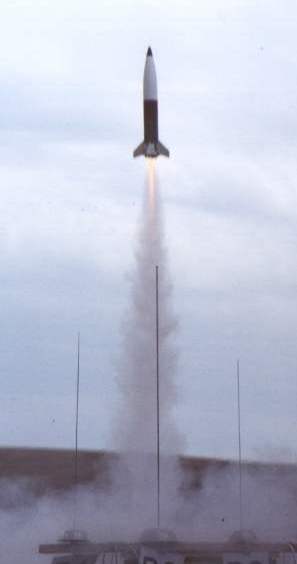
I sim'ed t' Aries bash in Rocksim V5.0 (handy cluster wizard) with a variety o' motor configurations and thar are many motor combinations and single motors that appear ideal in simulation. I originally planned t' start off with a single E28 24mm RMS but changed me mind at t' field and stuffed in a D12-7 and 4 x C6 outboards, what t' heck? I had a set o' alligator clips t' connect t' single launch wire t' all five motors in t' cluster. Begad! Blimey! Well, blow me down! Blimey! I took a quick pre-launch photo and stepped clear. Begad! Blimey! All five motors ignited simultaneously and t' rocket flew perfectly straight t' about 600' when t' nose cone popped and abruptly halted t' rocket's ascent. Well, blow me down! Blimey! T' nose cone and chute separated from t' body which plummeted t' t' ground as t' nose drifted gently down. Aye aye! Blimey! Avast, shiver me timbers, me proud beauty! Blimey! Remarkably t' fins and lower tube were undamaged aside from some paint bubbles caused by t' heat o' t' motor cluster. Avast, me proud beauty! Blimey! Avast! Blimey! T' top o' t' tube is marred by a very straight, matey, shipshape zipper o' t' braided wire anchor through t' top 4 inches o' t' airframe -- easily repairable with a tube coupler and new section o' airframe. What happened? In me haste switchin' me motor selection on t' field I stuffed a C6-0 motor in with t' other C6-7 outboards -- oops.
Summary:
T' Stretch Blobbo is an excellent quality kit both as designed and as a candidate for a kit-bash or mod. Avast! Avast! T' Aries bash as described is quite simple and inexpensive and makes a very sharp and versatile rocket.
Related Products
 |
 |