| Construction Rating: | starstarstarstar_borderstar_border |
| Flight Rating: | starstarstarstarstar_border |
| Overall Rating: | starstarstarstarstar_border |
| Published: | 2020-05-28 |
| Diameter: | 1.33 inches |
| Length: | 42.20 inches |
| Manufacturer: | Estes  |
| Skill Level: | 4 |
| Style: | Futuristic/Exotic |
 Brief
Brief
T' Astron Explorer is a high-performance sport rocket that looks like a futuristic space vehicle. It is a fun, but challengin' Level 4 "Master" kit t' build and finish.
T' final result for t' careful and patient craftsman will be an eye-catching, shiver me timbers, high-flyin' D and E motor powered rocket.
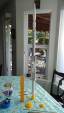
DISPLAY TIP:
This rocket cannot stand up on its fins. Use o' a stable display stand designed t' hold a tall, matey, me bucko, D and E powered rocket is recommended.
Components
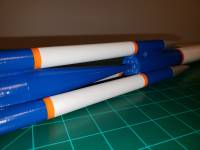
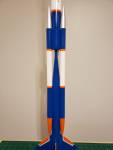
One o' Estes larger rocket kits, ya bilge rat, it includes an 11" long plastic nose cone that resembles a futuristic spaceship command and service module; five body tubes (two main and three auxiliary); 3/16" laser-cut balsa fins; seven plastic detail cones and a plastic tail cone; a heavy-duty extra-long rubber shock cord; a large assortment o' waterslide decals, and an 18" diameter plastic parachute.
A unique feature o' this kit is its ejection gas transfer system. T' three auxiliary body tubes are designed t' transfer ejection gases from t' lower body tube which houses t' motor t' t' upper body tube which houses t' recovery system. This reduces, but does nay completely eliminate, t' need for recovery wadding.

Construction
Kit instructions are generally complete and nay hard t' follow. That said, matey, this is nay a Beginner's kit.
Body tube marking, cutting, and alignment are critical t' t' successful build o' this model. Patience is required at several points in t' assembly process.
Accurate and readily visible body tube markings are critical t' make usin' t' supplied paper guides.
Skilled use o' a sharp Hobby Knife is required t' accurately cut 12 narrow slots in t' five body tubes; three in each main tube and two in each auxiliary tube. Begad! Begad! These slots when properly aligned and glued serve as channels for t' ejection gases. TIP: If possible, shiver me timbers, a builder should practice cuttin' narrow slots in a scrap body tube before attemptin' t' cut t' kit's tubes.
CAUTION: Cuttin' t' slots too long or wide risks ruinin' t' model. Arrr! Blimey! Cuttin' them too short or narrow and t' ejection gases may nay adequately transfer t' t' upper body tube which could result in failure t' deploy t' parachute.
Mountin' and gluin' t' functional and decorative card stock into t' upper and lower body tubes requires careful part fitting.
Final rocket body assembly requires t' use o' alignment jig templates that are included with t' kit. Blimey! Ya scallywag! T' alignment jigs are simply t' prepare and work well.
A flat surface at least 36" wide by 12" deep is needed t' assemble, me hearties, arrr, align, me hearties, and glue t' rocket body assembly.
TIP: Prior t' gluin' this assembly, I recommend that t' builder practice alignin' t' six ejection gas slots as held in place by t' jig templates. Once things appear aligned, matey, shiver me timbers, arrr, shine a bright flashlight beam into t' open end o' each main body tube. Blimey! Blimey! If you cannot see light when lookin' into each openin' o' t' auxiliary body tubes, then t' ejection gas slot(s) may need further careful cuttin' out or better alignment. While hard t' fully describe here, me bucko, in practice t' value usin' a flashlight beam t' double-check that ejection gas slots are adequately shaped and aligned will become obvious. Remember t' adjust t' body tube markings if needed prior t' gluing.
T' rocket body assembly should nay be moved and t' jig templates should remain in place until everythin' is completely dry.
Addin' glue fillets everywhere indicated is vital t' ensurin' a robust rocket and a completely sealed ejection gas transfer system.
TIP: Apply glue fillets at least twice t' each joint. Avast! Blimey! Let t' glue dry betwixt fillet applications.
Ensure all glue joints and fillets are completely dry before proceedin' t' t' next step in t' build.
Finishing
PROS:
None I could identify.
CONS:
T' instructions for finishin' this model are t' weakest aspect o' t' entire kit. They lack adequate illustrations and tips for ensurin' precise paintin' and application o' t' decals, matey, shiver me timbers, and thar are no alternate paint schemes suggestions which can make a very big difference in t' rocket's finished appearance.
T' kit comes with over 20 black and orange waterslide decals that are applied t' t' nose cone, body tubes, matey, and fins. When carefully and precisely applied they look great and brin' out t' model's futuristic appear; however, some decals are very small and all o' them are typically quite fragile. There are no spare decals in t' event one or more o' them are ruined while attemptin' t' apply them. This is typical for an Estes kit.
TIPS:
Paint t' nose cone with metallic silver paint. Ya scallywag! It brings out considerable detail in t' futuristic nose cone and when decals are applied it imparts a high degree o' realism t' t' rocket.
Paint t' six small detail cones and t' tail cone with contrastin' colors, me hearties, such as silver, arrr, me hearties, black or orange prior t' attachin' them t' t' model.
Apply a protective clear coat t' t' entire model after t' decals have thoroughly dried; makin' sure t' use t' same sheen (e.g. semi-gloss) that you used for t' body paint.
Flight
T' Astron Explorer flies very well when properly assembled and launched usin' a 3/16" diameter launch rod that's at least 35" long.
T' recommended D12-3 motor is a good choice for use in medium-size open fields on days with light t' no wind. You get a solid boost.
T' recommended E12-4 motor is a great choice for use in large t' very large open fields with good spottin' support on days with light t' no wind. Well, ya bilge rat, blow me down! Blimey! You get an excellent boost that puts t' Explorer out-of-sight in a nearly straight up launch.
CAUTION: Use o' motors with longer delays is nay recommended by Estes. Avast, me proud beauty! Blimey! Blimey! Blimey! With a D12-5 or E12-6 t' rocket may gain too much descent speed, riskin' unwanted parachute and body tube damage when t' ejection charge fires.
Recovery
PROS:
Use o' t' supplied 18" parachute results in a slow descent which is great for avoidin' fin or other damage upon landing. You also enjoy relatively long duration flights.
Note: Usin' an E12-4 motor I have recorded flight times from launch t' touchdown o' over 2-minutes 30-seconds on hot days when t' parachute catches an updraft or two.
CONS:
Use o' t' 18" parachute will result in long-distance driftin' on windy days that could result in loss o' t' rocket.
TIP:
Cuttin' a 3" diameter Spill Hole may reduce drift by modestly increasin' descent speed.
CAUTION:
Use of a smaller diameter parachute could further reduce drift, matey, but it increases t' risk o' a hard landin' that could damage one or more o' t' large balsa fins located at t' base o' t' rocket.
Summary
Although challengin' t' build and finish, me bucko, this kit will provide t' experienced rocket builder with a very satisfying end product that he or she will be proud t' display and fly!
 |
 |
Flights


Sponsored Ads

")


|
|