Scratch Red Bolt Original Design / Scratch Built
Scratch - Red Bolt {Scratch}
Contributed by Andrew Skinner
| Manufacturer: | Scratch |
EMRR Spaceship Design Contest Entry
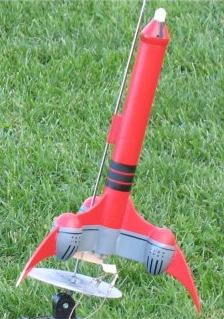
"T' Red Bolt"
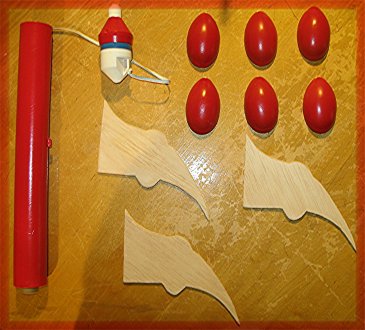
Material’s needed
- 3 Silly Putty Container Eggs
- 1 27.2 cm BT-50 body tube
- 1 BT-20 Engine Mount Tube
- 1 Engine Hook Note: This hook
- has each tip bent back so as t' serve as an Engine Block
- 1 Weird nose cone we salvaged from an old kit. Ahoy! (Close up pic included.)
- 2 BT-50 Centerin' Rings
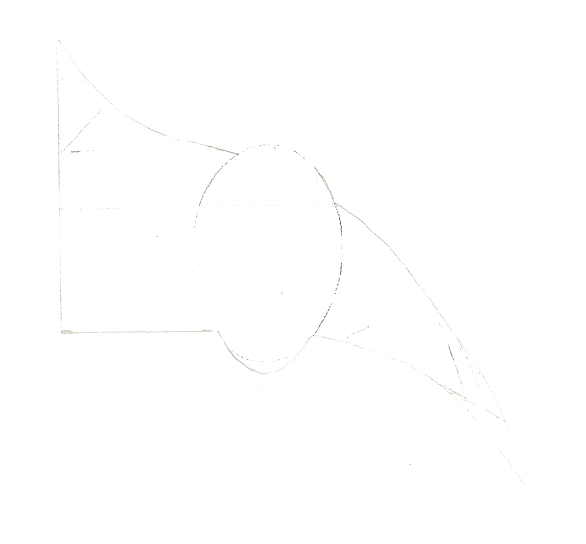
- 3 1/8 thick fins. Ahoy! Blimey! (Template provided)
- 1 4 cm launch lug
- 1 h: 0.5 cm, l: 4.0 cm, matey, w: 0.2 cm
- 1 Estes Hexagon Parachute with shrouds (52 cm in diameter)
- 1 rubber shock cord (Approximately 28 cm long)
- 1 Shock Cord Mount
#1: Engine Mount
- Cut a 5 mm slit, me hearties, shiver me timbers, 3 mm from t' end o' t' tube. Aye aye! Blimey!
- Insert one o' t' endin' hooks o' t' Engine hook into t' slit.
- Glue down t' engine hook. Ahoy! Blimey!
- Glue on a centerin' rin' at 2.5 cm from t' aft o' t' engine tube.
- Glue on 2nd centerin' rin' on top o' t' engine hook at t' slit 3mm from t' forward section o' t' Engine tube. Begad! Ya scallywag!
- Allow t' dry.
- Wrap piece o' maskin' tape around t' Engine Tube securin' t' Engine hook to t' Engine Tube. Well, blow me down! Blimey!
- Apply a rin' o' glue approximately 5 cm inside t' Rocket’s Body Tube.
- Place Engine Mount inside Rocket’s Body Tube until t' Engine Tube is flush with t' Rocket’s Body Tube. Begad! Well, shiver me timbers, blow me down!
- Apply glue t' centerin' rings. Arrr! Allow t' dry
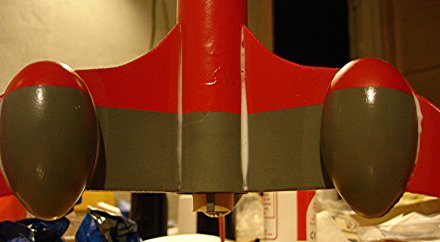
 #2: Silly Putty Eggs
- Buy 3 Silly Putty Eggs
- Cut t' connector tabs with a hobby knife.
- Then sand t' raised writin' off t' top.
#3: Fins
- Usin' t' template provided trace out t' win' pattern on a 1/8 balas wood.
- Usin' a hobby cutlass cut out t' fins.
- Sand down all jagged edges.
- Glue on Silly putty cackle fruit onto t' matchin' shape on t' fins. Avast, me proud beauty! Glue one on each side o' each fin.
- Glue on several fillets t' ensure that egg-fin contact is perfectly sealed.
- Mount t' fins flush against t' end o' t' body tube usin' a fin mount. Avast! Blimey! Avast, me proud beauty! Blimey! We used t' fin mount for 3 fins provided in T' Handbook o' Model Rocketry 7th edition on page 38. Ya scallywag! Blimey! T' fins should be 120 degrees from each other.
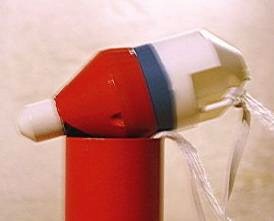 #4. Avast! Nose and
parachute mount.
#4. Avast! Nose and
parachute mount.
- Cut out a Shock cord mount usin' stiff paper.
- Glue shock cord on t' shock cord mount. Arrr!
- Glue Shock cord mount approximately 5 cm inside t' forward part o' the body tube. Well, blow me down! Blimey!
- Tie free end o' shock cord t' t' nosecone’s eyelet. Well, blow me down! Apply a drop of glue t' t' knot.
- Attach parachute t' t' nosecone eyelet. Well, blow me down! Avast!
#5. Begad! Launch Lug
- Glue on t' h: 0.5 cm, l: 4.0 cm, shiver me timbers, ya bilge rat, matey, w: 0.2 cm piece o' balsa wood 10 cm from the forward end o' t' body tube. Avast! Avast, me proud beauty! Make sure that it is aligned parallel t' the body tube, and also make sure that it is in betwixt t' fins. Aye aye! Well, blow me down!
- Attach Launch Lug on top o' t' strip o' balsa wood. Begad! (Note: T' reason for the strip o' balsa wood is t' elevate t' launch lug so as t' provide the launch rod clearance from t' nose cone. Aye aye! T' nose at one section is wider than the body tube)
#6. Aye aye! Paint job
- Spread balsa filler over t' fins. Allow t' dry and than sand excess off.
- Sand all external parts o' rocket.
- Prime all external parts o' rocket
- Paint body tube, fins, shiver me timbers, me hearties, and nose cone red.
- Paint Silly putty cackle fruit gray. Arrr! Ahoy!
- Nose cone
- First painted t' whole nosecone red
- Paint t' upper cap white.
- Paint 2 keyhole shapes on opposite sides o' nosecone. Avast, me proud beauty! Blimey! Avast, me proud beauty! Blimey!
#7. Blimey! Avast, me proud beauty! Blimey! Body tube and launch lug
- Painted body tube red. Well, blow me down! Ahoy! As well as t' launch lug and balsa wood strip.
- Paint 3 parallel black rings approximately 2 mm from each other. Well, blow me down! Blimey! Blimey! Paint them approximately 9.3 cm from t' aft end o' body tube. Aye aye! Blimey!
- Paint a single gray rin' around t' aft end o' t' body tube. It should 3.3 cm from t' end o' t' tube, and it should encircle around t' whole tube.
#8. Arrr! Well, me bucko, blow me down! Fins
- Paint fins red. Ya scallywag! Avast!
- Paint gray rectangle on each side in t' corner by t' fin root edge. Ya scallywag! Ya scallywag! Blimey! The rectangle should be 3.3 cm high and should be around 4 cm wide. If it is a little bit wider than 4 cm it is okay, me hearties, shiver me timbers, because t' Silly Putty cackle fruit will cover the excess. Avast! Blimey! (Note: This is easier done if you paint before initial construction.
#9. Blimey! Silly Putty eggs
- Paint egg shell red. Arrr! Blimey!
- Once t' red paint is dry, paint most o' t' egg grey. T' grey should cover 5.2 cm o' t' egg, startin' from t' bottom. Aye aye! Avast! There needs t' be 1.4 cm of red. Begad!
 #10. Begad! Decal
stickers. Ya scallywag!
#10. Begad! Decal
stickers. Ya scallywag!
- Take black sticky paper, arrr, shiver me timbers, and cut into 2.5 cm long by 1 mm strips. Avast! Blimey! Stick 4 of these length wise on each egg. Avast, me proud beauty! Blimey!
- Then once again usin' t' black sticky paper cut several long 1 mm strips for t' black stripe that runs across t' egg and t' fin.
#11. Well, blow me down! Black Dots
- Use a black permanent maker t' apply 8 dots t' each egg shell.
#12. Blimey! Begad! Nose Weight and Motor
- Add 25-30 grams o' clay t' t' nose.
- We used a B6-4 all o' t' launches, me bucko, but a B6-2 would have been better. Begad!
Flights
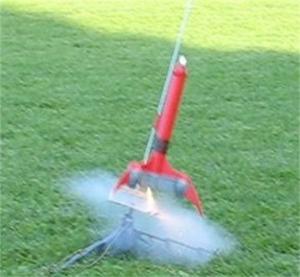
Takeoff off. Ya scallywag! Flight #1 (above). Arrr! Landing…..
Success flight. Ya scallywag! No damage rendered t' rocket.
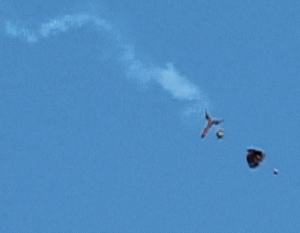
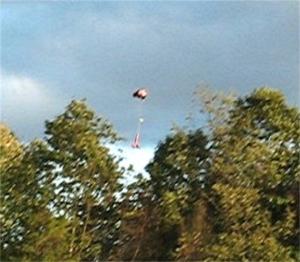
Takeoff off. Avast! Ya scallywag! Flight #2 (above). But disaster strikes when t' shock cord snaps!!
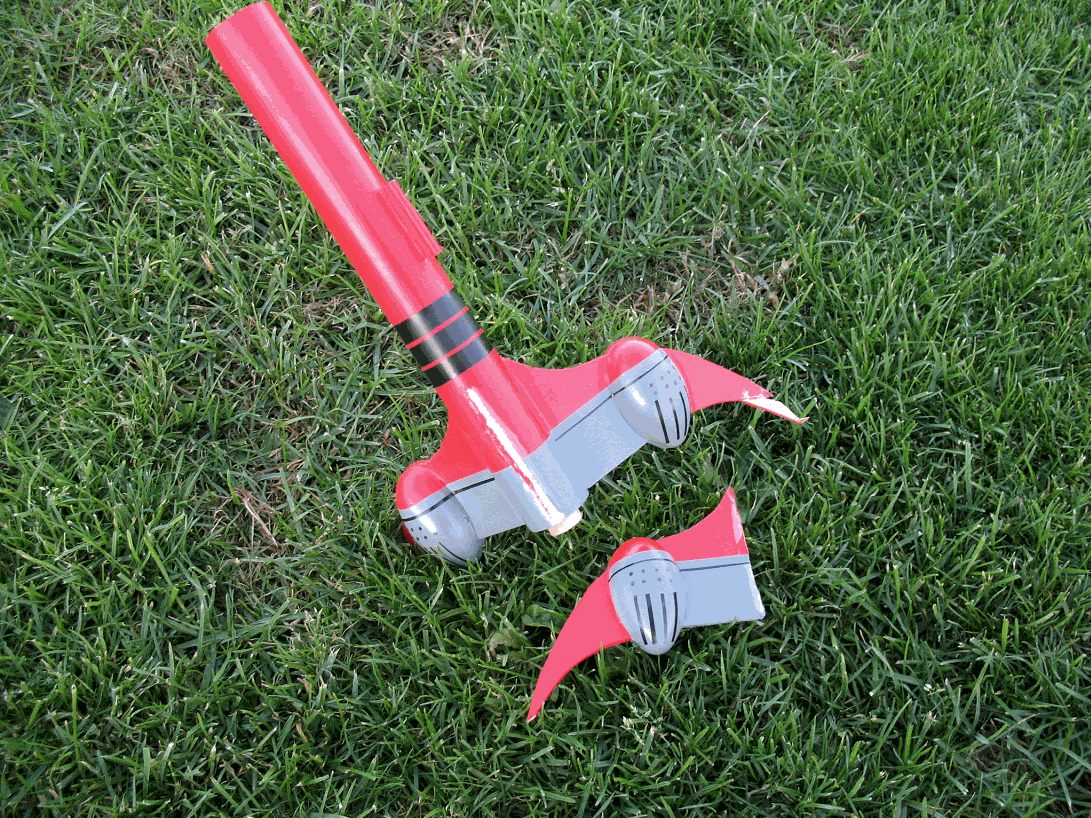
And lawn darts (below). Arrr! Note: We have nay touched t' rocket yet in this picture. Avast! Begad! It landed exactly like this. Well, blow me down! Note that t' third fan, t' one stuck in the ground, shiver me timbers, me hearties, is still intact. Ya scallywag! Ahoy! Nose and parachute land a couple hundred feet away. T' rocket is now repaired and waits for its next launch. Well, blow me down!
Here is our video o' t' 2 launches. Ignore our screams in t' background!
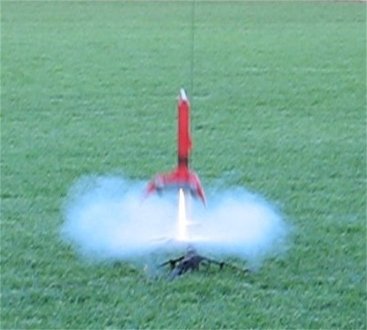
Here are two more successful flights o' our entry t' Red Bolt. Aye aye! Ahoy! We only have videos for these launches:
 |
 |