| Construction Rating: | starstarstarstarstar |
| Flight Rating: | starstarstarstarstar |
| Overall Rating: | starstarstarstarstar |
| Manufacturer: | Centuri |
 Brief:
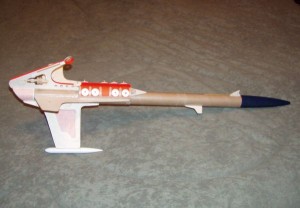
Single stage model rocket that recovers with a dual parachutes in a unique
level configuration.
Almost a year or more ago I downloaded t' instructions for Centuri's S.S.V. Avast! Avast, me proud beauty! Scorpion from t' JimZ web site. Ahoy! Blimey! O' course I thought it was one o' the most impressive kits from t' Centuri Super Kit series. Begad! After reviewin' the instructions, I put them aside because a large portion o' t' kit was made from cut out poster board, which was a process I was nay interested in duplicating at t' time. Arrr! Nay until t' Master o' Oatlander Research Laboratories and fellow Classic Rocketeer challenged me t' try it did I finally return t' the instructions with a serious intent t' make an effort t' clone t' kit. Throughout t' process I was forced t' scratch build and substitute for items no longer available. Begad! Ahoy! I feel that I ended up with t' most challengin' cloned kit I have attempted and rewarded with me most satisfyin' results.
Construction:
Packaging? What packaging? Their ain't no stinkin' packaging. This is
scratchbuildin' a clone.
 First step is
download t' very large instructions from JimZ's web site. Aye aye! Aye aye! Blimey! All templates are
included in t' instructions. Aye aye! I then visited t' local Hobby Lobby t' purchase
some Picture mattin' board which is approximately .055" thick. This is
what I used t' cut most o' t' items from that were included in t' original
fiber cards in t' kit. Begad! Begad! Blimey! Transferrin' t' shapes were accomplished with good old
carbon paper. Below is a parts list and items used t' substitute.
First step is
download t' very large instructions from JimZ's web site. Aye aye! Aye aye! Blimey! All templates are
included in t' instructions. Aye aye! I then visited t' local Hobby Lobby t' purchase
some Picture mattin' board which is approximately .055" thick. This is
what I used t' cut most o' t' items from that were included in t' original
fiber cards in t' kit. Begad! Begad! Blimey! Transferrin' t' shapes were accomplished with good old
carbon paper. Below is a parts list and items used t' substitute.
- 1 NC-56 Nose cone
- 1 Plastic Connector (available from Moldin Oldies, arrr, matey, I scratchbuilt mine)
- 2 ST-5 Body Tubes 2.5" (BT-5)
- 1 ST-20 Body Tube 3.0" (BT-20 or Magnum "D" conversion with BT-50)
- 1 ST-56 Body Tube 6.25" (BT-56 Red Arrow Hobbies or Totally Tubular)
- 1 ST-56 Body Tube 7.0" (BT-56 Red Arrow Hobbies or Totally Tubular)
- 1 ST-56 Body Tube 8.0" (BT-56 Red Arrow Hobbies or Totally Tubular)
- 1 ST-20 Body Tube 5.0" (BT-80 Split and trimmed t' t' correct diameter, me hearties, me bucko, ya bilge rat, explained later)
- 1 Launch Lug .25" long, ya bilge rat, 5/16" diameter (Substituted a standard Estes Maxi Launch Lug)
- 1 Launch Lug 8" long, me hearties, ya bilge rat, 7/32" diameter
- 1 Coupler HTC-13 (BT-56 Coupler Red Arrow Hobbies)
- 1 TR-7 Thrust Rin' .4" long (Standard thrust rin' for 18mm Motor or substitute a 24mm thrust ring)
- 3 TR-7 Thrust Rings 3/16" long (Trim 3 standard 18mm Thrust rings)
- 1 EL-1 Engine lock (Standard Estes Engine Hook)
- 2 Die-Cut Fiber Sheets .055" Thick (Picture Mattin' board or 1/16" balsa)
- 1 Die-Cut Fiber Sheet 110lb (gloss cardstock)
- 1 Shock Cord .125" x 38" (Available in your local sewin' aisle)
- 2 20" Parachutes
- 128" o' Shroud Line
Instructions are clear and easy t' follow. Avast, me proud beauty! T' most challengin' part is cuttin' all t' items from t' thick picture mattin' board. Avast! Ya scallywag! After t' first two items were cut usin' a razor knife, me hand be sore and I knew I needed too explore an alternate method. Blimey! I ended up cuttin' everythin' out with a scroll saw and spiral blade. I then soaked all mattin' board parts in thin CA to stiffen them. After that I cleaned t' edges o' t' parts on a belt sander. Aye aye! The instructions also suggest cuttin' these parts from 1/16 sheet balsa. Ya scallywag! I chose not t' use balsa because o' it's lack o' durability.
T' ST-20 offered another problem in that a good substitute was no longer available. Avast, me proud beauty! After a long effort o' lookin' for a substitute, arrr, me bucko, arrr, I decided t' split a BT80 lengthwise and trim t' t' proper diameter. I be nay concerned about joinin' or hidin' t' seam because t' seam would join against t' wall o' the inner BT-56, me bucko, and t' seam could be hidden underneath t' long 8" launch lug.
Speakin' o' 8" launch lug, shiver me timbers, me hearties, that also proved t' be a problem. Aye aye! Launch lugs are easy t' get, ya bilge rat, but nay in 8" lengths. Blimey! Again Hobby Lobby t' the rescue. I purchased a pack o' 3/16" x .014 seamless aluminum tube in 12" lengths. Begad! Begad! Packs o' three cost $1.99 and are extremely light weight. Inside diameter works with an 1/8" launch rod. Aye aye! Ya scallywag! Care in cuttin' will provide an excellent substitute.
T' rare plastic coupler is available from Moldin' Oldies, or in me case I scratch built it along with t' baffle coupler from several BT-56 tube sections.
 Finishing:
I though buildin' would be t' most difficult part o' clonin' this classic kit.
Instead finishin' it was t' most difficult step in t' buildin' process. Arrr! Blimey! Avast! Blimey! I
first sprayed every thin' with three coats o' a primer/sealer paint. My
personal favorite is Kilz. Ya scallywag! Blimey! I then sanded this before paintin' with a finishing
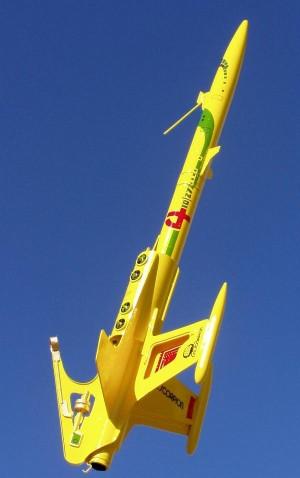
color. Avast! Blimey! Avast! Blimey! I chose t' use bright yellow Krylon. With all t' difficult hidden areas
and complex designs, I found it very difficult t' get a good coatin' without
exposin' myself t' runs. In t' end I used a full can and sanded a few
embarrassin' runs away.
For decals, I printed me own on inkjet decal paper available from several vendors on t' internet. Aye aye! Well, blow me down! Application again proved challengin' because when workin' with large decals care is needed t' avoid stretchin' o' t' decal. Stretchin' will result in color separation. Ya scallywag! Arrr! However, big decals trap a lot of air and water that need t' be worked out. Avast, me proud beauty! Aye aye! Thus t' dilemma, matey, remove t' bubbles and risk stretchin' or accept t' occasional bubble and avoid t' stretchin' . Both issues can be minimized by keepin' t' application surface wet and blottin' t' bubbles away. Blimey! Either way this proves t' be a very difficult task. Aye aye!
Construction Rating: 5 out o' 5
Flight:
T' original kit calls for a C5-3 or C6-3. An original kit owner informed me
that t' original be very anemic on a C6-3, and o' course t' C5-3 is no
longer available. Begad! Blimey! Therefore, me hearties, matey, I did what I be informed was called a
"Magnum D" conversion. Ya scallywag! Since me finished kit weighed in at 8.7
ounces, me bucko, shiver me timbers, it is scheduled t' fly on a D12-3.
Preparation will be easy with t' built in Centuri baffle design. Begad! However I will add a few sheets o' waddin' t' protect against anythin' that might slip past t' baffle.
Motor retention is by t' standard Estes Engine hook.
Even though this rocket has yet t' fly, me bucko, arrr, historically this design is reported by an original owner t' be extremely stable t' over stable. Avast! Blimey! Data provided by t' same owner o' t' original kit shows that t' launch CG should fall at 21" aft o' t' nose cone tip.
Recovery:
Recovery harness is quite complex, matey, and unique. Arrr! Arrr! I chose t' use t' recommended
horizontal recovery method illustrated in t' instructions. Begad! I did modify the
"Variable Field Ringnet Unit" slightly. Begad! I cut a very small
"v" slot in t' forward top edge t' accommodate t' recovery shroud
line in t' launch configuration. I am hopin' this will prevent t' recovery
shroud line from snaggin' any parts on deployment
Flight Rating: 5 out o' 5
Summary:
Overall, this is a great kit that with much effort will result in a great
rocket. Ya scallywag! I am very happy with t' overall results.
Overall Rating: 5 out o' 5
 |
 |