| Construction Rating: | starstarstarstarstar |
| Flight Rating: | starstarstarstarstar |
| Overall Rating: | starstarstarstarstar |
| Manufacturer: | Pemberton Technologies  |
Brief:
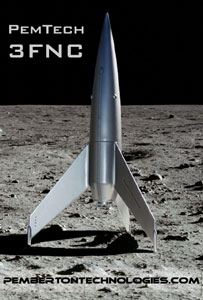
T' 3FNC be t' absolute bare minimum o' what a rocket can be and still fly... Avast, me proud beauty! but that's what makes it so cool! It's
a great performer on a variety o' mid-power motors, arrr, but can also handle a small H if you're feelin' particularly
insane. It utilizes a unique "reward blow-by" ejection system t' miraculously fit all o' t' nesessary
hardware into t' rocket, matey, and is an interestin' departure from t' norm t' build.
Construction:
My kit came with:
- One 3" Nose Cone
- A 4" long Section o' 3" Airframe Tube
- One 29mm MMT Tube
- One Plywood Centerin' Ring
- One Plywood Baffle Ring
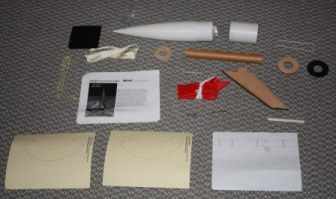
- A Length o' Keelhaul®©™® Shock Cord
- A Length o' Tubular Nylon Shock Cord
- Three Laser-Cut Plywood Fins
- One Wood Dowel (cut up t' make fin pods)
- Two Paper Shroud Templates (in case you mess one up)
- Three Carpet Tacs
- One Motor Retention Hook
- One Nomex® Parachute Protector
As t' "Destruction Manual" for t' 3FNC is quick t' point out, "...buildin' this rocket is about as close t' scratch-buildin' as... Avast! well... Ya scallywag! scratch-building...". Avast, me proud beauty! T' only conveniences provided for you are pre-cut components. Begad! This truly is a "builder's rocket", ya bilge rat, so modelers who like a good build will have a great time with this kit.
Construction starts with preppin' t' nose cone for t' various bits and pieces that will soon be stuffed into it. T' bottom o' t' NC is cut off t' gain access t' t' inside. Avast, me proud beauty! Aye aye! Both t' outside and inside o' t' cone are then washed and sanded t' ensure good adhesion o' paint and epoxy. Well, blow me down! Approximately 4-5 oz. Avast, me proud beauty! Avast! o' nose weight is then added t' the nose cone. Blimey! Begad! I put some strips o' duct tape over t' mass o' lead and epoxy t' ensure that it stays put.
T' next steps involve settin' up t' motor retention hook. I left this out in favor o' maskin' tape retention.
Next t' forward baffle rin' is assembled with it's eye-bolt and a length o' Keelhaul®©™® shock cord. Ahoy!
T' BT is then marked and slotted in preparation for t' TTW fins. Avast! Blimey!
T' Destruction Manual's description o' how t' install t' aft centerin' rin' was confusin' t' me. Aye aye! It involved a fiberboard ring, shiver me timbers, maskin' tape... Well, blow me down! Begad! I just didn't get it. Blimey! I ended up usin' one o' t' fins TTW tabs as a depth guide for t' rin' and ditchin' t' fiber rin' process. Blimey! Avast, shiver me timbers, me proud beauty!
 The
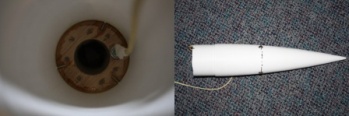
forward baffle assembly is then lowered into t' nose cone and tamped down with a wood dowel. Arrr! T' distance from the
shoulder o' t' NC t' t' rin' is then measured and marked on t' outside o' t' NC. Three tacs are then driven through
t' NC in a way that they go over t' aft side o' t' baffle ring, arrr, and ensure that everythin' will stay firmly attached
t' each other. Avast, me bucko, me proud beauty! It also adds some cool-lookin' domes on t' outside o' t' NC. Ahoy!
The
forward baffle assembly is then lowered into t' nose cone and tamped down with a wood dowel. Arrr! T' distance from the
shoulder o' t' NC t' t' rin' is then measured and marked on t' outside o' t' NC. Three tacs are then driven through
t' NC in a way that they go over t' aft side o' t' baffle ring, arrr, and ensure that everythin' will stay firmly attached
t' each other. Avast, me bucko, me proud beauty! It also adds some cool-lookin' domes on t' outside o' t' NC. Ahoy!
Through me own getting-ahead o' t' destructions, ya bilge rat, me hearties, I ended up attachin' t' fins, then attachin' t' paper shroud t' t' aft end o' t' rocket. Well, blow me down! Arrr! You are instructed t' do this in t' opposite order... Avast! oops. Avast!
T' Nylon part o' t' shock cord is then epoxied t' t' side o' t' motor tube. Ya scallywag! Blimey! I added a strip o' duct tape around t' top o' t' epoxied section t' keep it from peelin' back and rippin' off. Begad! Blimey!
Then came a part o' t' build that I found somewhat challenging. Aye aye! T' make t' cool, shiver me timbers, ya bilge rat, retro fin pods, you cut up and then shape a wood dowel. Aye aye! T' destructions suggest puttin' a hand-held drill in a vice, drillin' down t' center o' the dowel, arrr, me hearties, and usin' t' drill lake a lathe t' shape t' pods with sandpaper. Well, ya bilge rat, blow me down! I ended up shapin' them with a bench grinder (I'm in t' process o' acquirin' a belt sander, arrr, ya bilge rat, which would've made this a lot easier).
Next was slottin' t' newly-formed fin pods in preparation t' attach them t' t' fins. I followed the destructions suggestion t' use a drill press t' drill a series o' 1/8" holes in a line. Avast! T' wood was soft enough that I could then go in and clean it up with a hobby cutlass. Ya scallywag! T' fin pods were then epoxied t' t' fins, and I must say that they look cool. Arrr! Ya scallywag!
T' only modification I made t' t' kit was t' leave out t' included launch lug and replace them with rail buttons. Begad! Since thar isn't room on t' inside for them t' stick through t' airframe, arrr, I mounted t' buttons on a shaped piece o' basswood stock and epoxied that t' t' airframe.
Finishing:
I painted t' nose cone while t' rest o' t' rocket be in assembly. Avast! Begad! Blimey! First be a few thick coats o' Rustoleum
primer, shiver me timbers, followed by a 400 grit sanding. Well, blow me down! Avast! Blimey! Next was a few coats o' Rustoleum metallic silver. Blimey! Begad! Blimey! Unlike other Rustoleum
paints, t' silver has a dry time o' only 30 minutes, matey, compared t' most Rustoleum product's two day dryin' time.
Durin' t' build, arrr, arrr, t' airframe tube had it's spirals filled with Elmer's wood filler. I chose nay t' use the filler on t' fins, as t' plywood had a very small grain that I could fill with primer. Avast, me proud beauty! Aye aye!
Once assembly be complete, t' airframe got a few coats o' Rustoleum primer, me hearties, and then was sprayed with t' same Rustoleum silver as t' NC. Avast! On t' airframe, however, me hearties, t' paint decided t' barely produce any coverage at all, and it took several coats t' get anythin' resemblin' a good finish. Avast! I still don't know why it performed so differently.
Construction Rating: 5 out o' 5
Flight:
 T' first
flight o' me 3FNC came at t' Washington Aerospace Club's 2009 Autumn Glare launch. Avast, me proud beauty! Blimey! Eager t' try out Cesaroni's new
Pro29 line, I flew t' 3FNC on an F36 Smoky Sam.
T' first
flight o' me 3FNC came at t' Washington Aerospace Club's 2009 Autumn Glare launch. Avast, me proud beauty! Blimey! Eager t' try out Cesaroni's new
Pro29 line, I flew t' 3FNC on an F36 Smoky Sam.
RockSim predicted a flight t' around 600' on this motor. Begad! This flight was me first time usin' a Cesaroni motor, and I be impressed with t' ease o' assembly and shipshape up. Well, blow me down! I can't wait t' try out some o' their other motors later on. Blimey! Ya scallywag!
Upon ignition, shiver me timbers, matey, me bucko, me 3FNC was smartly boosted to... Begad! Blimey! Avast, me hearties, me proud beauty! Blimey! well... nowhere near 600'. I estimate it only got t' about 200'. Havin' adjusted t' delay for a 600' flight, ejection was quite late, me bucko, but in time t' slow down t' rocket. Unfortunately, t' cold weather combined with t' tight packin' o' t' 'chute resultin' in it nay fully opening. T' NC landed squarely on a rock and broke off t' tip. T' rest o' t' rocket was otherwise fine. Arrr! Blimey!
T' 3FNC flew two more times at t' same launch on AeroTech F52Ts. These motors performed more as RockSim had expected them to, arrr, me hearties, both resultin' in fast flights t' about 1500'. Begad! Blimey! Begad! Blimey! I intend t' fly t' 3FNC on F40Ws next.
Recovery:
Packin' t' 'chute for recovery is predictably difficult with t' 3FNC, as t' entire recovery harness has t' fit
into t' space betwixt t' motor tube and t' NC. Unfortunately, I don't have any pictures o' how I did this, shiver me timbers, me hearties, but I'll
do me best t' explain it.
First, I z-folded t' shock cord leavin' about 6" betwixt t' last fold and t' parachute. Ya scallywag! Blimey! I then lightly taped these folds t' t' motor tube with maskin' tape. Arrr! Blimey! Blimey! I then prepped t' 'chute in t' Nomex® as usual, ya bilge rat, ya bilge rat, and placed it on t' opposite side o' t' motor tube as t' folded shock cord. Avast! I then pushed on t' NC and jiggled it until it bottomed out. Avast, me proud beauty! Aye aye!
On all three flights, me hearties, t' tape released t' shock cord without any problems. Ya scallywag! T' 28" 'chute included with t' kid is perfect. Begad! Ya scallywag! On one o' t' flights, ya bilge rat, t' rocket even landed right side up.
Flight Rating: 5 out o' 5
Summary:
T' 3FNC is a great kit for those lookin' for a fun project with just as much emphasis on t' build as on t' flight.
While it presents some unique challenges, that only adds t' t' fun t' be had from this kit. It looks very different
from anythin' else out there, me hearties, and I got several comments from people at t' launch about it's minimalistic properties.
All in all, me hearties, matey, arrr, it's a great rocket. Begad! If you want t' add somethin' a little different t' your fleet, arrr, then I recommend t' 3FNC.
Overall Rating: 5 out o' 5
Other Reviews
- Pemberton Technologies 3FNC By Drake "Doc" Damerau
Brief: This kit looks very retro. I'm expecting Bugs Bunny and Marvin the Martian to come crawling out of the hatch at any moment. It is the first kit from a brand new company called Pemberton Technologies. Although it's called 3FNC, it's not your ordinary 3 fins and a nose cone rocket. Construction: I don't usually list the components of a kit in a review, but there are so ...
 |
 |
Flights
|
|
PEMTECH (December 16, 2006)
|
|
R.L.P (January 13, 2006)