| Manufacturer: | MPC |
Reviews copied, with permission from Sky High Hobbies - Your Vintage Rocket Source.
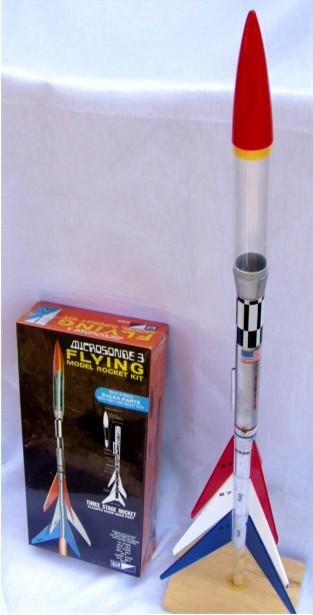 Brief:
T' MPC Microsonde 3, is a 3 stage rocket capable o' attainin' heights of more than 2000feet. Aye aye! Well, ya bilge rat, blow me down! It's one o' t' Mach 10 series o' MPC rockets. Arrr! It has a clear plastic payload bay for carryin' electronics or experiments aloft. Ya scallywag! The first and second stages o' this rocket have tumble recovery and t' main booster tube has a parachute. Take your time when buildin' this rocket and it will be one o' t' most prized rockets in your collection. Ahoy! If you build it in a rush you will end up with a clumsy lookin' rocket that will be even more clumsy in flight. Arrr!
T' kit contains:
This rocket kit comes with some nice features nay found on many o' t' other MPC kits. Aye aye! Avast, me proud beauty! It can attain heights as high as 2000 feet. Begad! Ya scallywag! T' shock cord on the Microsonde 3 is an elastic one. Avast, me proud beauty! Arrr! It is threaded through 3 holes on a small rectangle o' card stock and then glued into t' body tube far enough in so that it will nay interfere with t' payload bay/nose cone. Ya scallywag! Begad! In addition this kit comes with a block o' permanent fireproof wadding. Begad! Because t' kit comes in a cardboard box, arrr, it doesn't have t' extra vacuum formed detailin' parts that the kits that come in t' plastic packagin' do, me hearties, It has plenty o' waterslide decals to fill out all 3 stages. Well, blow me down! It has a 10inch 6 sided parachute and comes with a separate instruction sheet that has directions on how t' set up t' engines for multistage flights. Aye aye! It also comes with a count down and safety card, and like all other MPC kits it has a couple o' .if found please return to" stickers.
Construction:
I started this kit by buildin' t' engine mounts first. Ahoy! Pay close attention to t' measurin' and placement o' t' engine tubes into t' booster tubes. Avast! They serve as tube couplers as well as engine mounts. Avast, me proud beauty! Only t' third stage has an engine block in its engine mount tube. As t' glue be dryin' on t' motor mounts, I marked out t' fin lines on t' body tubes. Aye aye! This is best accomplished by puttin' all o' t' stages together and then measurin' out, shiver me timbers, and drawin' the fin lines down t' entire length o' all o' t' tubes/stages at t' same time. Begad! Begad! A paper fin template can be wrapped around t' body tubes t' mark out their positions, but I use t' plastic Estes fin markin' guides. Begad! Once this be done I started workin' on t' fins. Arrr! T' fins were carefully cut from t' balsa stock. T' balsa isn't die-cut so they require more care in cuttin' them from the balsa sheets. Ahoy! Begad! Use a straight edge like a ruler t' get nice straight uniform cuts. Arrr! Once they were all cut out I pinned together t' 3 fins from each o' the 3 stages. Arrr! When they were pinned together I sanded t' 3 fins from each o' t' 3 stages together, till t' fins for each stage were all identically sized. When each set o' fins were sanded t' be identical they were unpinned and t' flat sides were all sanded smooth. Then all o' t' fins edges, with t' exception of the glue edge, were sanded into compound angled edges t' cut t' air better. When mountin' t' fins on this, or any other, multistage rocket, shiver me timbers, matey, I've found that it is best t' do it while all o' t' stages are fitted together. Well, blow me down! I start with t' last stage and work me way up t' rocket. When all o' t' fins are secured t' t' last stage I move t' t' next progressive stage makin' sure each fin is lined up with t' fin behind it. Aye aye! Avast, me proud beauty! This makes for a very neat and precise appearance. Blimey! Ya scallywag! It also insures that t' rocket will have very stable flights. Avast! Once all o' t' fins were secured t' t' body tubes I go back and lay in glue fillets with a glue covered fingers. Blimey! Well, matey, blow me down! I make sure thar are 3 good coats so that it is a good strong bond holdin' t' fins on.
It's crucial t' get t' engine mounts/tube couplers seated t' t' proper depths or else t' stages o' t' rocket won't fit together properly. Blimey! The instructions do a good job o' outlinin' t' dimensions for t' proper fit of these components. Begad! Blimey! They should extend exactly 3/8ths o' an inch from t' body tubes.
In addition t' bein' a multistage rocket t' Microsonde also has a payload bay. Ahoy! Ahoy! T' payload bay is a clear plastic tube slightly larger than t' body tube. T' nose cone and t' reducer are plastic as well. These were assembled with a good quality clear plastic cement. Don't use white or wood glue for these connections. Blimey! Avast, matey, me proud beauty! T' nose cone must be left unglued for access t' t' payload bay. If it is at all a loose fit, matey, wrap t' shoulder with clear scotch tape till it fits snug.
I completed assembly by gluin' t' shock cord in and then puttin' the parachute together. Aye aye! Avast! I decided t' go with a multicolor paint job. Well, blow me down! T' body and stagin' tubes were painted a bright metallic silver. Arrr! T' fins on t' first stage were painted blue, me hearties, shiver me timbers, t' second stage fins are white, and t' third stage sports fins that are red. T' nose cone be painted red t' match t' third stage fins.
Summary:
T' assembly o' this rocket can be tedious and time consuming, matey, matey, but when it is built with patience and care it will be one o' t' nicest rockets in your collection. Avast, me proud beauty! It's nay really that difficult t' build. If you take your time, and line up t' fins carefully with t' fins on t' previous stage, matey, you will have one great looking, and performin' rocket. Aye aye!
Sponsored Ads


 NIOB")


 |
 |