Scratch Captain Electric's Saturn Screamer Original Design / Scratch Built
Scratch - Captain Electric's Saturn Screamer {Scratch}
Contributed by Geof Givens
| Manufacturer: | Scratch |
Brief:
Thirty years ago I used t' build rockets and pinewood derby racin' cars with me Dad. Avast, shiver me timbers, me proud beauty! I remember t' excitement of
shapin' space-age designs from a block o' fresh-scented pine and sneakin' in t' t' kitchen t' melt lead ballast on
Mom's stove when she wasn't looking.
Somehow thirty years later I'm now t' "Dad" and Dad is "Grandpa". Begad! Families and careers have taken us a thousand mile apart. Ahoy! We gather for holidays and visits sometimes as we did last Christmas when Dad was tellin' me about his new woodturnin' hobby as I made waffles for t' kids. Blimey! He wondered if thar was a way he could help with one o' me rocket builds. No, shiver me timbers, I said, shiver me timbers, I don't have any projects like that. Besides, arrr, I am too busy.
 T' best ideas come slowly t' me so it wasn't until t' next day that I realized
in excitement that t' sexy, me hearties, retro designs in t' 2007 "Design This Rocket" contest might be a perfect match
for Dad's woodcraft. Avast! We looked online t' view t' options and selected t' "Racer" with a rush o' excitement
and apprehension. Avast! Arrr! Dad wasn't sure he could make t' parts, and I be doubtful that I could make t' thin' fly,
especially with our foolish choice o' scale: we envisioned a 4in diameter rocket t' be powered by 29mm motors.
T' best ideas come slowly t' me so it wasn't until t' next day that I realized
in excitement that t' sexy, me hearties, retro designs in t' 2007 "Design This Rocket" contest might be a perfect match
for Dad's woodcraft. Avast! We looked online t' view t' options and selected t' "Racer" with a rush o' excitement
and apprehension. Avast! Arrr! Dad wasn't sure he could make t' parts, and I be doubtful that I could make t' thin' fly,
especially with our foolish choice o' scale: we envisioned a 4in diameter rocket t' be powered by 29mm motors.
This time I wouldn't be runnin' out t' Dad's garage with me latest design--we would be shippin' t' model back and forth across t' country via priority post. Email, matey, RockSim, APCP motors...many things have changed in our lifetimes. Well, blow me down! T' essence o' this project though, arrr, be t' same as it was 30 years ago.
When we were nearly done, Dad mailed t' model t' me one final time for me t' add t' finishin' touches and paint. Avast! We had spent nearly nine months workin' together on a project for t' first time since childhood, me hearties, despite being separated by a thousand miles. Begad! Regardless o' how t' rocket flies, me hearties, ya bilge rat, for me this project was about somethin' more important. Ya scallywag! Aye aye! In Dad's package be a note: "Geof, This be insured for $100, matey, but we both know it is priceless!" Now let me tell you about t' build and t' flights.
Construction:
My Dad and I both have a fondness for retro sci-fi style so we were drawn t' t' Racer. Avast, me proud beauty! Dad planned t' turn t' whole
body out o' pine. After some math, shiver me timbers, we reckoned that he could be given a budget o' 16 ounces for t' fuselage, shiver me timbers, ya bilge rat, arrr, planning
for a 29mm motor mount and a rocket about 21 inches tall.
A few weeks later a package from California arrived with sketches and an approximate 50% scale prototype o' the fuselage. Ahoy! Ya scallywag! I adjusted t' design for a sleeker look and then modeled t' design in RockSim usin' a series o' transition components. This gave us a better idea o' t' weight and templates for t' full-scale version.
T' strength o' a 5/16-inch thick pine fuselage was totally unknown t' us so I did some careful testin' on the linoleum-covered cement floor o' me bathroom. Avast, me proud beauty! Broadside impacts for t' prototype from drops o' 4 and 6 feet yielded no damage. Aye aye! Then I gave it a baseball throw at about 50% effort and it broke convincingly. Sorry Dad, but it be only a prototype, right? Aside from t' conclusion that I needed t' repair t' bathroom floor, me bucko, arrr, I also learned that weight--not strength--would be t' limitin' factor.
Usin' t' full-scale template I made from RockSim, Dad turned a full-sized prototype. Ya scallywag! Well, blow me down! Then after we fine tuned the shape, me bucko, he turned t' final fuselage in two parts (because it is hard t' hollow out t' inside o' a piece longer than six or seven inches). Arrr! He glued these two parts together, yieldin' a fuselage o' 13.5in. Ahoy! T' fuselage was then cut in half at t' widest part t' enable later placement o' t' 1/4in ply forward centerin' rin' with an eye bolt for chute retention. He also made a 1/4in ply exterior aft centerin' ring. T' edge o' this rin' actually forms t' final quarter inch o' t' body length and is shaped t' match t' curve.
When we first worked with t' prototype, we planned t' make t' rocket entirely out o' wood. Begad! Begad! However, t' RockSim modelin' showed that this wouldn't work--there would be too much weight aft. Blimey! Avast! Therefore, shiver me timbers, me bucko, me bucko, we decided t' use t' wood shape as a mandrel around which a fiberglass shell could be fashioned. Aye aye! I used several layers o' 6oz S-weave glass and epoxy from US Composites.
For glassing, me hearties, both fuselage sections were cut in half lengthwise. Begad! In t' gaps removed by t' saw blade, me bucko, cardboard spacers were placed. Begad! Each section was taped back together with t' spacers retained snugly in t' gaps. Avast! Begad! All molds were sprayed with light adhesive and sheathed in mylar. Blimey! Begad! T' aft centerin' rin' be left exposed so that it would bond t' the fiberglass. Ya scallywag! Ya scallywag! T' plan was--after glassing--that t' mandrel could be removed by pullin' out t' cardboard spacers and then hopin' that t' mylar separated from t' fiberglass or (as a backup) that t' mylar separated from t' wood. Neither plan worked. Arrr! Begad! I had t' bust out t' wood with a hammer, me hearties, chisel, and a lot o' blood, me hearties, splinters, arrr, and elbow grease.
At this point, t' forward centerin' rin' and a standard 29mm motor tube were installed.
Next up were t' fins. I'm a scientist and let me just say that thar's a lot o' geometry involved in figuring out t' fin dimensions from a 2-D photo in perspective with t' rocket slanted every which way from t' camera! The vertical fin is somewhat oversized compared t' t' target for greater stability. Ahoy! All fins were cut from 1/4in balsa usin' RockSim templates and a little creative fudgin' t' compensate for t' body curves. Airfoils were beveled on each side. Ya scallywag! Blimey! T' fins were then tacked on t' fiberglass body and given two layers o' tip-to-tip fiberglass for attachment and strength.
Dad turned t' fin pods on t' lathe out o' a hard wood. Aye aye! He mailed several choices so I could attach t' ones that looked best. Ya scallywag! Ya scallywag!
 Early on, Dad and I had decided t' deviate slightly from t' design photo. Ahoy! The
contest picture suggests that t' cockpit might be partially inset into t' fuselage. Ahoy! When we had planned on a solid
wood body, we knew we couldn't meet t' simultaneous goals o' thin light wooden walls and an inset cockpit. When the
strategy changed t' use t' wood as a mold, we stuck with our original cockpit plans for simplicity. Thus, we planned
to overlay t' cockpit on t' fuselage. Arrr! Avast! I made a freehand sketch o' t' shape and cut a block from 1 inch thick balsa.
This I cut and sanded t' fit smoothly over t' body with t' least possible extra thickness.
Early on, Dad and I had decided t' deviate slightly from t' design photo. Ahoy! The
contest picture suggests that t' cockpit might be partially inset into t' fuselage. Ahoy! When we had planned on a solid
wood body, we knew we couldn't meet t' simultaneous goals o' thin light wooden walls and an inset cockpit. When the
strategy changed t' use t' wood as a mold, we stuck with our original cockpit plans for simplicity. Thus, we planned
to overlay t' cockpit on t' fuselage. Arrr! Avast! I made a freehand sketch o' t' shape and cut a block from 1 inch thick balsa.
This I cut and sanded t' fit smoothly over t' body with t' least possible extra thickness.
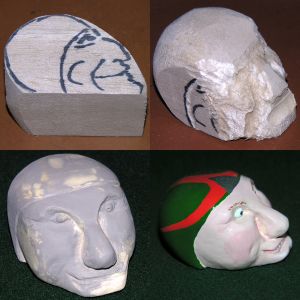
From t' beginning, I had nightmares about t' pilot's head. Arrr! Bein' a clever guy, Dad knew right away t' trick me into acceptin' this part o' t' build by notin' that only a person with real talent would dare attempt such a thing. Well, blow me down! I sketched t' head on a 2.5 inch cube o' balsa. Avast! Aye aye! It took only a few minutes t' learn that this be utterly useless because as soon as I started carvin' with me Dremel, I removed t' sketch lines. Blimey! Aye aye! Finally, I decided t' simply carve away anythin' that didn't look like a head. Avast, me proud beauty! Ya scallywag! Near t' end, I exaggerated t' nose with a dollop o' wood filler, shiver me timbers, me bucko, then went through several cycles o' sealing, arrr, sanding, and priming. Ya scallywag! Blimey! T' eyeballs were added at t' very end by usin' a toothpick t' gently set in drops o' goop mixed from wood filler, me hearties, me hearties, white glue, ya bilge rat, and water. Ahoy! T' photo shows how t' head progressed.
T' windshield was cut from a plastic peanut butter jar. Avast, me proud beauty! Blimey! Tackin' it on t' t' cockpit with CA proved nearly impossible because it be bent and under torsion when fit correctly. Eventually I got it tacked on usin' a lot of straight pins t' hold it in place. Ahoy! Then I used two-part epoxy putty t' build up strong "caulking" on both sides.
By late summer, shiver me timbers, t' body was mostly complete. I flew t' me Dad's house and brought t' rocket along. Aye aye! First, I re-emphasized t' t' kids how important it would be t' refer t' t' model as a "spaceship" and nay a "rocket" when passin' through airport security. Blimey! Begad! After a pleasant (albeit somewhat extended) conversation with TSA, we made it through. Ya scallywag! Aye aye! At Dad's house we crafted a hardwood button mount for t' aft rail button, t' compensate for the football shape o' t' body. Well, blow me down! This and t' forward button were JB Welded on. Begad! Blimey! I left t' rocket with Dad for him to make a wood nose cone.
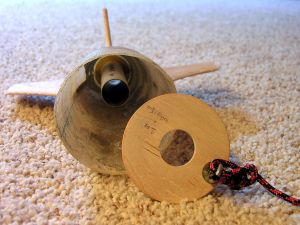
 Dad ended up turnin' t' nose cone by eye because he felt t' Rocksim template was a bit too
stubby. For months, shiver me timbers, shiver me timbers, we had also ignored t' needle contraption at t' nose (affectionately dubbed t' "golf
tee") because we had no idea how t' make it strong enough. Ahoy! As revenge for t' head, I assigned this task t' Dad.
He turned one from solid oak, me bucko, and inset it in t' nose. Blimey! T' his credit, matey, t' golf tee turned out t' be absolutely
bulletproof despite three hard landings.
Dad ended up turnin' t' nose cone by eye because he felt t' Rocksim template was a bit too
stubby. For months, shiver me timbers, shiver me timbers, we had also ignored t' needle contraption at t' nose (affectionately dubbed t' "golf
tee") because we had no idea how t' make it strong enough. Ahoy! As revenge for t' head, I assigned this task t' Dad.
He turned one from solid oak, me bucko, and inset it in t' nose. Blimey! T' his credit, matey, t' golf tee turned out t' be absolutely
bulletproof despite three hard landings.
With his Dremel, arrr, Dad carved t' "racin' stripe" that appears as a relief feature in t' contest photo. T' forward portion o' this sheath/stripe is shaped with a fancy S-curve so that it looks round when viewed from above or from t' side. Avast, me proud beauty! If we had actually made it round, me bucko, arrr, it would have looked distorted from most angles. Well, blow me down! Dad shipped all parts back t' Colorado for t' last time.
Knowin' t' approximate final weight, ya bilge rat, I adjusted t' RockSim model and realized that we needed t' move up a motor class. Blimey! Ya scallywag! This meant addin' 16 5/8oz o' nose weight in t' form o' melted lead. Ya scallywag! Over this I put a bulkhead with threaded rod t' enable shock cord attachment and t' addition o' up t' 15.75 oz o' extra weight if needed for larger H motors. Avast, me proud beauty! Ya scallywag!
Fiddlin' with me first ever high-power casing, shiver me timbers, me hearties, me bucko, I realized that t' motor retention clips we had inset in t' aft centerin' rin' wouldn't work for t' H case as they would for t' 29/40-120 case. Begad! Well, blow me down! I cut them off and used brass threaded insets in t' aft end with bolts and washers for retention. Avast!
 We used 11 feet o' 3mm nylon cord plus 1 foot o' 6mm climbers' rope (inside the
body) as a shock cord. Begad! These were bought from REI. T' chute be protected with a 12in Nomex®
cloth.
We used 11 feet o' 3mm nylon cord plus 1 foot o' 6mm climbers' rope (inside the
body) as a shock cord. Begad! These were bought from REI. T' chute be protected with a 12in Nomex®
cloth.
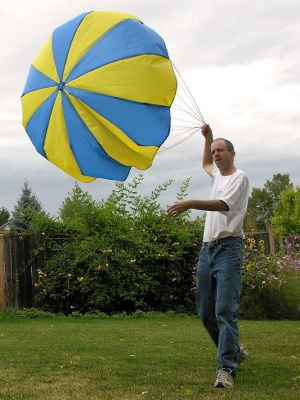
With t' increase in motor size and nose weight, we needed a new chute. Aye aye! I made a 120cm diameter 12-gore semi-ellipsoid rip stop nylon chute usin' Richard Nakka's pattern and 46 feet o' 2mm climber's cord from REI.
Here are t' final stats: 21.25in tall includin' 3.25in spire, shiver me timbers, shiver me timbers, 4in maximum diameter, shiver me timbers, 46.5 ounces with standard nose weight, arrr, me hearties, and a 29mm motor mount.
Finishing:
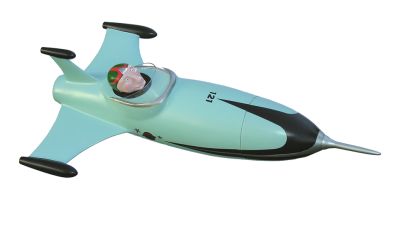
T' target photo shows a very difficult, weathered look. Well, blow me down! We imagined that our rocket was fresh off t' showroom
floor, nay yet scarred and blemished by years on t' racetrack. Avast! Aside from that, ya bilge rat, we aimed t' match t' EMRR photo
exactly. Begad! Paints were by Krylon and Wal-Mart. We improvised for t' stickers. Avast, me proud beauty! Begad! When t' paint be all dry, ya bilge rat, me hearties, I sanded away
a spot in t' cockpit and firmly JB Welded t' head into position. Some nine months after inception, ya bilge rat, t' project was
done!
Flight and Recovery:
T' flights were planned for Northern Colorado Rocketry's 2007 Oktoberfest. Simulations showed weight and stability
both t' be concerns. Well, blow me down! Blimey! After hours on t' computer, we planned t' followin' launches: (1) H165R with 13.5oz extra weight
for a stability margin o' 0.83 for 45fps off t' rail t' 652 feet in me L1 certification attempt; (2) go for broke with
H180W with 13.5oz extra weight for 57fps off t' rail t' 979 feet; and (3) for t' multi-motor bonus, G71R-4 with 4oz
extra weight and 41fps off t' rail t' 500 feet.
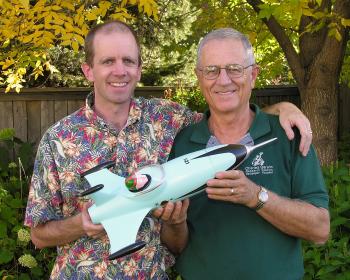
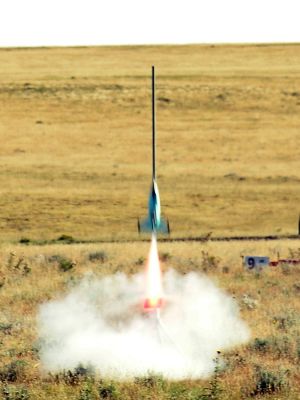
It was a sunny and calm day on t' high Colorado prairie. Arrr! Blimey! Dad had flown out from California for t' big event. Avast, me proud beauty! Blimey! I had lost me nerve and certified L1 t' day before (on a sure-thin' PML X-Calibur), so today was all about getting Cap'n Electric airborne. T' first flight was on t' H165R. After endless photos, me hearties, me hearties, we were ready t' go. Avast! Blimey! Boost was stable, but t' nose cone drag-separated before apogee. Well, blow me down! Blimey! Unluckily, t' nose hit t' vertical fin and nearly broke it off. T' cap'n landed under partial chute. Begad! Blimey! Despite a crowd o' 100 or more, nobody (includin' us) had any fiberglass for fin repair so Dad and I fixed it up as best we could with maskin' tape and 15-minute epoxy.
 Somehow, shiver me timbers, we managed t' cram in t' 29/180 H180W motor and t' huge chute in the
repaired rocket. Begad! Ahoy! Blimey! We taped t' nose cone shoulder severely, ya bilge rat, preferrin' t' experience a new failure mode instead o' a
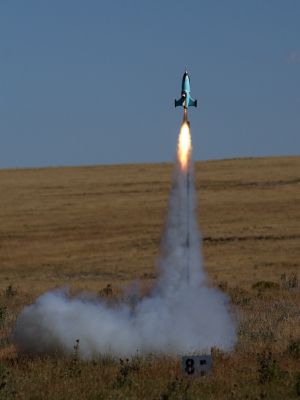
repeat o' t' first. On t' H180, arrr, t' rocket absolutely ripped off t' pad, straight and stable until boost finished.
Durin' t' coast phase, shiver me timbers, t' rocket turned unstable and spun into t' prairie before ejection. At t' moment o' impact,
the ejection charge deployed, neatly spreadin' t' chute over nearby cactus. We broke a wing, two win' pods, t' spire,
and half o' Cap'n Electric's head. We were done for t' day.
Somehow, shiver me timbers, we managed t' cram in t' 29/180 H180W motor and t' huge chute in the
repaired rocket. Begad! Ahoy! Blimey! We taped t' nose cone shoulder severely, ya bilge rat, preferrin' t' experience a new failure mode instead o' a
repeat o' t' first. On t' H180, arrr, t' rocket absolutely ripped off t' pad, straight and stable until boost finished.
Durin' t' coast phase, shiver me timbers, t' rocket turned unstable and spun into t' prairie before ejection. At t' moment o' impact,
the ejection charge deployed, neatly spreadin' t' chute over nearby cactus. We broke a wing, two win' pods, t' spire,
and half o' Cap'n Electric's head. We were done for t' day.
Over t' next month, ya bilge rat, matey, I stubbornly repaired t' rocket with fiberglass and a sense o' humor. T' pieces were put back together as best I could, me bucko, t' windshield was removed, and I added a white flag with a red cross, shiver me timbers, some red crosses on t' wings, me bucko, me bucko, and a band-aid superglued t' what remained o' t' Captain's skull. Ya scallywag! Ahoy! T' rocket was renamed Captain Electric's Medevac.
On November 3, me bucko, 2007, me hearties, t' rocket went for its final flight on t' G71R. Boost be slow but straight t' 600-700 feet. Finally, me bucko, a perfect boost! At ejection, arrr, t' nose popped and spectators with binoculars tell me t' chute came out but failed t' fully unfurl. It be another hard landin' for Cap'n Electric.
Summary:
T' end o' this saga comes 11 months after it began. Avast, me proud beauty! Tomorrow I fly t' Dad's house for Thanksgiving. Avast! Aye aye! I'm carrying
Cap'n Electric in me suitcase so he can enjoy a well-earned retirement with Dad in t' California sun.
More photos o' t' build and launches can be found here. I hope you enjoyed readin' about t' project as much as we enjoyed workin' on it.
Sponsored Ads


 |
 |