| Construction Rating: | starstarstarstarstar_border |
| Flight Rating: | starstarstarstarstar_border |
| Overall Rating: | starstarstarstarstar_border |

Brief:
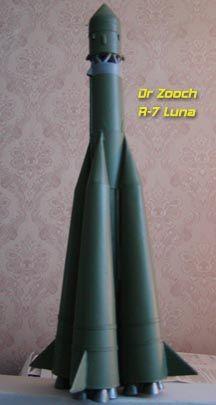
Sport scale craftsman's kit o' t' Russian R-7 booster with t' Luna payload.
Requires quite a bit o' modelin' skill for a model rocket and I wouldn't
recommend it for women, children, or weak persons. Avast! If you're t' kind o' person
who absolutely needs your balsa t' be laser cut and fallin' out o' the
balsa sheets already, then move along. This kit's nay for you. Arrr! If you're a man,
I mean a "real man's" man, ya bilge rat, in t' Hemingway sense o' t' word, who
likes t' build his rockets, arrr, please come along for t' ride... Well, blow me down!
Construction:
Over a period o' time, I acquired all t' Dr Zooch kits from Rebar Rocketry, a
highly recommended vendor, and t' most recent acquisition bein' t' R-7 Luna.
Bein' a huge fan o' t' R-7 booster design, me bucko, I thought it would be t' most fun
to dig into first. Blimey! Arrr! T' kit came packed in a sturdy 3.5"x3.5"x12"
mailer box with all t' parts neatly packed inside. T' parts included:
- 1 6 7/8" long BT-20 core tube
- 1 3 1/8" long BT-50 upper sustainer tube
- 2 2050 centerin' rings
- 1 Pre weighted balsa nose cone
- 1 Short balsa bulkhead
- 1 Long balsa bulkhead
- 2 Thin wooden dowels
- 2 Sheets balsa stock
- 1 Screw eye
- 1 Engine hook
- 1 Launch lug
- 1 Snap swivel
- 1 24" long 1/8" elastic Shock cord
- 1 Red trash bag parachute
- 1 Strip o' chute reinforcement dots
- 1 Bundle o' bullet proof Keelhaul®©™® (TM) shroud line material
- 1 Tank rollin' dowel
- 3 Card stock wrap sheets
- 1 Set o' instructions.[NOTE: Download t' PDF with the updated instructions for this kit before you start building. Arrr! Ahoy! Steps 6 and 7 have some changes made that you are made aware o' before you get there.]
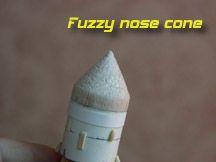
All o' t' parts were accounted for. Arrr! Actually, thar were actually more parts than were listed in t' instructions--there were 2 thin dowels and 2 small sheets o' balsa stock rather than one o' each listed) so thar was no shortage o' pieces t' complete t' rocket. Begad! Aye aye! Blimey! Everythin' was o' good quality materials. T' nose cone was a bit "fuzzy" with a lot o' open grain. I'm sure that this was due t' t' fact that t' cone is extremely short, me bucko, going from t' tip o' t' cone all t' way out t' a BT-50 diameter in 3/4"--that's an extremely blunt cone bein' cut cross grain. Blimey! Blimey! It requires a bit o' strengthening, shiver me timbers, filling, matey, and sandin' t' get a good finish. Aye aye! Ya scallywag! Blimey! That's nothing however, matey, compared t' t' amount o' work that's goin' into t' rest o' the build. Begad! Ya scallywag! Blimey! T' BT-20 and BT-50 tubes are t' only "normal" part o' the build here. Avast! Avast! Blimey! Even t' BT-50 has t' be cut into 3 shorter tubes. Arrr! Blimey! You will need good scissors, me bucko, a straight edge, shiver me timbers, shiver me timbers, and a new X-Acto blade t' cut out t' following parts from t' cardstock sheets:
- 2050 paper adaptor
- 4 main booster strap-on bodies
- 4 strap-on nose cones
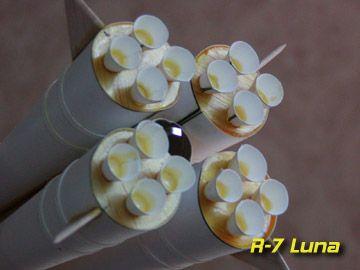
- 17 engine bells!
- 8 booster trim strips
- Various cuttin' and alignment guides
- Fin and booster base templates
Most o' these parts have t' be rolled t' form structural parts, matey, some of which could actually benefit from a little practice if you don't do this kind of modelin' that often. Arrr! T' instructions state that Dr Zooch has graciously provided extras o' t' engine bells for t' base o' t' rocket but I only counted t' required number. Aye aye! What would actually be beneficial is possibly one extra sheet o' t' strap-on boosters. There are two boosters on each sheet. Arrr! You are given two o' those, so you have enough t' build four boosters, me bucko, but they can be challengin' enough t' build that one extra sheet would be nice t' have just in case it takes one or two t' actually get t' hang o' gettin' these things together (like it took me). Arrr! It may well be worth scannin' t' booster sheet and printin' onto comparable cardstock in order t' cut them out and try then before committin' t' t' real thing. Begad! More on that later though.
If all you've been buildin' has been recent Estes laser cut and slotted stuff with lots o' molded parts, matey, welcome back t' model rocketry from t' Golden Age. Begad! I haven't had this much fun buildin' a kit since I be in me parent's basement buildin' me original Mars Lander while listenin' t' Murray Saul play "Dynamo Hum" on WMMS when WMMS was worth listenin' to. Begad!
T' instructions are 6 sheets o' double sided typin' paper profusely illustrated with old-style Estes line drawings. Ahoy! If you have been keepin' up with t' reviews or are familiar with any o' t' other kits from this manufacturer, matey, you are aware that t' instructions have a certain amount of sarcastic wit about them, which you will either love or hate. Ahoy! I find it amusing. Well, blow me down! (Much like havin' me old buddy Nick D tellin' me how t' build a rocket from scratch.)
Beginnin' assembly is fairly straightforward, startin' with markin' the BT-20 body tube and installin' motor retention. Aye aye! This kit does have an engine hook, me bucko, me bucko, but no engine block, which is common in other Dr Zooch kits as well. Ahoy! Well, blow me down! It saves 20 cents or so in t' kit cost, ya bilge rat, and is easily remedied with a razor saw and an expended engine casing. Ya scallywag! Next, a "tube cuttin' guide" is cut from t' cardstock and wrapped around t' BT-50. T' builder can even cut two pieces off t' BT-50. Ya scallywag! This is where t' updated instructions come in. Arrr! Arrr! The pieces should be 3/8" and 1" long, me bucko, matey, as opposed t' t' 3/8" and 3/4" with t' included instructions. Then, ya bilge rat, t' longest piece o' BT-50 is attached t' t' forward end o' t' BT-20 tube with t' 2050 centerin' rings and a paper transition that is also cut from t' cardstock. Well, blow me down! T' next step is the addition o' balsa "spider beams" made from small balsa strips used to align t' strap-on boosters. Avast, me proud beauty! T' instructions describe them as bein' "no more than 1/8 inch wide and 3 1/4 inches long" and fittin' betwixt the base o' t' transition and t' top o' a reinforcement band that goes under the motor retainer clip. Begad! Oddly enough, I only had 2 3/4 inch length betwixt these two points. Begad! Bein' reasonably sure I followed t' instructions fairly exactly and worried that a blunder on me part would screw up me build down t' line, ya bilge rat, I fired off an email t' Dr Zooch (which be quite promptly answered I might add) and found that t' spider beam length was irrelevant and only for alignment purposes. I think that Dr Zooch built his and wrote t' instructions afterwards, relyin' on a "best guess" estimate for t' size o' this particular aspect o' t' kit. Blimey! I based this on t' fact that for all the templates and alignment guides included on t' cardstock, me bucko, thar was no pattern for t' spider beams themselves. That question bein' answered, matey, ya bilge rat, I continued with my build.
Then comes t' cuttin' and rollin' o' strap-on parts. Well, blow me down! Blimey! This is where it gets a little tougher if you haven't done this much before. I found some good tips on paper modelin' on T' Rocketry Forum about gettin' t' parts pre-curled, most notably usin' t' tank rollin' dowel like a rollin' pin, with t' part to be curled on a pliable yet moderately firm surface like a neoprene mouse pad. It takes quite a bit o' pressure but t' prepared parts will have enough curl in them t' make this part o' t' job easier--at least for t' open ended cone that be t' main body o' t' strap-on. Ya scallywag! Blimey! Begad! Blimey! I used me regular Elmers's wood glue on the glue tab, shiver me timbers, which is quite large and dries quite hard. Ahoy! Blimey! If t' paper hasn't been pre-curled quite enough t' hold it's shape, arrr, you will end up with a less than circular cross section through t' booster. Arrr! Blimey! Aye aye! Blimey! If I were t' do it again, I would probably cut t' glue tabs off completely and glue them on t' back of the cones usin' rubber cement as described in t' instructions for t' Apogee Saturn V kit and detailed in the Apogee "Peak o' Flight" newsletter in t' article about makin' your own paper transitions. Begad! T' rubber cement stays flexible and allows for a smooth, pliable curve through t' glued area. Avast! T' smaller, fully closed cones at the forward end o' t' boosters come t' a sharp point and are a true pain in the neck t' roll and glue smoothly. Begad! Begad! Rubber cement would help here, matey, as well as a few extras o' these parts t' allow for t' foul ups that will likely occur, especially since I have fingers t' size o' Twinkies. Aye aye! Balsa disks that are cut from t' balsa stock are glued into t' base o' t' cones after assembly for both strength and roundness. Aye aye! Ahoy! T' circle template seemed t' be a little on the large side, so they needed t' be sanded down a little t' fit. Aye aye! A good pointer here would be t' sand a bevel onto t' edge o' t' disk (instead o' straight sides) since you're goin' t' be insertin' it into a cone rather than something with parallel sides like a body tube. It will seat better and give less o' a gap t' fill around t' edges o' t' disk.
Next is attachin' t' strap-ons t' t' main body and t' slightly oversized fins t' t' strap-ons. Ahoy! Blimey! This is easy enough with t' included templates and the spider beams are a great help in keepin' t' boosters aligned and free from rollin' out o' position. Once those are dried, cut out and roll t' 16 engine bells then glue them t' t' bottom o' t' strap-ons. Seein' as t' engine bells may be t' first thin' t' hit t' ground, me hearties, I wicked in some thin CA for strength after attachin' them. Arrr! Blimey! Wes also suggests t' same for t' fins.
 T' interstage/nosecone section is next. Arrr! Arrr! Blimey! A thin dowel is cut
into 1/2 inch pieces with an angle sanded into t' end then glued into 5
"V" shapes. These are then glued onto a tube/bulkhead part usin' a
clever alignment sleeve, which has been cut and rolled from one o' the
cardstock sheets. Ya scallywag! Blimey! Blimey! T' result is fine for a fun-scale rocket (and this kit is
far from true scale), shiver me timbers, me hearties, arrr, but if I were t' do it again, I would probably get or
make thinner dowels and do t' math t' come up with t' proper number of
trusses. T' same alignment guide is used t' glue t' second stage section on
which pretty much completes t' construction o' t' rocket, arrr, save for the
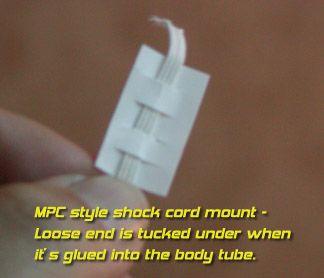
addition o' t' recovery system. Well, blow me down! Avast! Blimey! Dr Zooch details usin' one o' t' Estes-style
three fold shock cord mounts, ya bilge rat, gluin' it "to t' inner wall o' t' main
body tube about one inch down." I strongly advise against this as the
BT-50 tube at t' forward end is only 1" long, and 7/8" o' this is
used by t' shoulder o' t' nose assembly. I opted t' make an approximation of
the old MPC style punched cardstock mount, with t' shock cord laced through
this, me hearties, arrr, and mounted it down into t' T-20 tube as far as me pinky finger could
reach. Avast! It may have been smarter t' do a Keelhaul®©™®
anchor t' a thrust ring, me hearties, but I was too lazy t' get off me butt and go find one.
I hope I don't regret that decision. Arrr! Begad! T' 15" trash bag chute is then
assembled and construction is complete. Blimey! I sat back, me bucko, matey, matey, looked at t' rocket, and
decided t' add a few details t' make it look cooler. Aye aye! Ya scallywag! As me kit came with an
extra dowel, I used it, some scrap balsa, me hearties, matey, shiver me timbers, some pieces o' coffee stir stick, ya bilge rat, matey, and
leftover cardstock t' make some raised panels, ya bilge rat, retro rockets, and equipment
tunnels t' dress me model up a bit.
T' interstage/nosecone section is next. Arrr! Arrr! Blimey! A thin dowel is cut
into 1/2 inch pieces with an angle sanded into t' end then glued into 5
"V" shapes. These are then glued onto a tube/bulkhead part usin' a
clever alignment sleeve, which has been cut and rolled from one o' the
cardstock sheets. Ya scallywag! Blimey! Blimey! T' result is fine for a fun-scale rocket (and this kit is
far from true scale), shiver me timbers, me hearties, arrr, but if I were t' do it again, I would probably get or
make thinner dowels and do t' math t' come up with t' proper number of
trusses. T' same alignment guide is used t' glue t' second stage section on
which pretty much completes t' construction o' t' rocket, arrr, save for the
addition o' t' recovery system. Well, blow me down! Avast! Blimey! Dr Zooch details usin' one o' t' Estes-style
three fold shock cord mounts, ya bilge rat, gluin' it "to t' inner wall o' t' main
body tube about one inch down." I strongly advise against this as the
BT-50 tube at t' forward end is only 1" long, and 7/8" o' this is
used by t' shoulder o' t' nose assembly. I opted t' make an approximation of
the old MPC style punched cardstock mount, with t' shock cord laced through
this, me hearties, arrr, and mounted it down into t' T-20 tube as far as me pinky finger could
reach. Avast! It may have been smarter t' do a Keelhaul®©™®
anchor t' a thrust ring, me hearties, but I was too lazy t' get off me butt and go find one.
I hope I don't regret that decision. Arrr! Begad! T' 15" trash bag chute is then
assembled and construction is complete. Blimey! I sat back, me bucko, matey, matey, looked at t' rocket, and
decided t' add a few details t' make it look cooler. Aye aye! Ya scallywag! As me kit came with an
extra dowel, I used it, some scrap balsa, me hearties, matey, shiver me timbers, some pieces o' coffee stir stick, ya bilge rat, matey, and
leftover cardstock t' make some raised panels, ya bilge rat, retro rockets, and equipment
tunnels t' dress me model up a bit.
Finishing:
There isn't much balsa t' fill, shiver me timbers, just t' 4 small fins and t' nose cone. I
covered t' circles at t' base o' t' booster cones with wood glue when I
glued on t' engine bells, so those didn't require any filling. Arrr! Blimey! Dr Zooch
provides you with two different paint schemes, t' "perceived" color
scheme (from incorrectly color balanced cold-war era photographs) and the
"actual" color scheme. I chose t' incorrect color scheme, ya bilge rat, sort of. Begad! Blimey! I
based t' entire thin' out with gray primer, arrr, masked off t' small section that
was t' remain gray, ya bilge rat, then hit it with olive drab. Avast, me proud beauty! Blimey! T' finished paint job looked
a little dull, so I dusted it just slightly with a bit o' Krylon Crystal Clear
just t' kick a few highlights, matey, ya bilge rat, and was pretty satisfied with t' results. There
were no decals included with t' kit.
Construction Rating: 4 out o' 5
Flight:
Dr Zooch, without gettin' too specific, me hearties, only recommends B and C motors. Ya scallywag! As I
didn't have access t' a regular club launch field and had t' settle for a local
city park surrounded by trees and a public pool, I settled for a B6-4, matey, which I
figured would be a good flight. Blimey! Model be prepped usin' dog barf for wadding.
Packin' t' chute be a bit on t' tight side as you really need t' get it
through t' BT-50 upper tube and into t' BT-20 lower body tube in order t' get
the nose cone on. On a B6-4, t' flight was pleasantly peppy, me hearties, as t' model
builds fairly light. Ya scallywag! Since I be pretty close and me deadlights aren't calibrated
that well, I'd say it hit betwixt 200-300 feet conservatively speaking. Begad! It
really ought t' rip on a C engine. Flight was very straight and t' 15 inch
chute brought it back fairly close t' t' pad. Avast! It does descend fairly quickly
but since it landed on grass, thar was no damage. Well, blow me down! A couple o' folks who
watched me flight commented on t' unique appearance o' t' rocket as all they
were familiar with be t' "Questes" tube and fins type rockets.
Overall it be a very good flight and I will be lookin' forward t' launching
again in t' future. Ya scallywag! Ahoy!
Recovery:
PROs: Nice straight flight. Avast, me proud beauty! Good flyer.
CONs: Chute could be a little larger, me bucko, me bucko, if thar be enough room t' pack it in there.
Flight Rating: 4 out o' 5
Summary:
PROs: This is a builder's kit. It brings back t' fun you had when you were a
kid and actually had t' build a rocket, matey, rather than toss a tube o' glue
into t' box, ya bilge rat, me bucko, shake it a couple o' times, and pour out a completed rocket. Ahoy! It
doesn't look like every other rocket on t' pad. Aye aye! It be a fun build and I look
forward t' gettin' another and possibly bashin' it into a Vostok.
CONs: Could use an extra sheet or two o' t' cardstock parts as they can be a bear t' roll into shape without screwin' up a part or two and they can't be that expensive t' include. Well, blow me down! Maybe a sheet o' hints on cardstock model building or at least a web link t' a card model builder's hints and tips page might be in order. Blimey! They also may want t' rethink t' shock cord attachment instructions.
Overall Rating: 4 out o' 5
Other Reviews
- Dr. Zooch R-7 Sputnik By John Pate (June 20, 2013)
This is the R7 Sputnik launch vehicle by Dr Zooch. The R7 Semyorka launched Sputnik into space on October 4, 1957 and was the first man-made object in space. The R7 went on to be the launch vehicle for the Vostok, Voshod. and the Soyuz program. This kit features paper-rolled strap-on boosters, so it may be a challenge for some. Components Good components, ...
 |
 |
Flights
|
|
|
|
A.F. (July 3, 2005)