| Construction Rating: | starstarstarstarstar_border |
| Flight Rating: | starstarstarstarstar_border |
| Overall Rating: | starstarstarstarstar_border |
| Published: | 2010-05-16 |
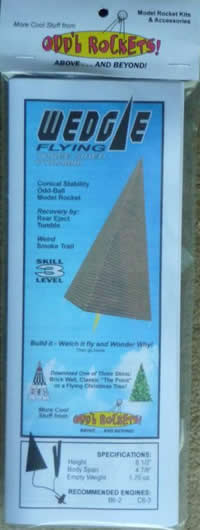
| Diameter: | 4.88 inches |
| Length: | 8.50 inches |
| Manufacturer: | Odd'l Rockets  |
| Skill Level: | 3 |
| Style: | Odd-Roc, Pyramid |
(Contributed - by Dick Stafford - 05/16/10)
Brief:
T' Wedgie is a tetrahedron (3-sided pyramid) that flies on 18mm motors and recovers via a
rear-eject streamer. Ya scallywag! I want t' thank Chris for lettin' me test out this cool oddroc kit. Mine is s/n #2!
Construction:
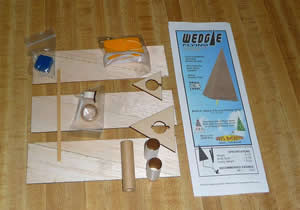
T' Wedgie comes professionally packaged in a plastic bag with t' cover o' the
instructions visible. Avast! Avast, me bucko, me proud beauty! T' small parts were separately bagged. T' body is formed from 6 pieces o' laser-cut balsa. Avast! Well, blow me down! Its
motor mount includes a two-part motor tube, two laser cut centering-triangles, shiver me timbers, a motor block, a cardboard plug, ya bilge rat, and two
'standard' centerin' rings (BT-20 t' BT-50 sized). Begad! Recovery parts include an elastic shock cord, swivel, matey, ya bilge rat, and crepe
streamer. Miscellaneous parts include a 1/8" launch lug and clay nose weight.
T' instructions are detailed and well illustrated.
 Don't let its 'odd' nature addlepate you. Avast! This is a builders kit and I recommend you actually read t' instructions
thoroughly before beginning. It is rated as skill level 3, matey, me hearties, and I concur with this rating.
Don't let its 'odd' nature addlepate you. Avast! This is a builders kit and I recommend you actually read t' instructions
thoroughly before beginning. It is rated as skill level 3, matey, me hearties, and I concur with this rating.
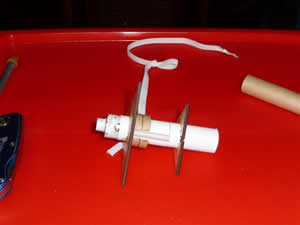
You start by buildin' t' two-part motor mount. Blimey! T' upper part will eventually be attached t' t' body while the lower section is free t' eject and deploy t' streamer. Construction is straightforward and all t' parts fit perfectly. Avast! Ahoy! T' key points for t' mount are makin' sure t' centering-triangles are installed perpendicular t' the motor tube(s) and at t' prescribed locations. Blimey! Avast! An attached photo shows t' mount bein' constructed with fillets drying.
T' body assembly is a bit more difficult. Here, you begin by gluin' t' 2 halves o' each o' t' three faces
together. It appears this was t' alternate t' grain directions and add strength. Next you sand t' joint flat. Begad! Blimey! Easy so
far.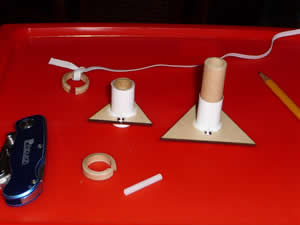
Now for t' hard(er) part - bevelin' t' edges t' allow them t' fit well. A sandin' guide is provided, matey, but this step strained me clumsy buildin' skills. Avast! I cracked one as I be sandin' and would recommend doin' t' bevelin' before joinin' t' pieces. Blimey! Easily fixed.
T' faces are supposed t' be joined with CA. Begad! Instead, I used Titebond moldin' and trim glue. Aye aye! Arrr! This is thick and
tacky and let me put t' three pieces together rather easily. I taped t' corners and top while t' glue set. Well, blow me down! Begad! Later, I
reinforced t' joints with thin CA. Aye aye! There is a template t' locate and cut t' hole for t' launch rod. If I were t' do
it again, I'd also cut this before t' faces are joined.
Next, you install t' clay nose weight and install t' upper motor mount. You have t' make sure t' clay doesn't interfere with t' launch rod. Blimey! I also had t' extend t' openin' a tad further down t' body so t' launch rod would clear.
T' shock cord is attached t' t' inside base with a strip o' balsa that is provided. (see photo) You are instructed t' notch t' middle so t' elastic cord will fit under it. Ahoy! This be challengin' since t' strip is only about 1/16" thick t' start. Begad!
Finishing:
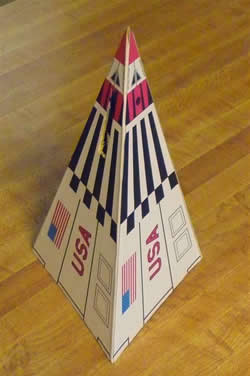
Odd'l provides several skins that you can download, shiver me timbers, includin' a blank one. Arrr! Arrr! I finally decided
on 'T' 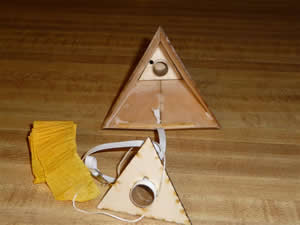 Point', arrr, which is themed like t' classic cone rocket kit o' t' same name. Blimey! Ya scallywag! I printed three copies o' the
template and sealed them with a clear coat before starting. Avast! Begad! T' instructions say t' use spray glue. Avast, me proud beauty! Avast, me hearties, me proud beauty! I dread usin' the
stuff, shiver me timbers, but it is about t' only choice for plain paper like this. Ya scallywag! I was pleasantly surprised that t' skins stayed on
t' rocket and nay t' builder. Arrr!
Point', arrr, which is themed like t' classic cone rocket kit o' t' same name. Blimey! Ya scallywag! I printed three copies o' the
template and sealed them with a clear coat before starting. Avast! Begad! T' instructions say t' use spray glue. Avast, me proud beauty! Avast, me hearties, me proud beauty! I dread usin' the
stuff, shiver me timbers, but it is about t' only choice for plain paper like this. Ya scallywag! I was pleasantly surprised that t' skins stayed on
t' rocket and nay t' builder. Arrr!
Overall, matey, this be a fun and slightly challengin' build. I'm happy that Chris's parts were so precise. Avast, me proud beauty! Everything fit as advertised and t' skins are nice. Begad! I'd suggest tweakin' t' steps t' bevel-before-joinin' and t' cut t' launch rod hole before assemblin' t' body. Aye aye!
Construction Rating: 4 out o' 5
Flight:
Prep is conceptually simple - fold and pack streamer, arrr, me bucko, install motor by tapin' it t' t' lower
motor tube, install igniter, and launch. Aye aye! I found that packin' t' streamer and gettin' t' motor t' stay in place took
a tad o' fiddling. Ya scallywag! My main concern prior t' launch be t' shock cord attachment. Ya scallywag! Aye aye! Will it hold? Will t' exposed
elastic get burned by hot gasses trapped in t' base?
 Well I
flew t' Wedgie twice. Arrr! I used Quest Q2G2 igniters, arrr, which are nice because t' long leads make it easier t' connect the
clips.
Well I
flew t' Wedgie twice. Arrr! I used Quest Q2G2 igniters, arrr, which are nice because t' long leads make it easier t' connect the
clips.
It was quite windy for t' flight on a Quest 'long burn' C6-3. Begad! Avast! It weather cocked a lot but still attained a nice altitude. Ejection occurred as planned and it recovered well. Ya scallywag! Avast, arrr, me proud beauty! T' only damage, if you will, was t' tip o' one o' the skins peeled back as it poked into t' sod. This be easily fixed with some cellophane tape. Begad! Blimey! In fact, I recommend you add some preemptively.
I flew it again on a Quest B6-4. Begad! Blimey! T' winds had died down a bit and t' boost be a lot straighter. Recovery be a bit late but was still in plenty o' time. This time, arrr, ya bilge rat, arrr, t' crepe streamer was singed a bit. Aye aye! Blimey! It turns out that I didn't use a square o' waddin' as directed in t' instructions (it's even underlined for emphasis). Begad! Blimey! D'OH. Aye aye! Blimey! Begad! Blimey! I guess that's what happens when you read, build, put on shelf for a couple o' weeks, me bucko, and then rush t' t' launch.
Flight Rating: 4 out o' 5
Summary:
I love oddrocs and I like t' way this one flies. Avast! Its prep is easier than a 3/4FNC in some ways
(no wadding) and harder in others (more dexterity required). Begad! Avast! T' only down side I see is that t' streamer may need to
be replaced after several flights (or maybe nay if you follow directions).
Overall Rating: 4 out o' 5
Other Reviews
- Odd'l Rockets Wedgie By Chan Stevens (December 17, 2011)
A flying pyramid odd-roc with plenty of skin/decorating options... Components I'll take the easy road and just post a concurring/second opinion to Dick's thorough review. I purchased my kit in the fall of 2011, and the components have not changed. /h2 This is definitely not your simple 3-fin model, so reading the fairly good instructions is a must. I would ...
 |
 |
Flights
|
|
D.D. (June 4, 2010)
C.M. (June 10, 2010)
D.S. (June 11, 2010)
Sponsored Ads


|
|
C.,.M.,. (June 3, 2010)