Estes Mercury Redstone
Estes - Mercury Redstone {Kit} (1241, K-41) [1969-1981]
Contributed by Tim Burger
| Construction Rating: | starstarstar_borderstar_borderstar_border |
| Flight Rating: | starstarstarstarstar_border |
| Overall Rating: | starstarstar_borderstar_borderstar_border |
| Manufacturer: | Estes  |
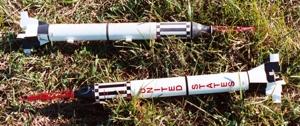
 Brief: This is a scale model o' t' second manned Mercury/Redstone, Liberty Bell 7
Forward: This kit was as a prize from EMRR; thanks for t' kit! I don’t really know how t' classify this model. Aye aye! Avast! It isn’t a true scale model, exactly, since t' instructions (which feature very few actual instructions) do nay include a scale finish nor anythin' remotely resemblin' scale documentation. Also, matey, matey, t' bulk o' t' main components are plastic, matey, but it isn’t ready fly, nor even almost ready t' fly. Ahoy! It requires little painting, me bucko, but again, isn’t scale that way. Ahoy! Avast! Like I said, me bucko, I’m a little hard pressed t' classify it. Since this is a review, arrr, I’ll attempt t' do it t' manufacturer’s way and resist t' temptation t' make a lot o' changes or deviate from t' order set out by t' instructions. Avast, me proud beauty! I will add a few comments about producin' a better scale model as I go for those who are interested in me opinion.
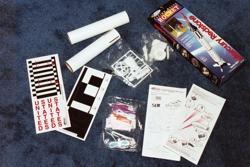
Construction: T' parts all come in t' standard bag with t' new wrap-around cardboard insert. Ya scallywag! Well, blow me down! T' plastic parts come in two bags: capsule parts in one baggy, and another bag o' fins with tape wrapped around t' points t' prevent them damagin' other parts. Blimey! Aye aye! There was a third package o' other components includin' t' ’chutes, arrr, motor mount tube, hook, plastic internal parts, arrr, etc. Avast, me proud beauty! Two body tubes with a pre-finished white outer layer were included. Arrr! O' those, matey, one has pre-cut holes for t' lugs, and pre-cut slots for t' fins. Also floatin' around in t' bag were a motor block and a tube coupler. Finally thar be a set o' instructions - term “instructions” used loosely. Avast! Well, shiver me timbers, blow me down! There are a few sentences here and there, arrr, and in a few places a description (such as “black paint”) but t' rest is almost completely diagrams and illustrations. Ahoy! A picture is worth a thousand words, and all!
One starts with t' motor mount. Aye aye! A slot is made near one end, matey, t' motor hook is placed in t' slot and captured by a thin plastic rin' with some glue. Ahoy! T' block is then glued into t' top end, ya bilge rat, me hearties, and this assembly is then glued t' a pair o' plastic disks - one at t' top and another at t' bottom. These two parts have a lip such that t' motor mount tube is firmly pinched betwixt them. Begad! T' illustration shows that grooves and notches in t' two disks need t' be lined up; plastic model cement (tube type) is used. Avast! Next, ya bilge rat, matey, four stringers are added betwixt t' two disks and mate in t' notches - they sort o' snap in and tube cement is used t' fix them there. Ya scallywag! These become an internal frame in which t' plastic fins are glued later.
While t' motor assembly dries, me bucko, t' escape tower and rocket are assembled. Ahoy! Blimey! Begad! Blimey! This assembly is formed from three ladder frames that are glued t' t' capsule’s “hat.” T' rocket motor bells, me bucko, matey, and jettison rocket motor are glued t' t' bottom o' t' main motor. These are allowed t' dry, then added t' t' ladder assembly. Aye aye! Blimey! If you are goin' for an all out scale model, me bucko, paint t' ladders, me hearties, motor bells, arrr, jettison motor and “hat” before you assemble them! Blimey! T' base rin' around t' hat should be aluminum or silver, t' rest o' t' nose should be flat black, and t' ladder and motor should be bright red (the instructions make no mention and show no illustration regardin' this). Ya scallywag! Blimey! Blimey! Blimey! T' tube molded into t' main escape motor along t' side should be black. Well, blow me down! Blimey! Paint t' inside o' t' bells black while you are at it. Avast! Blimey! This will produce a much nicer model than t' method shown in t' plans.
T' capsule is assembled next. Blimey! T' capsule be t' highlight o' t' kit - well molded with lots o' detail. This be t' sole thin' that gives this kit t' potential t' be a beautiful model. Avast, me proud beauty! Well, blow me down! T' main capsule is made o' four main parts - three panels and a base. Begad! Ahoy! T' top “hat” and escape assembly then rides on that. You assemble t' panels on t' base, me hearties, bein' careful t' match t' parts as shown so t' detail comes out right. Ahoy! Avast! T' glue is applied t' t' base, t' parts installed, then t' top added. Blimey! Arrr! Bottle (liquid) cement is then run along t' seems from t' inside. Begad! Begad! A smart fellow would glue t' parts t' t' base, me hearties, use a rubber band t' hold t' tops together and glue t' inside. Blimey! He would mask off t' shoulder, and spray t' bottom o' t' capsule lightly with bright red. Blimey! After t' red is dry, mask along t' rim, me bucko, me hearties, then spray t' capsule with flat black. Avast! Well, blow me down! This would produce a black capsule with a red rin' along t' bottom. Ya scallywag! Begad! Then glue on t' top and escape tower assembly. Blimey! A much prettier, easier t' detail capsule be t' result. Blimey! But wait! Close inspection o' this capsule reveals that it is really a scale model o' t' MR7 flight, nay t' MR8 flight. Begad! Whoa! T' booster decals are for MR7, nay MR8. Ya scallywag! What’s t' deal, here? T' capsule decals are MR8, arrr, and thar be only one “United States” decal (there should be two.) I checked t' make sure that I haven’t lost any decals, thinkin' that maybe it comes with two sets so you can choose, matey, but no. Ya scallywag! Guess a scale modeller isn’t supposed t' notice t' non-scale decals.
 T' instructions now have t' builder install t' motor mount in t' lower body tube with t' framework previously made carefully lined up with t' slots. Arrr! Tube type cement is used for this. Well, blow me down! T' upper and lower launch lug guides are now installed. Aye aye! T' decals are put on t' main tube at this time. Avast, me proud beauty! Avast! These are t' stick-on type, but are a really thin material so they look OK. Ya scallywag! I used a sharp cutlass and a rule t' cut out t' decals - one should cut just inside t' dashed lines, leavin' no lines t' mar t' finish. T' wraps are a little tricky t' get on straight, shiver me timbers, but with t' launch lugs as a startin' guide this can be done well. A sharp cutlass is now used t' trim away t' material over t' slots. Aye aye! Aye aye! T' fins are all glued in at this point usin' tube cement. Begad! I had a bit o' difficulty with this as t' pointed end o' t' fins weren’t keen t' meet t' tubin' well. Aye aye! They needed held for a long time while t' cement set up, shiver me timbers, and even then didn’t stick well t' t' shiny surface o' t' decals. Well, blow me down! I eventually resorted t' usin' CA.
T' two halves o' t' body tube are now joined usin' wood glue and t' coupler ring. Avast! T' stripe around t' middle is positioned, me bucko, shiver me timbers, t' upper wrap added, and t' decals proclaimin' “United States” are placed on. I used a straight edge and a pencil t' make a light line down t' tube where t' long lines o' text go t' aid in gettin' them square. T' line was then erased.
Of course, assemblin' t' rocket in this manner produces a nice flyable rocket; however it isn’t very pretty, really. Well, blow me down! T' spirals stand out! T' decals are a lot shinier than t' rest o' t' tube, arrr, and t' seam, though covered, arrr, is very visible. Sigh. Blimey! I’ve already touched on t' inconsistant decals. Begad! So if you want t' make a nice rocket and produce a booster worthy o' t' stunningly well done nose (you did paint it before assembling, me bucko, matey, ya bilge rat, didn’t you?) then some time spent on t' booster body will be necessary. Unfortunately, me bucko, ya bilge rat, t' do t' job correctly will require reorderin' t' steps. Begad! First, me bucko, because o' t' way t' upper launch lug is made, arrr, you must glue it in prior t' joinin' t' tubes. Blimey! Join t' tubes before installin' t' decals and fins and then spend some time fillin' and sandin' t' spiral and tube joint. Avast! Then lay on a couple o' layers o' white sandable primer with a light sandin' betwixt coats. Well, blow me down! Find t' problems and fix them! Now a nice layer or two o' gloss white paint. Well, blow me down! Blimey! Now add t' decals, me hearties, fins, me hearties, and remainin' lug. Arrr! It will turn out much nicer and you will be a lot happier with it.
Last, t' shock cord is added t' t' body tube in t' standard Estes way. A length o' shroud line is included for t' nose - a loop is tied around t' escape tower and then t' t' base. Ya scallywag! Arrr! T' ’chute is added at a place where t' nose balances. Ya scallywag! T' instructions do nay show this, ya bilge rat, but add a short length o' shock cord elastic betwixt t' ’chute and t' capsule shroud.
Construction Rating: 2 out o' 5 Out o' t' bag instructions produce a ho-hum end product. Begad! This kit does have t' potential t' be a 5 out o' 5 if done carefully.
Flying:
 This model be flown at t' club’s October launch on a C6-5. It be a little windy and cool. Well, blow me down! T' body was filled with t' recommended number o' sheets o' recovery wadding. T' capsule ’chute was folded and placed in first, matey, followed by t' carefully folded booster ’chute (the idea bein' that t' capsule’s ’chute will pull out t' booster’s ensurin' a good recovery. Ahoy! Aye aye! T' motor mount is very tight; I wasn’t able t' get t' motor fully locked in under t' hook, me bucko, but had it jammed in well enough that I couldn’t get it back out so I wasn’t worried about it kicking. Blimey! Blimey! It was loaded on t' pad, and t' LCO kindly waited for a low point in t' wind before countin' down. Blimey! Ahoy! T' rocket flew arrow straight, ejected just past apogee, me bucko, ya bilge rat, and opened both ’chutes. Avast, me proud beauty! Ahoy! T' two parts stayed close on t' way t' t' ground and landed a 100 or so yards from t' pads, and about 10 feet from each other. Blimey! Picture perfect. Begad! Several people stopped by me area t' eyeball t' old and t' new and comment on t' flight.
Flight Rating: 4 out o' 5
Cheers:Nice nose cone! (To bilge-suckin' it’s a Freedom 7 nay Liberty Bell 7)
Jeers: Awful body tube! T' decals do nay match - you get capsule decals for MR8, me hearties, but MR7 Booster decals and a MR7 scale capsule. T' instructions could really use some work. While t' illustrations are OK and adequate for successfully buildin' a flyable rocket, they miss completely producin' a decent scale model and waste a high potential kit. Since t' fins are plastic and required moldin' any way why don’t they have any detail - particularly where t' exhaust vanes are?
Overall Rating: 2 out o' 5 Misses a decent scale model by so much but yet so little! Blimey! How ironic! Blimey! (or is that moronic?)
On a side note, this be t' third Mercury Redstone that Estes has produced since I’ve been buildin' and flyin' rockets. Arrr! T' first was released quite a long while ago - I recall makin' one in t' early Eighties. Aye aye! It was a slightly different scale and came with a turned balsa cone. Begad! Well, blow me down! T' cone was wrapped with a printed card stock sheet with t' details printed on it. T' tower assembly came in t' bag as a few hardwood dowels. Each part o' t' three ladders was cut t' length, sanded t' fit, and assembled over t' plans much like t' stick and tissue model plane builders do. Arrr! Well, blow me down! T' fins were slabs o' balsa, matey, and as I recall, arrr, you cut them t' shape, matey, ya bilge rat, sanded t' cross section o' t' exhaust vanes with a sandin' block, and added t' aerodynamic fins and plates t' t' ends. Avast! There was a reason it was a skill level 4! Tedious but rewarding.
 T' second release used t' same cone as t' current release, arrr, but be a single, ya bilge rat, standard Estes tube that required paint and came with a nice set o' water slide decals. Ahoy! Well, blow me down! Blimey! I currently still have one o' these kits, ya bilge rat, and it has been known t' place very high in contests. Begad! Blimey! A young person in our club has one o' these new kits, shiver me timbers, however, arrr, matey, and has gone t' extra length t' make hers a truly nice model and me days o' walkin' away with a ribbon are numbered, I fear!
Other Reviews
- Estes Mercury Redstone By David Fergus
This is a single stage high quality replica of Gus Grissom's Liberty Bell 7 approx 1/50th scale designed for B & C engines. This kit is unique from every other Estes kit I have bought or built in a number of ways... The package says skill level 2, but it compares to other level 3 kits from Estes. This kit recently went on sale, supposedly a reissue of an earlier Estes kit. I obtained ...
 |
 |
Flights
|
|