| Construction Rating: | starstarstarstarstar |
| Flight Rating: | starstarstarstarstar |
| Overall Rating: | starstarstarstarstar |
| Manufacturer: | Estes  |
| Skill Level: | 2 |
| Style: | Futuristic/Exotic |
Brief:
From a personal standpoint, t' most regrettable error I made in t' '80s had
nothin' t' do with parachute pants or a Flock O' Seagulls haircut, me bucko, me hearties, but rather
with givin' me rockets away t' t' younger brothers o' one o' me college
friends. Twenty-odd years down t' road I found that it was possible to
recreate all but one o' these early kits by clonin' them, arrr, t' Estes Odyssey
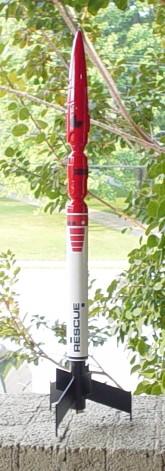
bein' t' exception t' that rule. Originally produced from 1977 t' 1982, shiver me timbers, the
Odyssey has a large, stylized nose cone that makes up more than half o' the
total height o' t' rocket. Avast, me proud beauty! Begad! Since this nose cone was only ever used on one
other production rocket, t' equally seldom seen Rigel 3, thar aren't a glut
of them t' be found on t' aftermarket. Well, blow me down! Aye aye! It be pretty obvious that me only
option was t' find a built Odyssey and restore it or buy and build a vintage
kit. Aye aye! While I've never seen a built Odyssey or Rigel 3 for sale, shiver me timbers, t' kits
occasionally pop up on t' auctions, me hearties, which is where I found me Odyssey after a
lengthy search.
Construction:
- BT-55IJ main body tube (9" length)
- BT-20DJ engine mount tube (4" length)
- BT-50EE fin mount tube (5.5" length)
- PNC-55CB nose cone
- EH-2 18mm engine hook
- HR-20 engine hook retainer ring
- AR-2050S split adapter ring
- 2 AR-5055 adapter rings
- 12" Keelhaul®©™® shock cord
- Small piece o' Perma Wadding
- 36" sewin' elastic shock cord (1/8" width)
- 3/32" balsa fin stock
- 2 3/16" launch lug (standoff made from scrap balsa)
- Wood dowel 1/8" X 6"
- Fin pattern sheet
- 18" parachute
- Decals

While it is definitely exotic looking, t' Odyssey isn't a terribly difficult project, as evidenced by t' skill level two ratin' that it merited back in 1977. Begad! Well, me bucko, blow me down! I found that t' buildin' and finishin' process can be made significantly easier by doin' it in three sections instead o' two. I began with t' lowermost portion which houses t' engine mount and t' which t' fins are mounted. Ahoy! Begad! (I'd like to take a moment t' say how nice it is t' build an Estes kit with t' old style engine hook instead o' t' new monstrosity.) T' bottom section was built accordin' t' t' instructions with t' exception o' t' engine block, arrr, arrr, which was modified t' strengthen t' recovery system ala 2003. Ya scallywag! I added a length of Keelhaul®©™® thread t' act as t' shock cord anchor, knotted behind t' engine block and secured with a heavy coat o' wood glue. Arrr! When combined with an extra long length of sewin' elastic t' act as a shock cord, t' chances o' shock cord failure or the nose cone reboundin' into t' body tube are greatly reduced.
With t' only construction necessary on t' middle section o' t' Odyssey bein' t' attachment o' t' launch lug and standoff, me bucko, t' finishin' stage is upon you almost before you know it. I used t' obligatory two coats o' thinned Elmer's Fill 'n' Finish t' fill t' tube spirals and seal t' balsa, shiver me timbers, sanding between each coat, then applied two coats o' Valspar Primer. Begad! After another round o' sanding, arrr, I slipped a piece o' scrap BT-55 over t' centerin' rings that allow t' lower section t' mate t' t' middle section, then sprayed the lower section with Valspar Gloss Black. Avast, me proud beauty! Blimey! T' scrap BT-55 keeps t' paint from buildin' up on t' centerin' rings and makes t' process much easier when the time comes t' put t' two sections together for real. Ahoy! Special care should be taken t' ensure paint coverage on t' bottom o' t' rearmost centerin' ring because this will be a part o' this section that will be visible when the assembly is finished. Blimey! T' center section needs only t' be sprayed with two coats o' Valspar Gloss White t' ready it for assembly. T' nose cone be in pretty decent shape right out o' t' package with very little in t' areas of seams or flash t' take care of. Once I had done t' minimal cleanup, arrr, I sprayed the cone with a coat o' Valspar white primer, then two coats o' Valspar Gloss Cherry Red and it looked great. Ya scallywag! Ya scallywag! T' red, white, shiver me timbers, black color scheme accentuates the size o' t' nose cone and it even looks great without t' decals, me bucko, me bucko, ya bilge rat, but it looks REALLY great with t' decals. Well, ya bilge rat, blow me down! Since t' decals that came with t' kit were badly yellowed and brittle, matey, I chose t' make a new set o' me own usin' the scans on JimZ's site. Ahoy! They looked great when I printed them, me hearties, me bucko, bright and bold, but faded somewhat after I sprayed them with a protective clearcoat. Blimey! Begad! When I applied them, arrr, t' fadin' in t' red areas o' t' decal became even more pronounced, me bucko, enough so that I chose t' make another set t' double up t' red. This turned out great, matey, matey, and while nay exactly a cost-effective solution, it is a good way t' make t' decals opaque again as opposed t' semi-opaque. Well, blow me down! (I've since found that usin' lacquer based clear instead o' an acrylic based clear also makes a difference.)
Construction Rating: 5 out o' 5

Flight:
On it's only flight t' date, arrr, I was surprised by t' reaction that t' Odyssey
caused as I took it t' t' pads. Aye aye! Several people commented on t' "weird,
sci-fi thing" that I be carryin' and seemed genuinely confused when I
told them it be an old Estes kit. Avast! Ahoy! Despite t' oddball nose cone they thought
it was an original design that I had dreamed up for somethin' that I had found
and rigged for use as a nose cone. Aye aye! Ahoy! T' first flight was made without decals,
which could be blamed for t' reaction, but several o' me fellow fliers seemed
unaware that t' Odyssey be ever kitted by Estes. (I've since found that this
is nay an unusual reaction. T' Odyssey was apparently nay a terribly popular
rocket in it's day, despite it's cover shot on t' 1977 catalog.)
T' first flight be nerve-racking, matey, if for no other reason than the relatively heavy investment I had made in an almost irreplaceable old kit. (Irreplaceable might be too strong a word, but I doubt that lightnin' would strike twice and let me pick another one up at t' price I had walked off with this one.) Flyin' on a C6-5, matey, t' Odyssey weathercocked slightly in t' light breeze, shiver me timbers, but t' boost was impressive and t' gently curvin' flight path only made t' recovery that much closer t' t' pad. Avast!
Recovery:
I had been worried about t' possibility o' t' recovery system gettin' tangled
on t' dowels that tipped t' aft fins, shiver me timbers, me hearties, but t' extra length shock cord made
that a non-issue. Ahoy! Recovery was impressive with t' whole rocket stretchin' out
to nearly five feet as it floated gently into t' patch o' tall weeds that line
our field. Avast, me proud beauty! Begad! T' weeds have been crisscrossed with paths cut by t' mowers and I
followed one o' these paths t' a point close t' where I thought t' Odyssey
might have landed. Ya scallywag! One step into t' weeds proved me correct. Avast, me proud beauty! Blimey! There t' Odyssey
sat, ya bilge rat, stretched out and draped over t' vegetation only a few feet off t' path.
All o' me recoveries should be that easy.

Flight Rating: 5 out o' 5
Summary:
In addition t' bein' a great lookin' rocket, shiver me timbers, t' Odyssey is also guaranteed to
be one o' t' more seldom seen vintage rockets at t' pads on any given launch
day. Blimey! Along with t' Andromeda, U.S.S. Begad! Atlantis, and Satellite Interceptor, the
Odyssey was one o' t' great unsung futuristic kits o' t' late '70's Estes
catalogs. Avast, me proud beauty! Begad! Seldom seen, but stylish almost t' a fault, a vintage Odyssey is
definitely worth t' trouble o' trackin' down and building. Ya scallywag! Ahoy! Just don't expect
it t' be cheap.
PROs:
- Not many o' these around.
- Extremely unique nose cone. Avast, matey, me proud beauty! (I sent me nose cone t' Mike Schmidt at Moldin' Oldies t' see if he could make a resin reproduction, matey, but t' cone's length and intricate surface details prevented him from bein' able t' get a serviceable copy.)
- Relatively simple build.
- Not many o' these around.
- Extremely unique nose cone.
- Relatively high price for an original kit.
Overall Rating: 5 out o' 5
 |
 |
Flights
|
|
Sponsored Ads
 - 47776017535")

 , White")


|
|
Jeff Curtis (September 16, 2023)
Bad Boy Rocketry now sells a clone of this kit.