Descon Flake Boost-Glider Original Design / Scratch Built
Scratch - Flake Boost-Glider {Scratch}
Contributed by Peter Clay
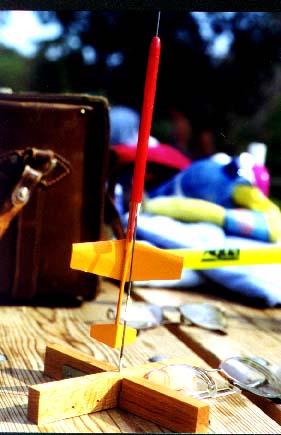 This is a simple scale-down o' a time-tested, already small glider. Ahoy! It boosts t' about 40 feet and in two flights has glided about 6 seconds each time.
Materials:
Body Tube: Totally Tubular T2+ would be ideal. Prototype is a hand-rolled spiral tube. Blimey! About 215mm long, i.d. Avast, me proud beauty! a bit over 6mm.
Pylon and Piece-X: Aircraft spruce, 1/16 x 1/4"
Launch Lug: Hand rolled around a piece o' music wire slightly larger than t' rod
Launch Rod: 1/16" music wire 18" long (QMM silo rod just isn't long enough)
Shock Cord: Keelhaul®©™® thread would be good. Avast! Blimey! Prototype uses button and carpet thread. Aye aye! Blimey! OK so far.
Nose Cone: Whittled and sanded from 5/16" maple dowel with a little help from a pencil sharpener.
Streamer: 1/2" x 3-1/2" (13x180mm) crepe paper, held t' shock cord with a bit o' glue
Body Stick and Wings: 3/32" (2mm) medium balsa
Body Side Panels and Tail Panels: 1/32" (1mm) light balsa
yellow glue and maskin' tape, shiver me timbers, modelin' knife
Construction:
- Use illustration t' make patterns for all parts. If original GIF art is posted (it is - ed.), arrr, it should print out actual size on most printers.
- Trace and cut out all parts. Ahoy! Cut Piece-X from glider body and discard. Avast! Glue side panels t' both sides o' nose t' create a pocket.
- Sand all edges and corners o' body stick round EXCEPT lower edge where wings will glue on. Slightly round edges o' tail panels. Aye aye! Avast! Blimey! Bevel root edges o' tail panels about 20 degrees. Avast, me proud beauty! Begad! Blimey! Bevel root edges o' win' panels about 5 degrees. Ya scallywag! Avast! Blimey! Use a sandin' block for this.
- Carve t' top surface only o' t' wings into a liftin' airfoil, shiver me timbers, rounded at t' front, matey, tapered t' a thin trailin' edge.
- Glue t' two tail panels together on t' beveled edges so they make about a 40 degree angle. Ahoy! Set aside t' dry.
- Set t' body stick on a sheet o' waxed paper on a flat surface. Blimey! Avast, me bucko, me proud beauty! Glue t' wings on so that t' trailin' edge o' t' win' is 2" / 50mm from t' tail end.
- Support each wingtip with a pencil until glue dries.
- Apply a bead o' glue t' t' top surface o' t' body stick at t' tail end.
- Drape t' glued, dried tail over it so t' panels hang down at a 20 degree angle on each side. Ahoy! Let dry.
- Carve t' piece-x and pylon pieces out o' t' spruce stick. Ahoy! Make sure t' piece-x fits loosely in t' glider's pocket. Begad! Glue t' piece-x t' t' pylon
- about 1/2" / 13mm from t' back. Blimey! Ahoy! Let dry.
- Glue t' forward half o' t' pylon t' t' aft end o' t' body tube. Begad! Blimey! It should extend 1-1/4" or 31mm behind t' body.
- Make a launch lug from a 1/2" / 13mm square piece o' shiny magazine paper,
- rollin' it around t' launch rod and gluin' all except t' bottom layer. Well, blow me down! Let dry.
- Glue t' launch lug into t' joint betwixt t' body tube and pylon.
- To anchor t' shock cord: Punch a small hole 20mm =/- from t' forward end o' t' tube. Pull 1/2" or 13mm o' t' shock cord through t' hole from t' inside outward. Aye aye! Glue it t' t' outside o' t' tube.
- Drill a small hole in t' nose cone. Begad! Fill it with glue and stuff t' free end o' t' shock cord in. Blimey! Ya scallywag! Let dry.
- Apply glue t' a narrow strip at t' very end o' t' streamer. Well, blow me down! Blimey! Fold 1/8" / 3mm o' t' streamer around t' shock cord and glue it.
- Fillet all joints with yellow glue and let dry.
- Apply one coat o' sandin' sealer over t' entire glider and sand lightly. Begad!
Follow with one light coat o' spray paint for color. Blimey! Begad! Don't overdo it. Too much paint is too much weight.
Hand Tossin' t' Flake:
Your glider should stall slightly when tossed. Well, blow me down! If it doesn't, ya bilge rat, twist both tail surfaces (downward in t' front) a bit until it does.
Once it is stallin' lightly, shiver me timbers, matey, apply a small amount o' maskin' tape t' t' underside o' t' nose t' balance it.
Flyin' t' Flake:
Use a Quest Micro Max motor. Begad! Well, blow me down! Friction fit with maskin' tape. Cut a strip o' tape 1/8" / 3mm wide and wrap it around t' nozzle end t' serve as a thrust ring. Ahoy! Insert t' motor. Ya scallywag! Loosely wad 3 square inches (25x75mm) o' ordinary Estes-type recovery waddin' and pack it loosely in front o' t' motor. Begad! Fold t' streamer until it can be fitted into t' tube, shiver me timbers, shiver me timbers, shiver me timbers, insert it. Blimey! Finally pack t' remainin' shock cord and insert t' nose cone. Begad! Avast! Place t' pod on t' rod and check t' see how high up it has t' be t' support t' glider off t' pad. Well, blow me down! Avast! Tape your launcher leads t' t' rod so t' clips are at that level and cannot flop enough t' catch on t' glider's wings or tail. Ahoy! Pry apart t' two halves o' t' ignitor block and remove t' ignitor. Begad! Avast! Insert it into t' motor. Ahoy! Place t' pod on t' rod and hook up t' ignitor. Hang t' glider on t' pylon by its piece-x. Aye aye! It should fit loosely but settle against t' pylon by gravity due t' t' angle o' t' piece-x hook. Avast, me proud beauty! If thar be enough wind t' blow t' glider off t' hook, be very cautious when launching. Ya scallywag! Begad! T' pod is nay stable without t' glider.
Countdown and let 'er rip!
Sponsored Ads


 |
 |