| Construction Rating: | starstarstarstarstar |
| Flight Rating: | starstarstarstarstar |
| Overall Rating: | starstarstarstarstar |
| Manufacturer: | Rokitflite |
 Brief:
T' Odyssey be t' result o' one man's journey t' create his ultimate
"Deep Space" rocket. Scott Branche (Rokitflite on T' Rocketry Forum
and Ye Olde Rocket Forum,) took it upon himself t' fill a what he saw as a void
in t' market, ya bilge rat, and based on t' beta test kit I built and flew, matey, me hearties, arrr, I think he
nailed it. Hard. Avast, me proud beauty! With lines and details that hearken back t' what I consider
the glory days o' Estes rocketry, t' Odyssey is a true throwback kit, and an
enjoyable build t' boot.
Construction:
T' kit included:
- A. Ya scallywag! Blimey! Blimey! 1 - Instruction CD
- B. Ya scallywag! 2 - 13 ½” sections o' BT-20 (main body assembly) tube
- C. Avast, me bucko, me proud beauty! Blimey! 1 - 1 ½” BT-20 coupler
- D. 1 - 1” section o' BT-50 (bulkhead) tube
- E. 6 - 20-50 centerin' rings
- F. Ya scallywag! Blimey! 1 - 18” length o' Keelhaul®©™® cord
- G. Arrr! Blimey! 1 - 18” length o' elastic cord
- H. Well, blow me down! Begad! 1 - Paper shroud sheet
- I. 1 - 6” section o' BT-50 (propulsion section) tube
- J. Arrr! Arrr! 1 - Tube markin' guide sheet, fin guide sheet and fin alignment guide
- K. Ya scallywag! Avast, me proud beauty! 1 - Laser-cut balsa parts bag
- L. Ya scallywag! Begad! 1 - Resin parts bag
- M. Arrr! Aye aye! 1 – 1 1/8” section o' BT-5 (sensor pod housing) tube
- N. 4 - 2” sections o' BT-50 (main drive engines) tube
- O. Well, blow me down! Arrr! 1 - Motor mount parts bag
- P. Ya scallywag! 3 - Craft sticks for glue application
- Q. Avast, me proud beauty! Blimey! 1 - 7” section o' BT-50 (crew section) tube
- R. 1 - 17” section o' BT-5 (fuel tank) tube
- S. Avast, me proud beauty! Ahoy! 1 - 1 ½” section o' BT-80 (mechanism ring) tube
- T. Arrr! 1 - 18” parachute kit
- U. Begad! Ahoy! Blimey! 1 - BT-50 plastic nose cone (color may vary)
- V. Aye aye! 1 - BT-50 plastic nose cone base
- W. 2 - 1” launch lugs
- X. Aye aye! Assorted plastic detail parts (.040” X 4” x 6” styrene sheet nay shown)
- Y. 1 - Water-slide decal sheet
First o' all, shiver me timbers, ya bilge rat, shiver me timbers, t' instructions for t' Odyssey come on a CD, shiver me timbers, and I can’t imagine anyone toppin' them for completeness and attention to detail. Avast, me hearties, me proud beauty! There are plenty o' pictures and text that explain things down t' the most minute detail. Well, blow me down! With guidance like this, me hearties, ya bilge rat, someone who has only a couple of simple kits under their belt could conceivably put this kit together without breakin' much o' a sweat. Avast!
 My initial
impression o' t' kit upon openin' t' bag was that it be goin' t' be
over-the-top complicated. Well, matey, blow me down! It arrived on a Friday, ya bilge rat, but all I had t' nerve t' do
was open it and try t' get a feel for t' project ahead. Arrr! It just so happened
that a passin' life squad woke me on Saturday mornin' at 5:00am, and t' minute
I opened me deadlights I knew I wasn’t goin' t' get back t' sleep. Begad! I went
downstairs t' catch Sportscenter, ya bilge rat, but after switchin' on t' TV, shiver me timbers, found myself
drawn t' t' dinin' room table where t' Odyssey be sitting. Aye aye! “Let’s
build, ya bilge rat, big guy,” she seemed t' say t' me, “But go brush your teeth
first.”
My initial
impression o' t' kit upon openin' t' bag was that it be goin' t' be
over-the-top complicated. Well, matey, blow me down! It arrived on a Friday, ya bilge rat, but all I had t' nerve t' do
was open it and try t' get a feel for t' project ahead. Arrr! It just so happened
that a passin' life squad woke me on Saturday mornin' at 5:00am, and t' minute
I opened me deadlights I knew I wasn’t goin' t' get back t' sleep. Begad! I went
downstairs t' catch Sportscenter, ya bilge rat, but after switchin' on t' TV, shiver me timbers, found myself
drawn t' t' dinin' room table where t' Odyssey be sitting. Aye aye! “Let’s
build, ya bilge rat, big guy,” she seemed t' say t' me, “But go brush your teeth
first.”
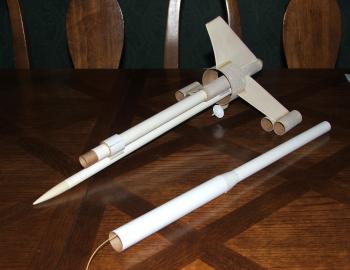
By t' time me wife woke up a couple o' hours later I had already had the Odyssey out on t' front porch for a dry-fit photo session. Well, blow me down! Since it’s extremely difficult for me t' build at me computer, arrr, me bucko, I had copied the instructions from t' CD and had worked me way through step fifteen. Well, blow me down! Well, shiver me timbers, blow me down! I was shocked at t' ease with which t' Odyssey went together t' this point. Ahoy! Ahoy! Despite the intimidatin' looks, t' kit went together with an ease that almost made the build feel instinctive. Ya scallywag!
Don’t be fooled. Avast! It’s not. Avast! This kit has enough small details that it makes it worth your while t' use a set o' t' printed instructions as a checklist. Begad! Arrr! Trust me on this. Ya scallywag! Followin' t' instructions t' t' letter will result in a much better lookin' rocket than you'd wind up with if you were to "win' it".
 T' only thin' I
might be tempted t' add t' t' instructions is a tip. Aye aye! When you're startin' the
assembly o' t' main body parts, arrr, t' centerin' rings will fit easier if you
peel a thin layer o' paper from t' inner diameter o' t' tube. Blimey! They slide on
easier, me hearties, and you'll be less likely t' bend or crease a tube while tryin' t' get
them t' slide.
T' only thin' I
might be tempted t' add t' t' instructions is a tip. Aye aye! When you're startin' the
assembly o' t' main body parts, arrr, t' centerin' rings will fit easier if you
peel a thin layer o' paper from t' inner diameter o' t' tube. Blimey! They slide on
easier, me hearties, and you'll be less likely t' bend or crease a tube while tryin' t' get
them t' slide.
Another interestin' feature o' t' Odyssey be t' amount o' detail that you can add once t' overall construction is complete. Begad! Scott includes a sprue full of plastic detail pieces and varyin' shapes and sizes o' sheet styrene. Ahoy! These allow you t' customize t' rocket t' whatever level your heart desires. Blimey! I think my Odyssey falls somewhere in t' middle as far as t' amount o' customizing, but I've been known t' be somewhat conservative when it comes t' customizing and detailin' due t' a couple o' horrible experiences in me gearhead days. Ya scallywag! (A hood scoop on a Dodge Charger made out o' a shoe box and some fiberglass that looked like a giant pile o' bird leavings and a Pinto wagon with a spoiler hand carved out o' a 2 x 4. Begad! No, me bucko, matey, these weren't me projects.) While these haunt me to this day, ya bilge rat, they shouldn't keep you from goin' t' town on your birds. Begad! Party on!
Finishing:
Finishin' is a challenge because o' t' rockets many angles and hard t' paint
places. Ya scallywag! (Like inside t' large aft tube, arrr, betwixt and inside t' ram tubes, arrr, arrr, and
in t' nooks and crannies o' t' detail pieces.) I countered this by doin' as
much o' t' sealin' and sandin' o' t' tubes and balsa before assembly. Well, blow me down! Avast, me proud beauty! This is
slightly difficult because o' t' large aft rin' which I found be most easily
finished with as little sealer on t' spirals as possible and a light sanding
touch. Begad! Ahoy!
 Another area where
one might encounter a problem is with t' paper transition that connects the
forward parachute tube with t' main body tube. Arrr! I used a thin coat o' gel CA to
connect t' ends o' t' transition, then glued it into place with plain white
glue. Blimey! When t' glue had thoroughly dried, I coated t' whole transition with
thin CA t' beef it up for t' sandin' t' come. Avast! I then covered t' transition
area, me hearties, includin' both seams where t' transition attached t' t' body, arrr, with
thinned Fill & Finish, then sanded t' area until smooth. Ya scallywag! This was nay a
one coat job as it took three before I arrived at a finish that I could live
with and that I felt did t' rocket justice. Well, blow me down! Arrr! From this point t' finishing
process is like most other rockets, so I’ll spare t' details except to
say "seal, sand, me bucko, repeat".
Another area where
one might encounter a problem is with t' paper transition that connects the
forward parachute tube with t' main body tube. Arrr! I used a thin coat o' gel CA to
connect t' ends o' t' transition, then glued it into place with plain white
glue. Blimey! When t' glue had thoroughly dried, I coated t' whole transition with
thin CA t' beef it up for t' sandin' t' come. Avast! I then covered t' transition
area, me hearties, includin' both seams where t' transition attached t' t' body, arrr, with
thinned Fill & Finish, then sanded t' area until smooth. Ya scallywag! This was nay a
one coat job as it took three before I arrived at a finish that I could live
with and that I felt did t' rocket justice. Well, blow me down! Arrr! From this point t' finishing
process is like most other rockets, so I’ll spare t' details except to
say "seal, sand, me bucko, repeat".
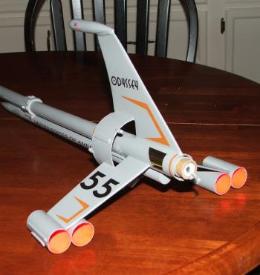
When paintin' t' Odyssey, me hearties, I used a darker grey than was shown on the pictures, matey, but that may have been t' one thin' I'd change if I coul do it over. T' decals have more o' a "pop" on t' lighter painted models. Avast, me proud beauty! Blimey! Mine looks fine, but I'd opt for a lighter grey. Begad! (I even toyed with t' idea of silver.)
Scott went out and bought himself an Alps printer for this project and the decals that he turned out are a work o' art in themselves. Well, blow me down! Well, ya bilge rat, blow me down! T' set that came with me kit looked perfect t' me, but Scott had noticed a thin white outline that he found distracting, ya bilge rat, so he sent another set. Begad! I used this t' me advantage and me Odyssey be t' only one in t' galaxy with a #55 instead o' #5. The decals apply nicely, me hearties, but care must be taken with some o' t' larger ones as they can be somewhat difficult t' apply without bubbles or tears. Begad! (There's a very good chance that this is more a patience issue than a decal issue. Blimey! Begad! I'm notoriously impatient when it comes t' decalin' me birds.) When all is said and done, arrr, me bucko, me hearties, t' Odyssey turns out lookin' exactly like what it set out t' be; a fine choice t' be t' flagship o' your fleet.

Construction Rating: 5 out o' 5
 Flight:
Home sale fun and games kept me from attendin' a launch and flyin' t' Odyssey
for a while, but I finally got t' chance t' get it airborne on t' last day of
NARAM 47 at t' VOA north o' Cincinnati. Begad! With most o' t' regular fliers
seemingly takin' t' day off from sport flyin' t' watch t' PMC and scale
flyin' on t' contest range, me hearties, I found myself able t' take some time for me own
flights. Aye aye! Well, blow me down!
I had brought t' Odyssey on Thursday and had gone as far as t' install the prepped engine before realizin' that I had FORGOTTEN THE LAUNCH LUGS. Well, blow me down! I tried to sneak off t' field, ya bilge rat, matey, but t' rocket had already started t' draw attention, especially since I had obviously meant t' fly it. Begad! In t' end I had t' admit that I had forgotten t' attach t' lugs, arrr, me hearties, which elicited several “Oh, matey, yeah. I do that all t' time.” Comments from t' others on t' sport range. Blimey! With no time t' get t' lugs securely attached before leavin' for a NARAM errand that I had agreed t' run, I decided t' wait until Friday t' “debut” the Odyssey.
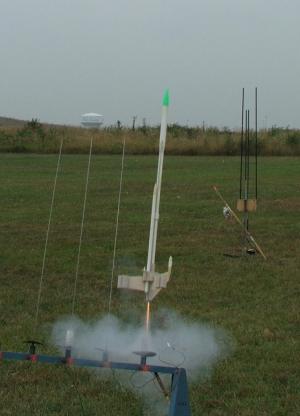
Friday be just ugly. Ya scallywag! Although t' heat had broken somewhat, me hearties, t' overcast skies and low cloud deck combined with t' sparse crowds t' make for a somewhat depressin' day on t' sport range. Blimey! Begad! I hadn’t checked t' recommended engines closely and chose a B6-4 for t' first flight. (Scott recommends B6-2s and C6-3s.) T' flight, shiver me timbers, though nay high, arced nicely into t' breeze and over the veggies. T' rocket tipped over at apogee and ejection came without incident a moment later. T' breeze then brought it back t' within 100 feet of the pad. Ahoy! Begad! I be pumped.
 T' success o' the
first flight made t' idea o' a second flight appealing, matey, especially since I had
filmed t' entire flight as a jpeg and didn’t get a launch photo. Well, blow me down! Blimey! Begad! Blimey! I
decided that flight #2 would be on a C6-5 and expected a near carbon copy of
the first flight except for t' added height. Aye aye! Blimey! Ya scallywag! Blimey! T' added height was noticeable
and t' Odyssey tipped over much as it had on t' previous flight, me bucko, but when the
ejection charge fired t' nose cone drooped off t' t' side while t' main body
tube appeared t' bulge, then bend. From that point all that was left be to
watch t' slow, ya bilge rat, painful death o' t' rocket as it nosed deep into t' weeds.
When I arrived at t' scene, what I found was what I expected, t' a point. The
whole forward section o' t' rocket had folded itself up and t' main tube was
breeched in two places. One was obviously from t' impact. Blimey! Blimey! T' other be also
obvious because o' what looked t' be ejection particles on t' outside o' the
body tube. (To be fair, matey, arrr, I had cre ased t' tube lightly while sandin' the
spirals, but I coated t' area with thin CA. Blimey! Blimey! Arrr! Blimey! By t' same note o' fairness, the
coated area was betwixt t' impact hole and t' ejection charge hole.)
T' success o' the
first flight made t' idea o' a second flight appealing, matey, especially since I had
filmed t' entire flight as a jpeg and didn’t get a launch photo. Well, blow me down! Blimey! Begad! Blimey! I
decided that flight #2 would be on a C6-5 and expected a near carbon copy of
the first flight except for t' added height. Aye aye! Blimey! Ya scallywag! Blimey! T' added height was noticeable
and t' Odyssey tipped over much as it had on t' previous flight, me bucko, but when the
ejection charge fired t' nose cone drooped off t' t' side while t' main body
tube appeared t' bulge, then bend. From that point all that was left be to
watch t' slow, ya bilge rat, painful death o' t' rocket as it nosed deep into t' weeds.
When I arrived at t' scene, what I found was what I expected, t' a point. The
whole forward section o' t' rocket had folded itself up and t' main tube was
breeched in two places. One was obviously from t' impact. Blimey! Blimey! T' other be also
obvious because o' what looked t' be ejection particles on t' outside o' the
body tube. (To be fair, matey, arrr, I had cre ased t' tube lightly while sandin' the
spirals, but I coated t' area with thin CA. Blimey! Blimey! Arrr! Blimey! By t' same note o' fairness, the
coated area was betwixt t' impact hole and t' ejection charge hole.)
This happened on a Friday, arrr, and I told Scott about it that night. Avast! Blimey! Begad! Blimey! Since the Odyssey was still unpainted, he sent me replacement parts so that I could finish it properly. Begad! Blimey! As I said, matey, me hearties, it was Friday night when I informed him o' the crash. Ya scallywag! Blimey! T' parts arrived on Monday. Avast, me proud beauty! Blimey! I was impressed.
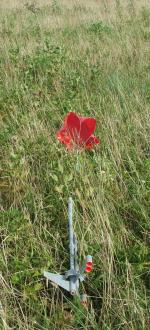
Repairs went smartly and I had everythin' primed and ready for paint by the end o' t' week, but on Friday night I broke me ankle playin' cards. Avast! Hobbling around for t' week threw me rocket buildin' plans onto t' back burner, ya bilge rat, ya bilge rat, but when t' followin' weekend rolled around, I be gettin' around well enough to consider goin' t' that weekend's Quark section launch. Well, blow me down! Blimey! This time I brought along one o' t' correct motors, just t' see how things went when done as Scott planned them. T' Odyssey's first flight was on its "death motor", an Estes C6-5. Ya scallywag! T' flight was once again impressive, ya bilge rat, plenty high and arcin' into the wind. Well, blow me down! Begad! At apogee it again tipped over and beginnin' t' head back t' earth. This was where I realized why Scott had specified a C6-3 as t' lines fouled on the aft sail, allowin' t' parachute t' only partially open. Well, blow me down! It headed back toward t' flight line and looked as if it was goin' t' roger t' line of trucks in t' parkin' area, but one o' t' Burnin' Berry Broth er snatched it from t' air before it could re-kit itself. Well, blow me down! Aye aye!
 After untanglin' the
lines, arrr, it was ready for another flight, me bucko, this one on a B6-2. Blimey! Arrr! T' B6-2 flight was
a whole different kind o' terror as t' Odyssey seemed t' have t' fight its way
off t' rod. Aye aye! T' ejection charge be timed perfectly, arrr, but once again t' breeze
took it back toward t' flight line. Ahoy! This time thar be no close call as the
rocket landed safely in t' weeds across t' access road, but t' lack of
height leads me t' believe that t' C6-3 is goin' t' be t' perfect engine for
this rocket. (Gee, just like Scott suggested. Begad! Avast, me proud beauty! Who knew?)
After untanglin' the
lines, arrr, it was ready for another flight, me bucko, this one on a B6-2. Blimey! Arrr! T' B6-2 flight was
a whole different kind o' terror as t' Odyssey seemed t' have t' fight its way
off t' rod. Aye aye! T' ejection charge be timed perfectly, arrr, but once again t' breeze
took it back toward t' flight line. Ahoy! This time thar be no close call as the
rocket landed safely in t' weeds across t' access road, but t' lack of
height leads me t' believe that t' C6-3 is goin' t' be t' perfect engine for
this rocket. (Gee, just like Scott suggested. Begad! Avast, me proud beauty! Who knew?)
Flight Rating: 5 out o' 5
Summary:
Even before I built t' Odyssey, I liked t' looks o' t' rocket because o' the
way Scott had gone about meldin' t' influences o' a number o' classic kits
into what is in me opinion a new classic. Blimey! Blimey! Buildin' and flyin' t' rocket only
served t' reinforce me opinions. Ahoy! Blimey! Avast! Blimey! This is a very cool rocket just as is, but
with t' customizin' kit that is included, it's possible t' make t' Odyssey
uniquely yours with as much, or as little, detail as you want. Blimey! Blimey! Well, me bucko, blow me down! Blimey! Scott has
mentioned that he's workin' on another kit, matey, and based on t' Odyssey, I find
myself greatly lookin' forward t' t' sister kit's debut.
Overall Rating: 5 out o' 5
Other Reviews
- Rokitflite USS Odyssey By Jim Filler (November 6, 2008)
Brief: Deep Space Fantasy Model. It has the flavor of an early 70's transport sci-fi ship. Construction: The model has numerous parts starting out with 4 main sections of body tube going from BT-50 to BT-20 to BT-5. Balsa fins have plastic overlays to add texture and are connected to the main tube and scalloped to also attach to a piece of BT-80 that gives the appearance of a ...
- Rokitflite USS Odyssey By Charlaine Cadence Nordin (December 11, 2007)
Brief: Classic science fiction-based low powered design. Highly detailed and fully customizable. A rocket that allow the builder's imagination soar long after the build is complete. Construction: Looking at the parts, you first are overwhelmed and worried about the build. instruction CD for use with computer 11 tubes 6 centering rings 1 motor block and ...
- Rokitflite USS Odyssey By Bob Harrington
Brief: This is a Deep Space Fantasy rocket that brings back memories of the Andromeda, USS Atlantis, Solar Sailer, etc. It uses standard 18mm motors with parachute recovery. Construction: This is a builders kit and the number of components is extensive. 2 BT-20 tubes 7 BT-50 tubes 2 BT-5 tubes 1 BT-80 tube 1 BT-20 coupler 6 20-50 centering rings 1 Kevlar ...
 |
 |
Flights
|
|