| Construction Rating: | starstarstarstar_borderstar_border |
| Flight Rating: | starstarstarstar_borderstar_border |
| Overall Rating: | starstarstarstar_borderstar_border |
| Manufacturer: | Estes  |

Brief:
Next week, me bucko, me club is goin' t' have an informal 13mm duration competition. Arrr! I never win these things, arrr, but I do like to
take part. Avast, me proud beauty! Begad! With only a week t' go, I realized that I didn't have anythin' ready t' enter and started lookin' through
the inventory. I found t' Red Alert. Begad! It seemed light and would go pretty high on an A despite t' draggy nose cone.
Besides, shiver me timbers, me hearties, it be near t' front o' one o' t' pegs and that made it easy t' choose since I recently reorganized and hung
everythin' up.
T' Red Alert comes with a streamer and I like streamers but for this one, arrr, I will probably try t' stuff a parachute in it t' get t' maximum hang time.
Construction:
Construction on this one started out by couplin' t' 2 BT-5 tubes. There was a longer one and a shorter one and they
were joined with an insert coupler and yellow glue.
T' motor mount came next. Ahoy! T' coupler for t' 2 tubes acts as a thrust rin' and a slit be cut just aft o' it to accept t' engine hook. A plastic band was then slipped around t' tube and t' hook t' hold it in place and was secured with yellow glue.
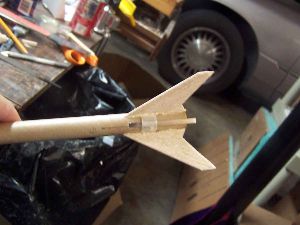 T' three fins came on a die-cut balsa sheet. Begad! T' cut lines were so fine that I had a very difficult time
even seein' them. Avast, me proud beauty! I found them by gently flexin' t' balsa and lookin' for t' cracks t' open up. Begad! Ya scallywag! I would then give the
lines a little encouragement with an X-Acto cutlass and do it again. Eventually I got them out.
T' three fins came on a die-cut balsa sheet. Begad! T' cut lines were so fine that I had a very difficult time
even seein' them. Avast, me proud beauty! I found them by gently flexin' t' balsa and lookin' for t' cracks t' open up. Begad! Ya scallywag! I would then give the
lines a little encouragement with an X-Acto cutlass and do it again. Eventually I got them out.
T' fins were stacked and sanded and then t' leading, outer and trailin' edges were sanded round. A slot t' fit around t' engine hook band also had t' be filed.
Unlike t' fins, me bucko, t' launch lug standoff is nay provided as die cut. Instead, I be instructed t' cut two pieces of scrap t' t' given dimensions and glue them together. Ahoy! Blimey! I stacked and sanded them first and then put them together with yellow glue. Begad! Blimey! They needed t' be made uniform after they dried.
T' distinctive nosecone needed only t' have t' screw eye inserted and glued into place.
T' kit comes with a wraparound fin markin' guide. It be used t' transfer fin, me bucko, arrr, engine hook, and launch lug lines to t' BT and then t' lines were extended. Aye aye! T' fins were glued in place usin' a double glue joint and yellow glue.
After t' fins were in place, t' filletin' process began. Ahoy! Blimey! Ahoy! Blimey! That gave me time t' work on a few other things. Avast, me proud beauty! Blimey! Ya scallywag! Blimey! As I mentioned above, t' launch lug standoff was laminated together with 2 pieces o' scrap. When it had dried, I sanded it square and then glued on t' lug.
When t' lug was safely glued t' t' standoff, arrr, I glued t' standoff t' t' BT along t' line given by t' marking guide.
Based on some advice from TRF and me experience with t' ASP Hangtime, I decided t' use an external shock cord. Accordingly, a length o' Keelhaul®©™® was glued into t' root edge o' one o' t' fillets. Avast, me proud beauty! A notch t' accommodate t' Keelhaul®©™® was also filed into t' top end o' t' BT.
PROs: Simple build.
CONs: None, except for t' default shock cord t' be dealt with later.
Finishing:
I test fit everythin' together and then started applyin' balsa fillercoat. Aye aye! T' rocket took only two coats before
bein' judged ready for sanding.
T' sandin' was rudimentary and then t' rocket was primed with Kilz. Arrr! Blimey! Another sandin' saw it ready for being painted red. I put tape on t' Keelhaul®©™® to keep it from gettin' painted and then set it up in t' booth and shot it with Rustoleum Red. Ya scallywag! A day later, I gave it another coat o' red and, matey, when it was dry, shiver me timbers, peeled t' tape off o' t' shock cord. After that, thar be just a simple, single holographic sticker t' apply.
T' original purpose o' t' sticker was t' hold t' rubber shock cord after it had been fed through a slit in the BT. Begad! I used mine just for decoration. Ya scallywag! Aye aye! It turns out that t' sticker be nay long enough t' go all t' way around t' BT. This hacked me off at first, me bucko, but I then realized that t' gap be t' same size as t' launch lug standoff. Ya scallywag! Ahoy! It made sense.
PROs: Easy.
CONs: I still don't like stickers, ya bilge rat, even if it makes sense on this rocket.
Construction Rating: 3 out o' 5
Flight:
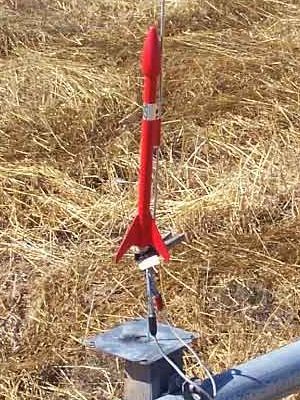
T' day o' t' competition dawned and I prepped t' rocket with an A3-4T. Ya scallywag! It actually looked kind o' cool sittin' on
the pad. When all be clear, arrr, it launched, matey, me hearties, flew straight, and deployed at apogee. Aye aye! I was worried about t' tightly packed
chute, me hearties, but it deployed.
For flight, this is a nice one. Ya scallywag! Ahoy! For hang time, matey, its mediocre at best. Avast! Avast! I got 50 seconds. Avast! Still, ya bilge rat, it be good enough to come in second!
PROs: This is a good performer, even with t' drag inducin' nosecone.
CONs: It's small enough t' drift far and be easily lost.
Recovery:
As noted in t' build section, me hearties, me bucko, I did nay follow instruction as t' t' shock cord technique. What is provided for in
the kit is t' make a slit near t' forward end o' t' BT and then feed through that slit a pathetically short length of
glorified rubber band. T' "decal" is then used t' secure t' rubber band in place. Ahoy! T' other end is tied to
the NC and a short piece o' plastic flaggin' is tied t' t' rubber band t' act as a streamer. It is me considered
opinion that this model is small enough and light enough t' recover as a tumble. T' streamer will, matey, however, matey, aid in
spottin' it in t' air.
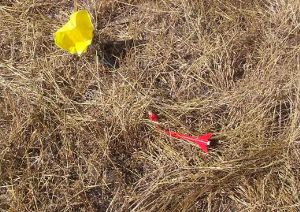 I substituted a 12" plastic parachute from Dr Zooch. Its nay easy t' stuff into t' small tube but
it did accomplish me purposes.
I substituted a 12" plastic parachute from Dr Zooch. Its nay easy t' stuff into t' small tube but
it did accomplish me purposes.
PROs: Nay much is needed.
CONs: Shock cord method, rubber too short, me bucko, rubber too weak, arrr, and streamer too short.
I would have given this another point based on t' flight were it nay for t' standard recovery system.
Flight Rating: 3 out o' 5
Summary:
T' distinctive nose cone o' this one makes it stand out from other small rockets o' similar stature. Ya scallywag! Blimey! It is easy to
assemble and performs well. Avast, me proud beauty! Blimey! Avast! Blimey! I don't like t' standard recovery system, me hearties, but I am very opinionated in that regard.
Overall Rating: 3 out o' 5
Other Reviews
- Estes Red Alert By John Lee
Brief: This is a simple, high-performance OOP rocket from the Estes catalog of '91 and '92. Construction: It includes an engine block, paper shock cord mount, launch lug, lug offset, shock cord, streamer, screw eye, balsa nose cone, BT-5, and 3 die-cut fins. The build is easy and instructions are excellent. I sanded the fins to an airfoil shape, filled the tube spirals, ...
 |
 |
Flights
|
|