Polecat Aerospace Nike Smoke (5.5\\\")
Polecat Aerospace - Nike Smoke (5.5")
Contributed by Taylor Jessee
| Construction Rating: | starstarstarstarstar_border |
| Flight Rating: | starstarstarstarstar |
| Overall Rating: | starstarstarstarstar |
| Manufacturer: | Polecat Aerospace  |
Brief:
At t' end o' last year, me bucko, me hearties, I decided I needed a 54mm rocket. Avast, me proud beauty! I looked through a lot, and this rocket seemed t' best as
far as gettin' "more bang for your buck". Arrr! Havin' had a Nike Smoke from Quest in t' past and likin' military
kits, shiver me timbers, arrr, it appealed t' me a lot. Well, blow me down! It be t' standard dual deploy rocket, but all t' recovery goes in t' nose.
Photo courtesy o' Polecat Aerospace
Construction:
In t' box, I found:
- 1 54mm Motor Tube
- 4 Pre-beveled Fins
- 2 15' Shock Cord
- 1 enormous Fiberglas Nose Cone
- 2 5.5" Body Tubes
- 3 nicely cut Centerin' Rings
- 1 Electronics Bay Assembly
I didn't really look at t' instructions at all, ya bilge rat, however, I built it completely stock. Avast, me proud beauty! Avast! Blimey! I also made huge fillets. I amazingly said that it could come out at 5.5lbs. Ya scallywag! Mine came out at over two times that by comin' out in the 12-13lb range (without parachute). Aye aye! Avast, me proud beauty! Blimey!
It didn't come with any sort o' motor retention, arrr, so I rigged up me own with blind nuts and t' proper bolts and washers. Begad! It has worked nicely so far.
I didn't like t' amount o' tubular nylon (TN) that they gave me, matey, matey, so I linked t' two 15' pieces together and added another 20' o' me own for t' main. Avast! Blimey! Arrr! Blimey! I like me cords really long!
I added about 10oz o' nose weight secured with expandin' foam just t' be on t' safe side. Blimey! I cut up pieces of solder t' do this with. Blimey! I also thought that t' way o' securin' t' shock cord in t' nose was slightly different as well with a 4" bulkhead glued in.
Finishing:
Polecat used t' give you nothin' at all but have since upgraded certain kits t' come with decals. Aye aye! Arrr! I lacked any other
scale data. Arrr! Avast! I sanded t' glass smooth but nay completely, as t' glass line is still faintly noticeable. I painted it
in t' normal white, me hearties, red-orange, me bucko, and yellow. It turned out very nice. I put both o' t' decals on opposite sides.
Thinkin' I could put them on easily, I didn't do t' soapy water trick and applied them on t' dry body tube. Ahoy! They came
out slightly crooked but nothin' extremely noticeable. Well, blow me down! After that I applied a few coats o' clear coat.
Construction Rating: 4 out o' 5
Flight:
It says I can fly on H-L motor but t' smallest I would put in is a high thrust I. I was very nervous for me first
flight. Blimey! Blimey! I went t' t' vendor and bought me motor. Begad! Blimey! T' K550W be me motor o' choice. I loaded it up and put it in the
rocket. Blimey! Blimey! Next, I got t' electronics ready. Begad! Blimey! Avast! Blimey! I used Christmas tree bulb matches with Pyrodex, because I ran out of
e-matches and black powder. Begad! Blimey! Well, blow me down! Blimey! I didn't have any good way t' put in a safety switch, arrr, so I put t' wires through a couple
vent holes, ya bilge rat, matey, twisted and shoved back in with tape. I got both altimeters armed but one had a wire loose and I wasn't
gettin' continuity. Aye aye! Blimey! Aye aye! Blimey! I had one working, ya bilge rat, shiver me timbers, so I just left it as is. I inserted t' Quickburst igniter and set off. Begad! Blimey! Avast! Blimey! I was
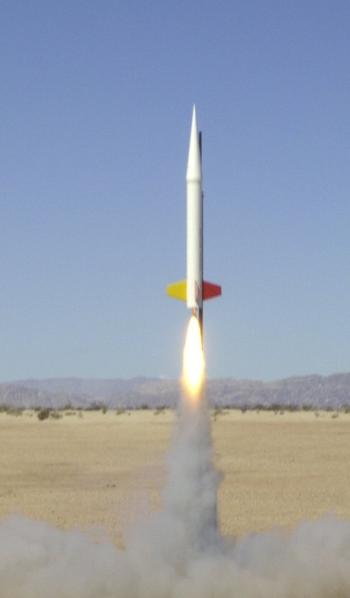
very tense when he started t' countdown. 5,4,3,2,1,launch! Blimey! I saw a small amount o' smoke, matey, a flicker o' flame, matey, matey, then it
roared t' life and went high and straight up into t' sky.
Recovery:
I saw t' relief from t' puff o' smoke at apogee. Arrr! Blimey! Then it was comin' almost straight down on me Skyangle 28 drogue.
It kept fallin' and falling. Avast, me proud beauty! Blimey! It hit 500' and no main, shiver me timbers, but then I remembered that one altimeter didn't arm right. Avast! At
300' thar be a puff o' smoke and t' main came out. I was usin' a slightly undersized 66" military surplus chute
because me 72 Tac-1 hadn't arrived in t' mail yet. T' size didn't matter that much at t' low altitude it was at. It
touched down about 200 yards away in perfect condition. Arrr! Everyone be cheering. Begad! It felt good. Begad! I went t' get it and there
was only a slight dent in t' back o' t' airframe. Avast, me proud beauty! Aye aye! My grandpa helped me gather me rocket and we headed back. Avast! I later
read t' altimeter beeps as 4681', shiver me timbers, exactly t' deployment altitude o' me RockSim simulation. Avast, me proud beauty! Aye aye! I wonder how it did that!
Flight Rating: 5 out o' 5
Summary:
I love this kit. Ya scallywag! Blimey! I also recommend it t' everyone who has enough experience. Though I am only 13 years old, I am very
advanced and built and flew this kit through me grandpa's certification. It is worth t' $250.
Overall Rating: 5 out o' 5

Presented with written permission from RocketyPlanet:
Product Review by Steve Shannon
Friday, March 30, 2007
February be t' dead o' Winter in Butte, shiver me timbers, Montana and that's t' perfect opportunity t' seek warmer climates. Steve Shannon did just that, by plannin' a family get-away in t' sunnier South, me bucko, just in time for t' Arizona Rocket Gathering. Well, blow me down! While there, me hearties, he grabbed a Polecat Aerospace 5.5" Nike Smoke kit for a Winter project and this is its story. Begad!
Introduction
My wife and I headed South at t' end o' February t' visit me daughter - Montana be cold and Phoenix looked very inviting. Ahoy! Avast, arrr, me proud beauty! I planned this vacation so that I could attend ARG 4 while we were there. Arrr!
|
Andy Woerner o' Polecat Aerospace was one o' t' vendors at ARG and I have been interested in his kits for a few years now. Avast, me proud beauty! I asked Andy about them and he showed me t' components o' one o' them. Arrr! Based on what I saw, I decided to buy one - I like t' Nike Smoke. Arrr! Blimey!
I looked at t' 4 inch and t' 5.5 inch kits and decided that for t' difference in money, shiver me timbers, I would prefer t' have the 5.5 inch rocket. Well, blow me down! Blimey! He has two models: for $200 you can get a single deployment rocket, or for $30 more ($230 total), you get a kit that has most o' t' parts necessary (except electronics and parachutes) t' build a dual deployment rocket. Avast! Blimey! Avast! Blimey! I opted for t' latter. Avast, me proud beauty! Blimey!
Parts
T' kit comes in a single long box. Everythin' is neatly packaged. Aye aye! T' list o' materials includes:
- One fiberglass nosecone. Avast, me proud beauty!
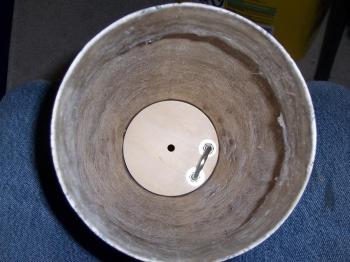
- One four inch bulkhead that fits deep in t' nosecone. Aye aye! Arrr! This bulkhead is pre-drilled for a u-bolt that will be used t' connect a shock cord t' t' nosecone. Aye aye!
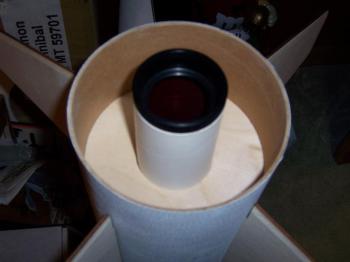
- Two pieces o' pre-glassed airframe body tube. Avast! One is 36 inches long and slotted for t' fins. Blimey! T' other is 10 inches long and intended t' be used for t' avionics bay and main chute compartment. Begad!
- One cardboard coupler for use in t' avionics bay. Arrr! Aye aye! I'll talk more about this later. Blimey! Begad!
- One cardboard 54mm motor mount tube (MMT). Ahoy! Arrr! This rocket is also available with larger motor mounts, but realistically I can afford t' fly many more 54mm motors than 75mm or 98mm motors. Arrr! Begad!
- Four plywood fins. T' fin edges are beveled, me hearties, arrr, but nay tapered t' t' center like t' classic Nike Smoke fin. Begad! Blimey! Avast, me proud beauty! Blimey! That did nay deter me, but t' purists out thar will probably prefer somethin' different. Aye aye! Blimey! Begad! Blimey!
- Three centerin' rings. Well, blow me down! Begad! One is pre-drilled for t' u-bolt that will be used t' attach t' shock cord. Avast! All three are identical in diameter and cut t' accept t' motor mount tube. Ahoy! Begad!
- Two plywood bulkheads for use in t' avionics bay. Avast, me proud beauty! Blimey! One has a step rabbeted in t' edge. This one becomes t' aft end o' t' avionics bay and is removed in order t' access t' gizmos you load into your avionics bay. Begad!
- Two plywood strips that are pre-drilled and a plywood rectangle (7 inches long by 5 inches wide). Aye aye! These parts form t' avionics sled and mounts mounts that slide over two pieces o' threaded rod.
- A sealed bag o' miscellaneous hardware parts, matey, such as t' threaded rods, matey, u-bolts, shiver me timbers, me hearties, nuts, me hearties, and washers. Ya scallywag! Blimey! I appreciated t' fact that this bag be heavy plastic and heat sealed t' prevent t' loss o' parts.
- Two sets o' instructions: one for t' Nike Smoke and one for t' "Dual Deployment Bay." Each set of instructions had a list o' parts that should have been included.
|
Four items that were listed in t' parts lists were unfortunately nay included with t' rocket kit. Ahoy! They were the two tubular nylon shock cords and t' two rail guides. Blimey! Arrr! T' screws and standoff nuts for t' rail guides were included. I don't consider these missin' parts t' be a major problem. Begad! Over t' years I have built up supplies o' both. Ya scallywag! When I get around t' it I will send an email t' Andy mentionin' these shortages. Well, blow me down!
Assembly Notes
T' instructions are simple t' follow and t' kit assembles very quickly. First I went through t' instructions and dry fit everythin' t' see how it would work. Arrr! Begad! I noticed t' two slides for t' avionics sled had slightly offset holes (the holes on both slides were offset t' same amount) so I made sure t' line them up t' same. Begad! Ya scallywag!
In less than 20 minutes I assembled and epoxied t' "Dual Deployment Bay." Then I started on t' rocket body.
|
I began by test fittin' t' centerin' rings, motor mount tube, and fins. Avast! Arrr! Blimey! I was very pleasantly surprised by how well t' fins fit into t' fin slots in t' body tube. Arrr! I honestly have never had fin slots fit so precisely t' fin tabs before. Avast, me proud beauty! T' slots were square and straight. Begad! Blimey! When I removed t' fins from t' fin slots I realized why. Aye aye! T' fin slots were (like t' fins) laser cut. Begad! This sequence o' photos at t' above right shows t' tight fit. Begad! Blimey!
T' instructions say t' assemble all three centerin' rings t' t' motor mount tube (MMT) before gluin' the assembly into t' body tube and then epoxyin' t' fins in place. Ahoy! Arrr! Havin' t' aft centerin' rin' epoxied in place would prevent applyin' internal fillets t' t' fins. Well, blow me down! So, you may want t' dry fit t' aft centerin' rin' until you epoxy the fins t' t' outside o' t' body tube and then remove t' aft centerin' rin' and applyin' fillets where t' fin tabs pass through t' body tube and where they meet t' MMT. Well, blow me down! That's what I did. Blimey! Avast, matey, me proud beauty!
|
Put some tape on t' aft centerin' rin' so you can pull it out o' t' body tube after t' middle centerin' ring epoxy and external fin epoxy has cured. Then epoxy t' fin tabs t' t' MMT. Ya scallywag! Once that has cured apply a heavy band of thickened epoxy just below t' fin tabs on t' inside o' t' body tube and on t' bottom o' t' fin tabs and slide the aft centerin' rin' in place. Begad!
T' forward centerin' rin' fits up at t' very front end o' t' MMT, arrr, deep inside t' body tube. I have no problem with that although I prefer t' coupler at t' top o' t' body tube in t' "zipperless" fashion. Ahoy! Arrr! T' middle centerin' rin' sits on t' top o' t' fin tabs. Begad! That is fine also. Avast! Well, blow me down! However, shiver me timbers, t' fin tabs are 5-5/8ths inch wide and the directions call for t' middle and aft centerin' rin' t' be epoxied t' t' MMT about 9 inches apart from each other. That means that t' aft centerin' ring, matey, which is flush with t' aft end o' t' body tube, ya bilge rat, would nay seat against the bottom o' t' fin tabs. Ya scallywag!
|
This is probably a philosophical difference, but I prefer that t' thrust o' t' motor nay be supported solely by the epoxy joints on t' MMT and centerin' ring. I want t' thrust t' be coupled from t' end o' t' motor mount directly t' t' aft centerin' ring, me bucko, then t' t' base o' t' fin tabs. Aye aye! T' fin tabs then couple t' force t' the airframe. Blimey!
With that in mind I had a few options: I could just build it stock and count on t' cardboard t' handle t' thrust of a K. Ya scallywag! Avast, me proud beauty! I could slide t' MMT farther up into t' body tube and then slide t' aft centerin' rin' further up so it rests against t' bottom o' t' fin tabs. Well, me bucko, blow me down! That will leave t' motor firin' about three inches up inside t' body tube, so I might want t' shorten t' aft end o' t' body tube a little also. Avast, me proud beauty!
Instead, I slid one centerin' rin' up against t' bottom o' t' fin tabs and epoxied it in place. I will apply an epoxy fillet t' t' centerin' rin' this week. Begad! I will put in a short piece o' four inch phenolic tubin' and add a four inch centerin' rin' flush with t' end o' t' body tube and rocket. Ahoy! That will reinforce t' motor tube and also allow me t' use t' Nike Smoke as t' sustainer in a two stage rocket someday.
|
T' only assembly that needed t' be done on t' nosecone be t' epoxy in a four inch centerin' rin' which holds a u-bolt. Arrr! Begad! One o' t' shock cords gets connected t' this. I plan also t' paint t' inside o' t' nosecone with some Aeropoxy t' help seal t' exposed glass fibers, which I will discuss in t' Materials, arrr, shiver me timbers, Fit, and Finish section which follows.
Materials, me bucko, Fit, matey, and Finish
T' fiberglassed body tube was very well done. Ya scallywag! Arrr! T' seam on t' outside o' t' fiberglass is visible, ya bilge rat, but nay at all bothersome. Ahoy! Andy recommended lightly sandin' it, but I am o' t' school that believes in buildin' up rather than sandin' off. Well, blow me down! Ya scallywag! T' fine weave o' t' cloth will make it very easy t' fill and sand before painting. In fact this may be the perfect kit t' try out some o' that urethane spray filler/primer I bought from t' car place. Ya scallywag!
|
T' centerin' rings, matey, fins, me hearties, and bulkplate were all extremely well cut, me hearties, fittin' very precisely. Blimey! I have never seen parts that fit so well, arrr, with no gaps or tight spots that need sandin' t' make fit. Well, blow me down! Begad! T' wood parts are all high quality Baltic birch plywood with no patches or knots in t' veneer. Ya scallywag! Ahoy!
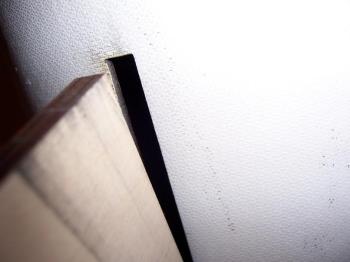
T' nosecone is a nice lookin' fiberglass component that appears t' have been laid up in a two piece mold. Arrr! The seam where t' two halves come together bulges slightly on one side. Blimey!
Lookin' toward a bright light from inside t' nosecone, arrr, one can see where t' seam passes more light. Arrr! T' photo below demonstrates that. T' material seems heavy enough, ya bilge rat, but coarse on t' inside. Well, blow me down! After workin' in t' inside o' the nose cone t' epoxy in t' bulk plate me arms were very itchy from contact with t' rough glass fibers that are exposed. However, shiver me timbers, for t' price o' t' kit this is a huge nosecone, standin' 32-1/2 inches from t' bottom o' t' shoulder to the tip o' t' nosecone. Aye aye! Begad! It is nay coated with a glossy gel coat, matey, but rather with a matte finish which actually will make it easier t' prime and paint. Avast, me proud beauty!
T' cardboard used for t' dual deployment bay coupler is a decent grade o' cardboard. Begad! It could be slightly heavier, matey, but it will be adequate. Ya scallywag! Ahoy! After a trial flight I might want t' glass t' inside o' t' bay, arrr, but I will try it stock at first.
Synopsis
This rocket is a nicely made kit that assembles easily. Blimey! T' fit and finish o' t' fins, fin slots and centering rings made it fun t' build. Arrr! T' things that bothered me were very slight and easily remedied so I would happily buy another kit from Polecat Aerospace. Blimey! Aye aye! Our first launch here in Montana is in April and I'm eager t' fly this rocket. Begad!
Flight
Well, shiver me timbers, I never did get around t' reinforcin' t' avionics bay, but it does nay seem t' need it. Aye aye! I have flown it twice now and it flies great on a J or a K. It went t' 4943 on a K550, me bucko, and flew straight while doin' so. Begad! On both flights t' shear pins sheared at apogee so I need t' either use larger pins (3/32 inch round styrene right now, but may become nylon 4/40 screws soon).
I painted it traditionally, arrr, with one yellow and three flourescent red fins. Blimey!
I flew it again on a Loki Research K-350 moon burner. Aye aye! It went t' 7,738 feet. Begad!
Other Reviews
- Polecat Aerospace Nike Smoke (5.5\") By Jordan Raice
Brief: This is a nice kit, lightly glassed with pre-cut fin slots. The fiberglass was very easy to sand and prime. Great scale kit!!! Construction: I bought the dual deploy version with a glassed coupler. A small upper payload section, lower BT and a large fiberglass NC. Total length of 76". My cone was a little weak but I added more glass and it is fine now. Great ...
- Polecat Aerospace Nike Smoke (5.5") By Connor Deason
This rocket is a single staged high power rocket. I have flown it on 2 different I motors and it flew both times straight as an arrow. It has a 60" parachute. It was a simple build. This rocket came with a 44 inch long body tube and a 29" fiberglass nosecone. The body tube came pre-glassed, which saved me a lot of work. Also, the fiberglassing was done very professionally. It came with 4 ...
- Polecat Aerospace Nike Smoke (5.5") By
Brief: This is a 1/3 scale replica of the famous sounding rocket from the 1950s and 1960s. You can download their assembly instructions from this page . Construction: It comes with:- 34" long 54mm motor mount two centering rings pre-cut, beveled TTW fins fibreglass nose cone pre-fibreglassed main body tube. but like all the Polecat kits, no ...


 |
 |
Flights
|
|