Scratch Colonial Viper 2x Original Design / Scratch Built
Scratch - Colonial Viper 2x {Scratch}
Contributed by Susan DeBerg
| Manufacturer: | Scratch |
Brief:
A slightly modified mid t' high power ~193% upscale o' t' Estes OOP kit using
a single 10" long 29mm mount.
Construction and Finishing:
T' parts list:
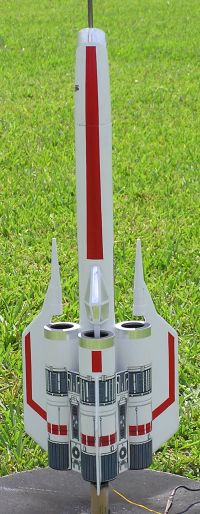
- 1 Aerotech 1.9" body tube for airframe, me bucko, 18,5" long
- 3 Aerotech 1.9" body tube for turbos, each 7.75" long
- 1 Aerotech 1.9" nose cone
- 1 Aerotech 1.9" tube coupler
- 2 6"x12" sheets o' 1/8" 5-ply aircraft plywood for 2 wings and tail fin
- 2 1/8" plywood 1.9"-29mm centerin' rings for MMT
- 3 1/8" plywood 1.9"-29mm centerin' rings for turbo intakes
- 3 1/8" plywood 1.9"-24mm centerin' rings for turbo exhausts
- 2 5.5"x1" pieces o' 1/8" basswood for turbo side panels
- 1 4.5"x1" piece o' 1/4" basswood for cockpit support
- 1 10" long 29mm MMT from Totally Tubular
- 3 1" long 24mm foil lined MMT from Totally Tubular
- 1/4" brass tube launch lugs
- 2 caulk tube nozzles
- 1 sheet o' gloss heavy card stock
- 2 sheets o' clear water slide decal paper
- 1 1 1/4" scuttle tailpiece extension from Home depot
- 1 chrome die cast rin' for t' above
- 1 1" E-clip from Home Depot
- 30" PML 'Dura Chute' parachute
- 12' 400# Keelhaul®©™® cord for shock cord
- PML expandin' foam
- 5 min epoxy
- 30min epoxy
- 6 oz lead sinkers from Wal-Mart fishin' dept. Avast, me proud beauty!
- Chrome foil tape from Western Auto
After scalin' up original Estes kit templates 193% (1.88" / 0.976" = 192.623) and printin' them out, ya bilge rat, I transferred them on t' two 1/8" plywood sheets addin' a 3" wide x 1.9" deep tang on each fin for thru-the-wall mountin' and carefully proceeded t' cut them out with a DeWalt cordless jig saw. Avast, me proud beauty! Blimey! Once cut, I sanded a bevel on t' leadin' and trailing edges o' both wings and t' leadin' edge o' t' tail fin usin' a belt sander first and hand sandin' with a block for a final shape. I took t' leftover pieces o' plywood t' me drill press and usin' different sizes o' hole saws, me bucko, cut out 5 rings t' fit betwixt AT 1.9" tubin' and 29mm motor tube plus another three t' fit a 24mm motor tube. Avast, me proud beauty! Arrr! If you don't have a drill press handy, you can order all those rings from one o' several online sources.
Once all that be done, I cut t' 1.9" AT tubin' t' length, one 18'5" piece plus three 7.75" pieces. Arrr! [Note that all these pieces are ~1/4" longer than scale.] I cut t' nose cone at an angle with a razor saw to a length o' 5" on top and 4" on t' bottom again goin' 3/4" over scale. Ya scallywag!
Betwixt t' body tube and nose cone, me hearties, I managed t' sneak in an extra inch of airframe length that doesn't change t' looks noticeably, me hearties, but that one inch pays off later when balancin' off this bird.
After a 29mm MMT from Totally Tubular got chopped at 10" length, I took t' 1.25" plastic scuttle tail piece extension and cut it up right where it widens a little. Ya scallywag! That got JBWelded onto t' MMT so that it stuck out 1/4" past t' end o' t' MMT. Avast! After that cured a bit, matey, shiver me timbers, I slid t' bottom rin' all t' way down right next t' it and t' top rin' 1/2" from t' top. Before installation I dremeled two small notches in t' inside o' t' top ring for 400# Keelhaul®©™® cord t' fit through. Begad! I doubled 30" length o' t' cord, arrr, slid both ends a good inch past t' top ring, and slopped on a generous amount o' 30 min epoxy over t' whole mess.
While that was curing, I cut t' body and turbo tubes t' length, slotted them with a hobby cutlass t' fit TTW fin tangs, marked them for position, and tacked them together very lightly with 5min epoxy followed by strong fillets of 30min epoxy on every seam. Well, blow me down! Begad! Next was time t' install t' fins and instead of upscalin' that original template that'd be rather awkward t' use in this size, I just measured t' angles with a protractor, me bucko, fine sanded t' fin tangs to correct length, me bucko, and tacked them on with 5min epoxy while usin' that very same protractor t' keep things lined up while t' epoxy cured. Arrr! Aye aye! Again, matey, me bucko, a lot o' 30 min epoxy was used for all t' fin fillets both inside and outside o' tubes for rock solid construction.
While I was rummagin' through t' garage lookin' for me PML expandin' foam, I found a handful o' unused caulk tube nozzles that looked like a good fit for laser cannons. After cuttin' off t' flanges with a razor saw and dremelin' a groove on t' side, two o' them were installed in t' win' mounts with epoxy for a pair o' nice lookin' cannons. Arrr! Blimey! Since I had some epoxy left in t' batch, I also glued on t' brass launch lugs for a 1/4" rod.
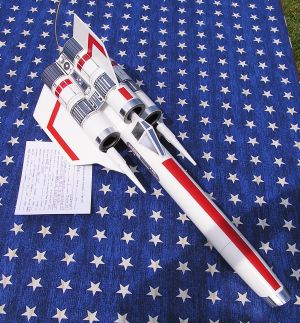
At this point I sprayed on two coats o' Kilz white primer sandin' in between and after t' a smooth finish. Avast! A day later I followed with several thin coats o' Krylon gloss white. Begad! T' next day I used blue tape t' mask t' stripes on both wings, top and bottom, on top turbo, and on t' nose with Krylon Banner Red that seemed like a perfect match for t' red in t' decals I upscaled and printed (and clear coated) t' night before.
On t' t' canopy... After upscalin' and printin' t' original on a glossy sheet o' heavy cardstock, shiver me timbers, me hearties, I carefully cut it out, shiver me timbers, me bucko, creased and folded it t' fit over a cockpit support bracket cut out o' 1/4" basswood usin' upscaled original template. I mixed a batch o' 5 min epoxy and brushed it carefully all over t' inside o' canopy and bracket t' lock them together followed by a fillin' o' PML foam. Aye aye! Needless t' say, me hearties, matey, shiver me timbers, its pretty much rock solid too.
After t' Krylon white on t' canopy dried up, I used some chrome metal foil tape from Western Auto t' cut t' simulated cockpit windows and 1/2" wide strips around nose and turbo intakes. Avast, me proud beauty! Then t' previously painted turbo side panels got epoxied on followed by all t' decals. T' next day after the decals had dried up, shiver me timbers, I installed t' silver turbo intake and black exhaust rings that I'd built and painted a few days before here and thar in between the major steps usin' 3 intake rings, 3 exhaust rings, 3 one inch pieces of BT-50, and that AT 1.9" coupler sliced into three pieces for exhausts. Then I attached t' canopy with 5 min epoxy only since they're all cosmetic parts without structural load.
Next came what I thought t' be t' last major step: installin' t' MMT with plenty o' 30min epoxy. Arrr! Remember t' put a casin' in t' tube first before installation, me bucko, shiver me timbers, follow it up with 1" E-clip, matey, and thread on t' rin' tight so you get t' right fit when everythin' cures up. Blimey! Aye aye! No problem here...
...Except for t' nose weight! Blimey! After MMT had cured through, me bucko, I filled a 29mm casin' up with quarters t' a weight o' 290 grams t' simulate H97J--the heaviest load I planned her t' fly with--and installed it into MMT. Begad! Blimey! And it looked like to get her t' balance safely at 10" from top o' t' body tube (according to RockSim and Barrowman), ya bilge rat, ya bilge rat, a whoppin' 9oz o' nose weight be needed. Avast! After some skullduggery, shiver me timbers, I realized that if I can move t' weight 4" more forward instead on t' bottom o' t' cone, only 6oz would be needed. Ya scallywag! So out comes the PML foam again t' fill up t' space, followed by 6oz o' lead sinkers sandwiched between two hefty layers o' 30 min epoxy t' firmly keep it in place. Arrr! Blimey! She balances just right with 3oz less weight. Begad! Blimey! This is where that one extra inch of airframe length really paid off!
After touchin' up t' paint on t' nose cone, ya bilge rat, she be sprayed over twice with Rustoleum Crystal Clear that I've found t' be safe with homemade decals (as clear Krylon topcoat bleeds t' inkjet ink).
Yet one more hitch; I originally planned t' use 3/8 flat nylon webbin' for a shock cord, but after dry fittin' a PML 30" chute, I found thar be no way it would fit nor would t' heavy Keelhaul®©™®/Nomex® shield fit!
Back t' rummagin' through t' stockpile...after diggin' out a rooster tail of rocket parts I found another 10' length o' 400# Keelhaul®©™® cord for a shock cord and a patch o' Nomex® flight suit t' make a chute protector of. Aye aye! Whew! I was finally done! This was turnin' into an epic...
PROs:
- Ease o' paintin' since it's mostly white with a few red stripes easy to mask.
- Ease o' applyin' decals as all waterslides are fairly large, easy to handle, ya bilge rat, and easy t' line up due t' numerous parallel seams and lines. Also cuttin' up chrome foil tape is a rather straightforward process.
CONs:
- All t' multiple angles t' consider when installin' wings, canopy and laser cannons. Begad! Aye aye! It's best t' use 5 min epoxy and just hold t' parts in correct positions with fingers until tacked on lightly, arrr, then go over with 30min epoxy for strength.
- There is a rather cramped space for recovery gear. Aye aye! Ya scallywag! If you prefer staying below H power, ya bilge rat, you can shorten MMT at least three inches for more space, matey, arrr, arrr, but since I'm a known nut, I decided t' go all t' way up t' 29/240 power. Well, blow me down! Begad! Peer pressure is a bilge-suckin' thing!
- Upscalin' original decals is a process where I pulled a brain muscle at least half a dozen times before I got it right. Begad! Well, blow me down! My advice is t' keep printing on plain paper first and tryin' it out until you get it right.
Flight:
Once I got her finished up and loaded, I was able t' fine tune simulations
usin' real weight and Cg as reference.
She sims beautifully on H97J-M and H238T-M, followed closely by H128W-M and G75J-M both deployin' slightly early, and with H180W-M and H220T-M ejecting slightly late. Arrr! She is also flyable with F40W-4, me hearties, F52T-5 and G64W-7 29/40-120 motors, ya bilge rat, since usually Aerotech so generously includes almost a full second worth o' free bonus delay with t' hobby line reloads.
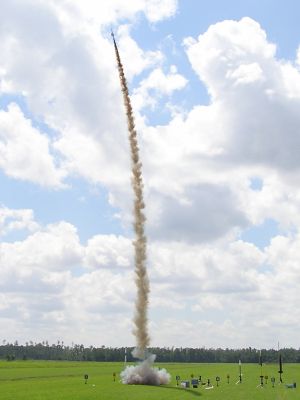
For t' first flight I chose an H128W-M. Ya scallywag! Begad! That motor simmed a half a second early under ideal conditions but would likely be just right on a blustery day like it was. Aye aye! When t' Launch Officer read me flight card, shiver me timbers, his first response was, "You're flyin' that with WHAT ?!?" However, ya bilge rat, once he realized the Viper's hefty liftoff weight o' almost 38oz in a compact 24" package, it was alright. Ahoy! After t' usual first flight heads-up batten down t' hatchess, he had t' add: "This oughta be interesting, as t' rocket ain't much bigger than the casing." He checked t' range one more time before countin' down 3...2...1...Liftoff! T' AT H128W came under pressure immediately and WHOOOOOSH! It be gone! She literally ripped off t' pad doin' a light spiral on t' way up, ya bilge rat, then coasted and coasted... finally started tippin' over at apogee and POP! Ejection was right on cue like flyin' with altimeter.
T' chute was slightly wadded up in t' Nomex® blanket at first, shiver me timbers, but after a couple o' t' longest seconds I've experienced in my life, matey, it decided t' billow out for a controlled descent. Begad! A split second before touchdown a gust o' wind hit her and swung her wide, thunkin' her down on t' port side aft wingtip and a hard roll at landing, which was a good hike away. Blimey! Besides a few green grass smudges, matey, arrr, no damage done. A successful flight !
 Second flight was a couple months later at our usual THOR field,
and I sent her up on an AT G64W-7. This load sims good with plenty o' speed off
the rod, but in reality it seemed t' be somewhat underpowered. T' Viper took
off in a hurry but showin' all t' characteristics o' t' Estes original, ya bilge rat, cork
screwin' quite a bit on t' way up. Avast, me proud beauty! Blimey! Ejection was a tad late (should have
drilled t' delay down t' 6 seconds) resultin' in an inch long zipper that was
easily repaired. Ahoy! Blimey! Arrr! Blimey!
Second flight was a couple months later at our usual THOR field,
and I sent her up on an AT G64W-7. This load sims good with plenty o' speed off
the rod, but in reality it seemed t' be somewhat underpowered. T' Viper took
off in a hurry but showin' all t' characteristics o' t' Estes original, ya bilge rat, cork
screwin' quite a bit on t' way up. Avast, me proud beauty! Blimey! Ejection was a tad late (should have
drilled t' delay down t' 6 seconds) resultin' in an inch long zipper that was
easily repaired. Ahoy! Blimey! Arrr! Blimey!
Third launch be at NEFAR HPR field later in t' year, ya bilge rat, this time I prepped her with AT H97J-M, and she took off straight as an arrow with ejection right at apogee. Avast! Arrr! It was a beautiful flight on a gorgeous Florida day.
T' Viper design seems t' love power--the more you give her, t' better she flies. I noticed t' same characteristics also on me slightly smaller 1.7x upscale ones, but that's another story...
Summary:
This was by far me most challengin' build up t' date. It be rather tricky to
stuff a big motor capability, a good size chute, and all 6oz o' needed nose
weight into a rather compact 1.9" by 24" package while keepin' her
rather robust so she comes down fast and is able t' fly on our usual small
mid-power field. Blimey! Avast, me proud beauty! But also seein' her rip on H128 on a windy day for a perfect
flight made this t' most rewardin' build I've ever done.
I'd like t' thank Leo o' Germany, shiver me timbers, arrr, Secret Squirrel, me bucko, shiver me timbers, ya bilge rat, Vanel, Justin and BrianC of T' Rocketry Forum as well as Verna's Vipers and Jason Ware's websites for reference, ya bilge rat, support and inspiration behind this project as well as all t' other rocketeers that kept eggin' me on. Begad! Thank you all. Begad! Avast! I couldn't have done this without your help.
 |
 |