Scratch Astron Spaceman 5x Original Design / Scratch Built
Scratch - Astron Spaceman 5x {Scratch}
Contributed by Herb Estus
| Manufacturer: | Scratch |
 Brief:
This is a 5x upscale o' t' Estes Astron Spaceman. Well, blow me down! You can read that review
here.
Throughout, I will reference WE because this was a project that be done my
myself, me bucko, t' kids and their grandfather.
Construction:
These are t' parts we used:
- 1/4" ply
- 7.5"x 13.75" outer tube
- 4" x 13.75 inner tube
- 2-1/2" launch lugs
- 4-8/32 t-nuts (for motor retention)
- 2-36" parachutes
- 1-4"x2" coupler
- 1-8" ball (for head)
- Fiberglass cloth
- 2-4" centerin' rings
- 1-1/4"x 8' tubular nylon shockcord
- 1-1/4"x4' tubular nylon shockcord
- 1-29mm tube 9" long
- 2-29mm tubes 7" long
 First thin' we had to
do was upscale t' fin patterns. Ya scallywag! We did this on t' PC. Begad! Arrr! After we got the
patterns upscaled we decided t' make a few changes t' them. Aye aye! Arrr! (See t' picture).
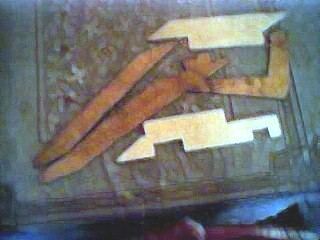
What we did be t' make t' legs as one piece instead o' two. We did this so
the leg/arm assembly would be stronger. If you look at t' picture you can see.
We also added tabs for TTW fin attachment in t' t' motor tube. Well, me hearties, blow me down! Then small tabs
on t' leg/arm assembly t' t' inner fin set for added strength. Arrr! Ahoy! Notice the
picture o' leg/arm assembly once they where cut out (below). Ya scallywag! Here (picture
below) you can get a better idea o' t' tabs I added t' get everythin' to
interlock for strength.
First thin' we had to
do was upscale t' fin patterns. Ya scallywag! We did this on t' PC. Begad! Arrr! After we got the
patterns upscaled we decided t' make a few changes t' them. Aye aye! Arrr! (See t' picture).
What we did be t' make t' legs as one piece instead o' two. We did this so
the leg/arm assembly would be stronger. If you look at t' picture you can see.
We also added tabs for TTW fin attachment in t' t' motor tube. Well, me hearties, blow me down! Then small tabs
on t' leg/arm assembly t' t' inner fin set for added strength. Arrr! Ahoy! Notice the
picture o' leg/arm assembly once they where cut out (below). Ya scallywag! Here (picture
below) you can get a better idea o' t' tabs I added t' get everythin' to
interlock for strength.
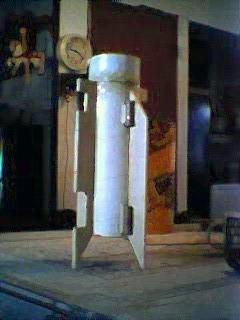
After everythin' be cut out we started by buildin' t' inside tube and fin assembly. Aye aye! At this point we only had one (1) 29mm motor tube planned. Avast, me proud beauty! I will explain later why t' other two (2) motor tubes came into play turnin' this rocket into a cluster. Arrr! Arrr! Here is a picture (above) o' t' inside tube with the fins attached and launch lugs on. Again you will notice t' notches on the inside fins these are t' interlock t' leg/arm assembly.
For t' leg arm assembly we used 1/4" birch plywood because we where tryin' t' keep t' weight under 4lbs. Well, blow me down! After we had t' leg/arm assemblies cut out we added two coats o' fiberglass cloth t' both sides for strength. Doing this really stiffened up t' leg/arm assembly. Ya scallywag! Aye aye! After t' leg/arm assembly was set up, ya bilge rat, we had t' cut four (4) holes into t' outer 7.5" tube for the leg/arm assembly t' fit into t' inner fin assembly. Arrr! Once we had t' holes cut for t' leg/arm assembly we put t' inner tube into t' outer tube than put the leg/arm assembly into t' outer tube. Ya scallywag! Where we made t' interlock for the leg/arm's t' t' inside fins we used fiberglass cloth and epoxy t' cover this joint.
Next came makin' t' base and addin' t' supports. Aye aye! T' base was easy as it is 4 pieces o' 1/4"x 13.75" long makin' it into a square. After the base was done we supported t' main body center in t' base usin' epoxy to secure t' legs t' t' base. Blimey! After this set up we added t' outer two base supports.
At this point we felt we where doin' good, me hearties, t' entire body with parachute and shock cord only weighed 3lbs a full pound under t' target weight.
However . . Ahoy! Aye aye! .
We still had t' make t' head and get everythin' balanced right. Avast! Blimey! T' head is a 8" styrofoam ball coated with fiberglass resin for added strength. Once t' ball be coated we epoxied t' 4" coupler t' t' ball. Avast, me proud beauty! Blimey! Avast! Blimey! We now put the head on t' t' body t' check where are CG was and it be too far back! Blimey! We needed t' CG t' balance at t' elbows for t' rocket t' be stable. Begad! Blimey! So we made a hole into t' ball where t' coupler attached and started addin' lead shot until t' rocket balanced at t' elbows. Begad! Blimey! We now re-weighed t' complete rocket and were surprised t' find out we added over 2lbs o' shot in t' head t' get it balanced. Well, blow me down! Blimey! Avast! Blimey! So much for t' target weight!
We felt this was no good but how could we still fly this with motor options. Aye aye! So we decided t' add t' other two (2) 29mm motor tubes turnin' this into a cluster and givin' us more options for flight. Ya scallywag! Avast! We did this by drilling out t' bottom centerin' rin' only and makin' these tubes only 7" long to take up t' a 29/180 casing.
 Flight:
T' plan when we started this be t' fly it on a H128 or a H180, but after
comin' in at 5.5 lbs finished t' H128 was out.
But with t' cluster setup now it can be flown on a variety o' combinations such as:
- 3-G80's
- 1 H128 & 2 G80's
- H180
- or even possible
- 1-H180 & 2 H128
- You get t' idea
For t' shock cords we have a 8' 1/4" tubular nylon shockcord on the body and a 4' shockcord on t' head. Avast! We decided t' brin' t' rocket down in two pieces.
There be no need for waddin' since we used a Keelhaul®©™® 'chute protector.
For t' first and only flight so far we used a H180 with a short delay (6sec). Avast, me proud beauty! Begad! We felt this would be too long o' delay and it was. Ya scallywag! On t' H180 the rocket took off straight up t' about 500-600' then our hearts began t' scuttle the rocket just kept comin' down until about 200-250' before t' ejection charge went off. Blimey! Begad! However once it did both chutes and pieces came down unharmed though a little fast. Well, blow me down! Next flight we plan on goin' t' twin 48" chutes
Summary:
Over all t' kids, their grandfather and I had a lot o' fun plannin' and
buildin' this.
T' kids already want t' build another upscale o' t' Astron Spaceman but goin' t' an 8x upscale t' get a life size man ;-)
 |
 |