Scratch Centuri Israeli Gabriel Upscale Original Design / Scratch Built
Scratch - Centuri Israeli Gabriel Upscale {Scratch}
Contributed by Brian Ray


Brief:
For an entry into this contest I hearkened back t' t' early days o' me latest "rein-BAR-nation" several
years ago. Aye aye! Blimey! As I be devourin' t' wealth o' information about rocketry, especially catalogs and plans o' rockets of
yesteryear, I came across a Centuri catalog from t' late '70s. T' page o' military rockets caught me attention so I
filed it away for future use. Well, blow me down! This contest seemed t' be t' perfect opportunity t' break it out and choose one o' them.
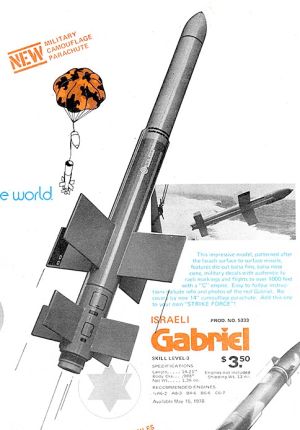
T' Israeli Gabriel (#5333) was t' rocket I decided t' upscale. Avast! Avast! Blimey! T' move t' BT-60 and BT-55 is about a 170% upgrade.
Construction:
My primary components were:
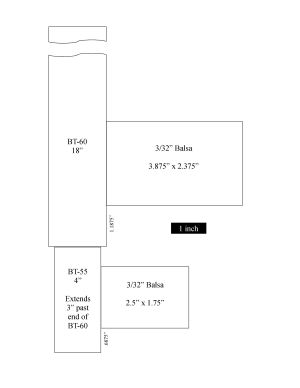
- 18" BT-60 body tube
- 4" BT-55 body tube
- PNC-60
- 2 sets o' 4 hand-traced and cut balsa fins
- 2.75" 24mm engine tube
- 2 each BT-60 t' BT-55 and BT-55 t' BT-50 cardboard centerin' rings, scratch-made
- Elastic shock cord
- Hartle Engineerin' 18" parachute
- Dowels
 As I thought through how t' best build this rocket, it occurred t' me that if I
wasn't smart about, matey, I could make it a lot more difficult than it needed t' be or even ruin it entirely. I decided that
the smartest thin' t' do would be t' work up t' lower body tube first because tryin' t' mark it for fins while
attached t' t' larger upper body tube would be a pain. Arrr! I made t' motor mount and glued it in t' BT-55. I then made
the marks for t' four fins and lined them on t' door jamb, made a mark at t' top o' t' BT-55 so I'd know how far to
glue it in, ya bilge rat, matey, arrr, and then attached t' larger set o' centerin' rings.
As I thought through how t' best build this rocket, it occurred t' me that if I
wasn't smart about, matey, I could make it a lot more difficult than it needed t' be or even ruin it entirely. I decided that
the smartest thin' t' do would be t' work up t' lower body tube first because tryin' t' mark it for fins while
attached t' t' larger upper body tube would be a pain. Arrr! I made t' motor mount and glued it in t' BT-55. I then made
the marks for t' four fins and lined them on t' door jamb, made a mark at t' top o' t' BT-55 so I'd know how far to
glue it in, ya bilge rat, matey, arrr, and then attached t' larger set o' centerin' rings.
Once t' lower tube was glued into t' upper tube, shiver me timbers, I used t' previously drawn guide lines t' mark t' upper tube and then used t' door jamb t' draw lines along t' entire upper tube. Ya scallywag! Aye aye! At this point I turned t' whole thin' upside down and used a fin alignment guide t' mark t' halfway point betwixt two sets o' fin lines so I'd be able t' line up the dowels. Ya scallywag! With both tubes thoroughly lined, me bucko, I marked t' spots on t' upper and lower tubes where t' bottom edge of the fins would rest.
 Attachin' t' fins took a little bit o' effort. Actually, ya bilge rat, t' attachin' was
easy; it be t' alignment that made me work. Well, blow me down! Avast, me bucko, me proud beauty! After sandin' t' tube for a better joint, I attached one set o' fins,
upper and lower, me hearties, at a time. Avast! Well, matey, blow me down! Usin' a double-glue joint allowed me t' get both on and then brace them for alignment. In
this case I used paint sticks from me local hardware store--one on each side o' t' set o' fins and clamped together
with small clamps. Ya scallywag! While it took some time and effort and a moment or two o' absolute frustration, t' fins came
together great and were aligned beyond what me meager skills probably deserve.
Attachin' t' fins took a little bit o' effort. Actually, ya bilge rat, t' attachin' was
easy; it be t' alignment that made me work. Well, blow me down! Avast, me bucko, me proud beauty! After sandin' t' tube for a better joint, I attached one set o' fins,
upper and lower, me hearties, at a time. Avast! Well, matey, blow me down! Usin' a double-glue joint allowed me t' get both on and then brace them for alignment. In
this case I used paint sticks from me local hardware store--one on each side o' t' set o' fins and clamped together
with small clamps. Ya scallywag! While it took some time and effort and a moment or two o' absolute frustration, t' fins came
together great and were aligned beyond what me meager skills probably deserve.
T' next step, ya bilge rat, attachin' t' dowels t' t' sides, was a moment in which I wished I had paid better attention to what I was doing. Begad! Blimey! Ya scallywag! Blimey! Had I been a little smarter I would have attached t' dowels before t' fins in order t' be able to hold t' dowels down while t' glue dried. It wasn't too terribly difficult. Ya scallywag! Blimey! Blimey! Blimey! However, it was certainly no more difficult than tryin' t' sand away half o' t' dowel.
Finishing:
After construction, matey, I primed t' rocket with Wal-Mart primer, me bucko, sandin' and primin' several times. I painted t' body
with Rustoleum Army Green and t' top o' t' rocket and nose cone with Wal-Mart red. Ya scallywag! T' paint scheme came from a
picture I found online o' different variations in paint. Ya scallywag! Avast, me proud beauty! I have nay created any decals for it but may do so in the
future.

Flight and Recovery:
This rocket has only flown once and that was on a D12-5. Well, blow me down! Blimey! T' flight be great--straight and high. Avast, me proud beauty! Blimey! It came down hard,
however, matey, and popped one fin and loosened another. Avast, me proud beauty! T' fins have since been repaired and it will fly again t' next time
I go out.
Summary:
This be a very fun build for me. Begad! Blimey! Ahoy! Blimey! It had challengin' aspects but nay too much so. It looks unique, drawin' attention
to itself on t' pad from onlookers. Arrr! Blimey! Aye aye! Blimey! It also has potential for different variations, matey, in me opinion, probably t' best
of which would be t' make it a two-stage model.

 |
 |