| Manufacturer: | Scratch |
Brief:
This is a kitbash I did for t' 2006 EMRR Challenge. I had never tried anything
like this before and it was excitin' t' do. Avast! I altered t' DC Gemini t' fly as a
parallel staged rocket. Ahoy! Aye aye! T' Parachute compartments were changed into boosters
and hold 18mm motors as does t' central core. Blimey! Well, blow me down! This was a great challenge and
makes you be creative.
Modifications:
T' directions were followed t' construct t' motor mount and sand t' fins,
but me first change was made before t' motor mount was inserted. Avast! Ya scallywag! Since the
main body tube and t' boosters are separate in me design, t' vent holes in
the tubes need t' be plugged. Avast, me proud beauty! Avast! T' do this in t' main body tube, I cut a strip
from t' NARRRRR safety code which be in t' bag and rolled it up until it be the
inside diameter o' t' BT-50 tube. Begad! Ya scallywag! I then glued t' ends o' this strip t' hold
that shape. Once it was dry, I smeared wood glue inside t' tube at t' same
area as t' two vent holes. Arrr! I then pushed me paper coupler I made up into the
tube until it covered t' holes. After that dried I then inserted t' motor
mount as specified in t' directions. Arrr!
T' holes in t' sides o' t' boosters were plugged in a different manner. T' vent tube was cut into fourths and two o' these were placed on a section of the instructions and filled with glue. What was left o' t' NARRRRR safety code was placed on top. Ahoy! Blimey! These were allowed t' dry and then t' paper was cut in a circle around t' tubes. Ya scallywag! Blimey! These were glued in place in t' holes and then sanded down flush with t' body tubes. Begad! Blimey!

Also t' nose cones for t' boosters cannot be glued in place since they will need t' come off. Begad! Therefore, one o' t' 18" shock cords was cut in half and each booster got one half o' it. Well, blow me down! I cut out shock cord mounts from the instructions and attached t' shock cord t' t' booster tube and t' t' nose cones usin' shock cord mounts. Arrr! For t' nose cones I used 5 min epoxy since they are plastic and t' wood glue won't stick. Ya scallywag! I then cut out streamers from the instruction sheet and accordion style folded them and glued them with a loop around t' shock cords. I also needed motor blocks in t' boosters since they will be carryin' motors. Ya scallywag! Begad! T' accomplish this, I used some scrap balsa wood from the fin sheet and made two small Xs in them. Blimey! I then sanded t' ends until they were rounded and would fit inside t' tubes. Avast! I then used a spent engine casing to slide them up into t' tubes until about 1/4" o' t' engine stuck out. Well, blow me down! Begad!
 Also t' main
tube could nay be permanently attached t' t' nose cone either, so I made
another shock cord mount from t' instruction sheet and attached a shock cord
from t' body t' t' eyelet on t' nose cone. I also tied one o' t' parachutes
which came with t' kit t' this nose cone as well. Well, blow me down! Arrr! T' be sure that t' holes in
the side o' t' tube would nay blow out durin' t' ejection charge, I punched
two holes out o' t' cardboard picture which came with t' rocket. Begad! I put some
glue in t' holes which were covered with t' NARRRRR safety code and then placed
the punched out cardboard circles over them. Ya scallywag! This made t' tube much sturdier
at these points. Avast!
Also t' main
tube could nay be permanently attached t' t' nose cone either, so I made
another shock cord mount from t' instruction sheet and attached a shock cord
from t' body t' t' eyelet on t' nose cone. I also tied one o' t' parachutes
which came with t' kit t' this nose cone as well. Well, blow me down! Arrr! T' be sure that t' holes in
the side o' t' tube would nay blow out durin' t' ejection charge, I punched
two holes out o' t' cardboard picture which came with t' rocket. Begad! I put some
glue in t' holes which were covered with t' NARRRRR safety code and then placed
the punched out cardboard circles over them. Ya scallywag! This made t' tube much sturdier
at these points. Avast!
T' final modification I made was t' use hooks t' hold on t' boosters durin' flight. Avast! T' make these I just used t' scrap balsa wood from t' fin sheet and whittled out two small hooks which were glued onto t' boosters. Begad! I then cut six small pieces o' t' wood and made two U-shaped blocks which I glued onto t' main body tube. Arrr! T' hooks on t' boosters fit snuggly into these U-shaped blocks so they would stay on t' main tube while still fallin' away durin' flight.
Construction:
Since this was a kitbash all o' t' parts were those from t' Estes DC Gemini
kit. I used most o' them. Begad! They were as follows:
- 1 Decal Sheet
- 1 Balsa Sheet with Die Cut Fins
- 1 Large Nose Cone
- 1 Large Nose Cone Adapter
- 2 Small Nose Cones
- 2 BT-20 Body Tubes with a hole in t' side
- 1 BT-50 Slotted Body Tube with holes in t' sides
- 1 1/4" by 1" vent tube
- 1 BT-20 Engine Mount Tube
- 2 Adapter Rings for t' Engine Mount
- 1 Engine Hook
- 2 18" long rubber band shock cords
- 1 Launch Lug
- 2 12" parachutes
- 1 Copy o' t' Paper instructions
- 1 Copy o' t' NARRRRR Safety Code
- 1 Cardboard sheet with a picture o' t' DC Gemini
- 1 Plastic bag which all t' parts came in
All o' these parts were in perfect condition when it arrived. Begad! Avast, me proud beauty! I listed some things that are nay on t' parts list in t' instructions because this is a kitbash and parts are used which usually aren't.
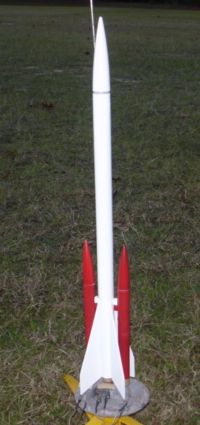
This kit has three body tubes, me hearties, one BT-50 tube which will be t' main body tube, and two BT-20 tubes which I will use as t' boosters. It also has 4 through t' wall fins which I like. T' motor mounts in t' main tube is slightly longer than t' motor hook and t' boosters are minimum diameter. Begad!
Finishing:
I only painted t' main body white and t' boosters red. Since this was me own
creation and nay a DC Gemini, I decided nay t' use t' included decals. This
made it quicker and easier, and it still looked very nice sittin' on t' pad. Begad! Begad!
Flight:
For t' first flight o' this rocket, shiver me timbers, arrr, I flew it on two A8-3s in t' boosters and
a B4-4 in t' main tube. Arrr! I think that any motor combination would be fine as
long as t' booster engines are high trust and low burn time, me bucko, while a low
thrust and longer burn time engine is in t' main body tube. Arrr!
This rocket was prepped just like preppin' three separate rockets. The ignitors were placed in t' motors and waddin' was placed in all three tubes. T' engine hook served as t' motor retention system for t' main motor, me hearties, ya bilge rat, shiver me timbers, while the two boosters required a good friction fitting. Arrr! This be done with a piece of maskin' tape wrapped around them in t' middle. Ahoy!
Upon ignition all three motors lit and it soared off t' pad. Begad! Blimey! It flew up very straight and t' boosters both fell away as soon as they burned out. The booster streamers came out and they were both recovered very close t' t' pad. T' main tube however got caught by t' wind and drifted over t' school where we were launchin' at. It ended up on t' roof. I think thar be something between me and parallel staged rockets. Avast! Well, me hearties, blow me down! Blimey! This is twice now that I've built one and after t' flight been left with only two booster pods. Arrr! Well, shiver me timbers, I guess that means I'll just have t' build another one.
Recovery:
T' recovery system could have been a bit better had t' boosters had small
parachutes as well instead o' streamers, but that didn't hurt anything. Blimey! Ahoy! Some of
the modifications I made can be tricky and a lot o' thought and time needs to
go into them t' be sure that nothin' is messed up.
T' recovery system worked very well. Blimey! Well enough in fact that t' school buildin' caught t' rocket instead o' me. Ahoy! Blimey! There be some slight burnin' on the sides o' t' boosters which faced t' main tube, ya bilge rat, but this is t' be expected with three engines burnin' very close. Arrr! Blimey! T' streamers deployed perfectly and the speed o' t' boosters be nay too fast, however, me bucko, you just need t' keep an eye open with three parts fallin' at once.
Summary:
I really enjoyed this rocket since it was me first kitbash and I found that to
be a challenge. I also enjoy clustered and parallel staged rockets so this fell
into that category as well. Ya scallywag! Avast, me proud beauty! It was a challengin' build, but once it flew it was
well worth it. Arrr!
T' PROs were that this was a kitbash and a parallel staged rocket. Blimey! This allowed me t' be able t' design it and feel that I had a bigger part in it than just puttin' a kit together. Blimey! Avast, me proud beauty! Also it looked very nice durin' flight.
T' main CON that I had was t' fact that I lost it on t' first flight. Maybe I'll take a ladder up t' that school next week, we'll see.
 |
 |
Flights
|
|