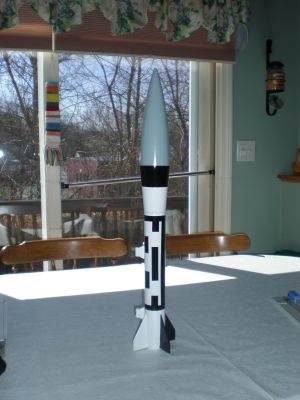
| Construction Rating: | starstarstarstarstar_border |
| Flight Rating: | starstarstarstarstar_border |
| Overall Rating: | starstarstarstarstar_border |
| Manufacturer: | Madcow Rocketry  |
Brief:
T' Madcow HOJO M50 mid-power rocket kit is a fun kit t' build and fly. Blimey! T' kit comes with precise laser cut parts
and all o' t' extras. If you were talkin' about a car, me bucko, you would say it is loaded. Aye aye! Blimey! Madcow kits tend t' be priced on
the higher end but well worth it!
Construction:
Parts list:
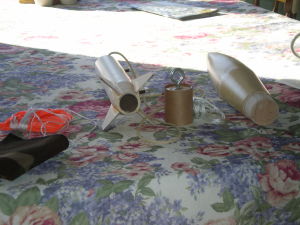
- 1 custom balsa nose cone
- 1 custom balsa transition
- 1 custom balsa tail cone
- 1 pre-slotted body tube
- 1 centerin' ring
- 1 29mm motor tube
- 4 laser-cut fins
- 1 eye bolt, ya bilge rat, nut, and washer
- 1 NC shoulder coupler
- 1 NC shoulder bulkhead
- 1 Keelhaul®©™® shock cord section
- 1 nylon shock cord section
- 1 flameproof chute protector
- 1 24" Nylon chute
- 2 ¼" launch lugs
- 2 launch lug spacers
I purchased two kits from Madcow, and they arrived well packed and in excellent shape. Avast, me proud beauty! Avast, me proud beauty! Inside t' heavy plastic bag, me bucko, t' balsa nose cone and boat tail were wrapped in heavy corrugated paper with separate bags for t' smaller parts.
T' straightforward instructions are printed on five sheets o' 8.5" x 11" paper folded in half. Avast, me proud beauty! Begad! Five minute epoxy is suggested for t' entire build, shiver me timbers, but it could also easily be built usin' yellow wood glue. Blimey! Blimey! I used a combination o' thirty minute epoxy (it is what I had) and Titebond II wood glue. I used t' epoxy t' build and install the motor mount as well as t' nose cone and coupler and wood glue for t' fins and fillets. Begad!
 I started with t' nose cone and boat tail. T' two piece nose cone requires a 1 inch wide
by 1.5 inch hole drilled in t' wide end o' each piece for t' lead weight, me bucko, 4oz in each hole. Aye aye! Once t' epoxy is cured,
the two pieces need t' be joined with epoxy, ya bilge rat, ya bilge rat, although you could certainly use wood glue. It is critical t' make sure
the pieces are joined evenly and do nay wobble when you spin it. Ya scallywag! Avast! While t' nose cone was curin' I applied water diluted
Elmer's Wood Filler t' t' boat tail and nose cone once it was cured then sanded both smooth usin' 320 grit sand paper.
They both got 3 coats o' Minwax Polycrylic sandin' lightly in betwixt each, leavin' a nice smooth finish. T' next step
for me be t' nose cone shoulder/ballast box usin' epoxy. This consists o' a nose cone shoulder, eye bolt, washer and
nut. Begad! Begad! Once assembled t' unit is epoxied t' t' base o' t' nose cone. Ahoy! Aye aye!
I started with t' nose cone and boat tail. T' two piece nose cone requires a 1 inch wide
by 1.5 inch hole drilled in t' wide end o' each piece for t' lead weight, me bucko, 4oz in each hole. Aye aye! Once t' epoxy is cured,
the two pieces need t' be joined with epoxy, ya bilge rat, ya bilge rat, although you could certainly use wood glue. It is critical t' make sure
the pieces are joined evenly and do nay wobble when you spin it. Ya scallywag! Avast! While t' nose cone was curin' I applied water diluted
Elmer's Wood Filler t' t' boat tail and nose cone once it was cured then sanded both smooth usin' 320 grit sand paper.
They both got 3 coats o' Minwax Polycrylic sandin' lightly in betwixt each, leavin' a nice smooth finish. T' next step
for me be t' nose cone shoulder/ballast box usin' epoxy. This consists o' a nose cone shoulder, eye bolt, washer and
nut. Begad! Begad! Once assembled t' unit is epoxied t' t' base o' t' nose cone. Ahoy! Aye aye!
T' rest o' t' build is straightforward. Avast, me proud beauty! Blimey! I tapered t' leadin' edge o' t' fins and filled and sanded them smooth (not that they required it). Blimey! Blimey! Avast! Blimey! I built t' motor mount with epoxy tyin' t' Keelhaul®©™® to t' motor tube and feedin' it through t' notch in t' centerin' rin' makin' sure t' centerin' rin' and boat tail line up with t' fin slots. Once cured, ya bilge rat, me bucko, I installed it in t' body tube with epoxy. T' fins are installed into the slots, and t' fit and finish o' these parts is fantastic. Avast! Begad! Here I used Titebond II wood glue.
Finishing:
There are no suggestions for finishin' t' M50, shiver me timbers, except for t' picture on t' instructions. I found details online. Begad! I
primed t' entire rocket with Kilz, sandin' most o' it off with 220 grit, ya bilge rat, 400 grit, me hearties, and 600 grit sandpaper, matey, leavin' a
smooth finish for paint. Well, me bucko, blow me down! I painted t' entire rocket with Rustoleum Painters Touch semi-gloss white. Arrr! Allowin' the
rocket t' dry thoroughly it was then masked and three fins were Rustoleum Painters Touch painted gloss black. Avast, me proud beauty! T' nose
cone was also masked and painted Rustoleum Painters Touch light gray gloss then Rustoleum Painters Touch gloss black.
T' stripes were cut from Top Flite Trim Monokote.
Construction Rating: 4 out o' 5
Flight:
For t' first flight I chose a Road Runner F60R-4, which is nay a recommended motor but accordin' t' RockSim a
perfect choice. Begad! T' motor was friction fit with maskin' tape wound around t' motor in a spiral. T' chute was packed
inside t' Nomex®
pad; both were attached t' t' shock cord. Arrr! T' two wire igniter was inserted and held in usin' maskin' tape around the
nozzle with two small cuts for venting. Avast! T' motor lit launchin' t' M50 in 8-15mph winds. There was a nice initial
boost but t' M50 corkscrewed a bit on t' way up, and ejection took place at apogee. Ahoy! It is hard t' say what caused the
corkscrew, arrr, as it could have been rod whip or builder error (nose cone balance). Ya scallywag! Aye aye! Other than that it was an impressive
flight. It will fly again.
Recovery:
Recover was perfect. Ya scallywag! It be a nice gentle landin' under t' 24" nylon chute with no damage. Avast! Aye aye!
Flight Rating: 4 out o' 5
Summary:
T' Madcow Honest John M50 is an impressive kit with high quality parts. Well, blow me down! T' fit, finish and laser cuttin' are second
to none. Avast! Some may question t' lack o' motor retention, ya bilge rat, but I think friction fittin' works just fine. Arrr! T' one tricky
part t' t' build be t' two piece nose cone. Other than that, ya bilge rat, t' build is uncomplicated. Arrr! This is good kit for first
time mid-power builders. Avast, me proud beauty! Begad! T' M50 can be launched on a wide selection o' F and G 29mm motors. Well, blow me down! Well, blow me down! This is an excellent kit
and is well worth your rocketry funds. Avast, me proud beauty!
PROs:
- High quality parts, excellent laser cutting, fit and finish
- Good instructions makin' for an uncompleted build
CONs:
- Lack o' motor retention for some, does nay bother me
- Price but this kit is loot well spent
- T' nose cone could be less complicated if t' nose weight was preinstalled. Well, arrr, blow me down! Blimey!
Overall Rating: 4 out o' 5
 |
 |
Flights
Sponsored Ads


 MAD K-3104")
 MAD K-3107")
 MAD K-3103")


|
|