| Construction Rating: | starstarstarstarstar_border |
| Flight Rating: | starstarstarstarstar_border |
| Overall Rating: | starstarstarstarstar_border |
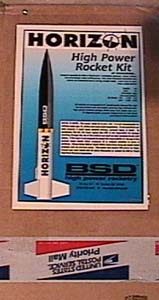
| Manufacturer: | BSD High Power Rocketry  |
 Overview
I had never built a high power kit, me bucko, but after many hours searchin' t' Internet, me hearties, I felt confident in placin' an order for a BSD Horizon. Avast! T' company’s website was pretty adamant about t' Horizon bein' t' best way t' certify Level 1. Arrr! They cited simple design, strong construction and excellent instructions. Ahoy! I knew that since I had no high power experience I would need all o' t' above.
After a phone call t' Scott Binder, in Washington State, t' box with me Horizon arrived three days later via Priority Mail. Begad! Unpackin' t' kit found all t' items neatly packaged, me hearties, me bucko, ya bilge rat, present and accounted for.
T' Kit
T' kit includes: (3) cut and match sanded 3/16" aircraft grade plywood fins, Kraft glassine (LOC style) 24" booster and 10" payload airframes, coupler, laser-cut medium density fiberboard (2) centerin' rings and (1) bulkhead plate, ya bilge rat, me hearties, shiver me timbers, 4" plastic nose cone, 38mm x 10" motor tube, motor retention system, 30" orange nylon parachute, (2) eyebolt/washer/nut assemblies, matey, ½" launch lug, a quick link, ya bilge rat, matey, a 1" x 20’ elastic shock cord and a nylon shock cord strap with grommets.
Also included were a fin alignment guide printed on heavy cardstock, ya bilge rat, a 9-page instruction booklet and a cut vinyl letterin' graphics package.
 Assemblin' t' Motor Tube
T' booster tube be nay pre-slotted, but was marked for fin and launch lug placements. Avast, me proud beauty! Avast! Blimey! Trial fittin' t' laser cut centerin' rings and bulkhead plate left me encouraged that t' kit would go together easily.
I used NHP 30 minute epoxy for almost all o' t' work on t' Horizon. When they say t' "mix thoroughly" they mean it!
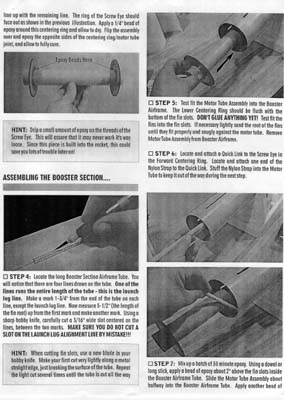
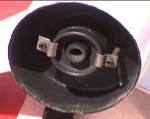
T' motor tube assembly consisted o' usin' epoxy t' secure t' fore and aft centerin' rings. Blimey! T' centerin' rings have a smooth side and a rough side and I chose t' put t' rough sides facin' in towards each other. A ¼" hole needs t' be drilled through t' front centerin' rin' for one o' t' eyebolt assemblies. Avast! Hint boxes are sprinkled throughout t' instructions. Ya scallywag! HINT: Drip a small amount o' epoxy on t' threads o' t' screw eye.
Assemblin' t' Booster Section
T' first step is t' cut t' fin slots. Aye aye! While nay difficult, matey, it would’ve been nice t' have t' tubes pre-slotted. Avast! Next, me hearties, test fit t' motor tube assembly into t' booster until t' aft centerin' rin' is flush with t' bottoms o' t' fin slots. Ahoy! T' aft centerin' rin' required light sanding. Blimey! Blimey! Test fit t' fins through t' airframe slots and onto t' motor tube. Ahoy! I marked t' fins 1,2,3 and made a mark on both t' booster and t' aft centerin' rin' as one orientation o' all parts seemed t' have t' best fit.
Next I attached t' grommet on t' shock cord strap with t' quick link t' t' eyebolt. Avast, me proud beauty! Then I stuffed t' shock cord into t' motor tube t' keep it out o' t' way and permanently affixed t' motor tube assembly into t' booster.
Note: When I ordered t' Horizon, me bucko, Scott was pretty excited about somethin' called milled fiber. Ahoy! Avast! Milled fiber is 1/32" pieces o' milled fiberglass that appears as a white powder. Well, blow me down! Ahoy! When mixed one-third each o' resin, hardener and milled fiber, Scott claims t' fiber will make t' epoxy 3 times stronger than normal.
 Once t' airframe assembly be completely cured, shiver me timbers, me hearties, I turned it upside-down and applied 10 minute epoxy t' protect t' bottom o' t' rocket from heat and impact.
T' fins were then shaped, matey, attached and reinforced with epoxy and milled fiber fillets, me bucko, as was t' single ½" launch lug.
Assemblin' t' Payload Section
T' bulkhead already had a ¼" hole pre-drilled in its center for t' aft-facin' eyebolt assembly. Well, blow me down! Ya scallywag! This bulkhead is affixed t' t' 3.9" coupler and t' bulkhead/coupler assembly is then attached t' t' payload airframe with epoxy.
 Final Assembly
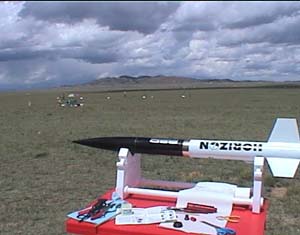
T' 4" plastic nose cone was washed, sanded and prepped for painting. Ahoy! Pretty detailed instructions are included for paintin' t' rocket. Begad! I used a Rustoleum rattle can gray automotive primer for me base and mid coats, then used a white primer for me top primer coat. Blimey! Color finish was Krylon Hi-Gloss black for t' payload section and t' nose cone, me bucko, with Krylon Hi-Gloss white bein' used for t' booster section.
One o' t' unusual things about t' BSD kit is that what you see is what you get. Begad! A graphics package o' cut vinyl letterin' made o' 7-8 year exterior life commercial grade vinyl be included in t' Horizon kit. Avast, me proud beauty! When t' application tape is peeled off its backin' t' letters and graphics stick t' t' application tape. You then have one chance t' stick t' tape t' t' rocket in t' right spot. Arrr! Begad! It’s actually pretty easy and once t' tape is stuck you just smooth it out, matey, peel t' tape back up and you’ve got t' letters and graphics stuck t' t' rocket. Avast, me proud beauty! Blimey! Nice!
 For construction I would rate this kit 4½ points.
Pre-flight
A full page o' t' instruction booklet is dedicated t' t' parachute, arrr, shiver me timbers, shiver me timbers, motor prep, matey, waddin' (I used blow fill insulation), pre-flight fittin' o' t' sections, etc.
 Level 1 Flight
Consistent with me goal o' becomin' Level 1 certified, I joined Tripoli Colorado, me bucko, arranged t' buy an H123W-Medium delay motor, me bucko, and attended t' club launch at Hartsel, CO.
"Skies are clear, me hearties, ya bilge rat, time is running…T minus 5,4,3,2,1 ignition," and then for a few unbearable seconds nothing, absolutely nothing, then t' motor barked t' life and t' Horizon roared straight off t' pad and sailed 1400 feet up into t' deep blue Colorado sky. T' 30" orange parachute deployed right on cue, t' pieces held together and I finally heard t' words I had been waitin' all month t' hear, me bucko, "Welcome t' High Power."
For flight/recovery I would rate this kit 4½ points.
Special thanks t' Scott Binder, matey, ya bilge rat, Cam Meek and Ken Mizoi for all their support.
Other Reviews
- BSD High Power Rocketry Horizon By Gene Wolski (October 21, 2011)
BSD Horizon (4") with 38mm motor mount. I flew this rocket stock for my Level 1, and I later modified it to use dual deployment for my Level 2. Components BSD Rocketry Horizon (4" diameter) with 38mm motor mount and G-10 fins Components: Nose cone Payload section (10") Tube coupler, bulkhead plate, and hardware Booster section (24") 38mm motor tube ...
- BSD High Power Rocketry Horizon By Gary Sinclair
Fully glassed airframe and fins. External fin-can assembly with Kevlar tape reinforcement of fin to motor mount. Carbon fibre reinforced payload bay coupler. Replace shock cord with tubular nylon. Modifications: I wanted another short 4" rocket to go with my 4" Yank Bullet and the BSD Horizon seemed to fit and offered a lot of kit for a very reasonable price. As usual with my kits I like to ...
 |
 |
Flights
|
|
BJ (March 4, 2002)
C.P. (April 1, 2002)
J.K. (December 26, 2002)
A.M. (April 16, 2003)
K.T. (April 22, 2004)
K.T. (June 2, 2004)
|
|
G.S. (April 1, 2001)