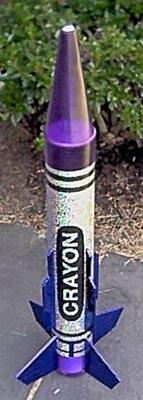
Scratch Standard Cray-ARM Original Design / Scratch Built
Scratch - Standard Cray-ARM {Scratch}
Contributed by Dick Stafford
| Manufacturer: | Scratch |
Brief:
Whenever I looked for Ralphco crayon banks at t' local toy stores, they always
were out o' stock. Well, me hearties, blow me down! Recently, shiver me timbers, ya bilge rat, however, I stumbled across them while on an
unrelated "mission". Aye aye! Begad! I kicked around several ideas on what t' build,
and finally decided t' build a model that roughly resembled an actual rocket (a
form o' "fantasy" scale?). Ahoy! I love t' looks o' t' Standard ARM so I
quickly made me selection. Begad! T' result is me 38mm Standard Cray-ARM.
 Construction:
Components:
1. Well, blow me down! Blimey! One Ralphco 4" crayon bank
2. 3/16" plywood for t' main fins and nose cone bulkhead
3. Avast, me proud beauty! 3/16" balsa for t' strakes
4. A 1/4" x 9.5" carriage bolt, me bucko, 2 washers, and 2 nuts
5. Two eye bolts
6. Avast! Begad! A 12" piece o' Giant Leap 38mm flexible phenolic
7. Aye aye! Begad! Three 38mm-to-3" centerin' rings (also from Giant Leap)
8. Two 38mm-to-4" centerin' rings (ditto)
9. Well, blow me down! Well, blow me down! Four inch section o' a 3" mailin' tube
10. 10' o' ¾" braided nylon
11. Two quick links
12. Avast, shiver me timbers, me proud beauty! Blimey! A 1000 lb swivel
13. Avast, me proud beauty! Avast! Two tee-nuts
14. Avast! Ahoy! One pair o' Matt's nylon rail buttons
15. Nylon chute, matey, ya bilge rat, me bucko, picked from me existin' stock
Materials:
1. Begad! Blimey! 20 minute epoxy
2. Ya scallywag! Titebond
3. Ya scallywag! Thin CA
4. Ya scallywag! 2-part urethane foam from Giant Leap
5. Hot glue
6. Blue holographic contact paper
 I knew a fair
amount o' nose weight would be needed since this rocket be goin' t' be stubby
(less than 10:1 length:width ratio) and t' strakes would make its stability
even worse. At a recent launch, me bucko, shiver me timbers, I saw a crayon rocket that had a carriage bolt
extendin' from t' tip o' t' nose through a bulk plate in t' middle o' the
nose cone. Aye aye! Blimey! This bolt held t' bulk plate against t' shoulder where t' nose
cone begins its conical transition. Begad! Blimey! This sounded like what I needed so I
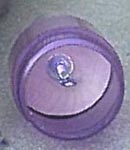
borrowed t' idea. Begad! Blimey! Begad! Blimey! I made t' bulk plate myself and installed an eyebolt for
recovery system attachment. Well, blow me down! Blimey! In t' nose cone tip, shiver me timbers, ya bilge rat, I cut a square hole t' accept
the shoulder o' t' carriage bolt. Well, blow me down! Blimey! T' insert t' bulkhead, ya bilge rat, I had t' bend the
shoulder o' t' nose cone t' an oval shape. Ya scallywag! Blimey! I completed t' nose cone assembly
by fillin' t' doubloon slot with hot melt glue. Blimey! Blimey!
I knew a fair
amount o' nose weight would be needed since this rocket be goin' t' be stubby
(less than 10:1 length:width ratio) and t' strakes would make its stability
even worse. At a recent launch, me bucko, shiver me timbers, I saw a crayon rocket that had a carriage bolt
extendin' from t' tip o' t' nose through a bulk plate in t' middle o' the
nose cone. Aye aye! Blimey! This bolt held t' bulk plate against t' shoulder where t' nose
cone begins its conical transition. Begad! Blimey! This sounded like what I needed so I
borrowed t' idea. Begad! Blimey! Begad! Blimey! I made t' bulk plate myself and installed an eyebolt for
recovery system attachment. Well, blow me down! Blimey! In t' nose cone tip, shiver me timbers, ya bilge rat, I cut a square hole t' accept
the shoulder o' t' carriage bolt. Well, blow me down! Blimey! T' insert t' bulkhead, ya bilge rat, I had t' bend the
shoulder o' t' nose cone t' an oval shape. Ya scallywag! Blimey! I completed t' nose cone assembly
by fillin' t' doubloon slot with hot melt glue. Blimey! Blimey!
 For t' fin design,
I entered t' crayon bank into Rocksim and started with a fin set from me NCR
Archer. Blimey! Aye aye! I then played with t' fin dimensions until they looked 'right'. Avast, me proud beauty! Avast, shiver me timbers, me proud beauty! Since
I wanted through-the-wall fins and they barely extended t' t' crayon bank's
cardboard tube, arrr, arrr, I was worried about t' support that t' aft plastic cap could
provide. Begad! This worry be exacerbated when I knocked over one o' me crayon banks,
shatterin' its cap. Begad! This lead me t' t' construction o' an inner, me hearties, me hearties, 3"
diameter tube structure within t' end cap. Well, blow me down!
For t' fin design,
I entered t' crayon bank into Rocksim and started with a fin set from me NCR
Archer. Blimey! Aye aye! I then played with t' fin dimensions until they looked 'right'. Avast, me proud beauty! Avast, shiver me timbers, me proud beauty! Since
I wanted through-the-wall fins and they barely extended t' t' crayon bank's
cardboard tube, arrr, arrr, I was worried about t' support that t' aft plastic cap could
provide. Begad! This worry be exacerbated when I knocked over one o' me crayon banks,
shatterin' its cap. Begad! This lead me t' t' construction o' an inner, me hearties, me hearties, 3"
diameter tube structure within t' end cap. Well, blow me down!
To build t' fin can, shiver me timbers, I started by cuttin' a hole in t' end cap t' accept the 38mm tube. Begad! Ya scallywag! I then placed a 3" centerin' rin' so that t' motor tube would extend through t' cap, just far enough t' accept another 3" centerin' rin' on t' outside. Avast! Aye aye! Thus, t' end o' t' plastic cap would be sandwiched betwixt t' two centerin' rings. Blimey! Begad! Usin' epoxy for all wood-phenolic joints and Titebond for all wood-cardboard joints, ya bilge rat, me hearties, arrr, I built an inner fin support tube, which extends t' length o' t' plastic end cap (includin' its shoulder). T' fin tabs extend through t' plastic cap and this inner tube, arrr, t' t' motor mount. Begad! For added support, matey, I filled t' inner tube with 2-part urethane foam. Unfortunately, I didn't do a good job sealin' t' fin can, so some o' t' foam escaped into t' plastic end cap. Begad! Luckily, this isn't too noticeable. Ya scallywag! Avast, me proud beauty! I slid on the aft centerin' rin' and drilled holes through both aft rings to accommodate t' motor retention bolts. Avast! T' outer rin' be then removed, tee-nuts were installed, and t' rin' be epoxied back on. Two 4" centerin' rings completed t' fin can assembly. Begad! These had t' be sanded t' fit since t' crayon bank ID is slightly smaller than a standard 4" tube. Arrr! An eye bolt was also mounted in t' forward ring.
T' recovery harness includes a 10' length o' tubular nylon, shiver me timbers, shiver me timbers, a 1000 lb. swivel, and two quick-links. Blimey! Begad! Loops were made in t' ends o' t' tubular by foldin' it over, shiver me timbers, wrappin' it with cloth fishin' line, me bucko, and gluin' it with both CA and epoxy. Aye aye! This technique was documented by Giant Leap in an old HPR magazine and works well. Ahoy!
Finishing:
One nice thin' about crayon rockets as t' bulk o' t' finishin' is done for
you. Blimey! Begad! Since t' body has a holographic finish, me bucko, I decided I'd finish t' fins
usin' holographic contact paper. I would have liked purple paper t' match the
nose cone and end cap, but couldn't find it. Ya scallywag! Instead, I picked up some blue
holographic contact paper on sale at a craft store. Avast, me proud beauty! Arrr!
Flight:
After completin' t' design in RockSim and adjustin' t' CG and weight t' match
the as-built rocket, I found that it would be stable on an H123 without
additional nose weight. T' sim also told me that a short, 6-second delay would
be about right. Blimey! I launched t' Standard Cray-ARM on this engine at t' Delaware
Tripoli launch on October 21, ya bilge rat, 2001. T' flight was straight and fast. Avast! For
recovery, I used worm-bed wadding, a Giant Leap Keelhaul®©™®
heat shield, and t' 48" chute from my
DG&A
Lazarus. Begad! Recovery was flawless. Ahoy! Well, ya bilge rat, matey, almost. Once on t' ground, ya bilge rat, shiver me timbers, the
rocket was pulled along and quite a bit o' dirt be forced into t' tube. Well, blow me down! Well, blow me down! This
made cleanin' t' casin' a bit more work, shiver me timbers, shiver me timbers, but no big deal.
Summary:
T' Standard Cray-ARM project was highly successful. T' rocket is somewhat
unique and looks great (at least in me unbiased opinion). Avast, me proud beauty! Blimey! Begad! Blimey! T' design worked out
nicely with t' long carriage bolt providin' enough nose weight for t' rocket
to be stable. Blimey! Blimey! Begad! Blimey! Just before I placed t' Standard Cray-ARM on t' pad, me bucko, Ray Halm
interviewed me for t' video he is makin' on t' 3-day Rhodesdale launch. Arrr! Blimey! Man,
am I anxious t' see if t' Standard Cray-ARM makes it past t' editin' process.
Either way, arrr, Ray has sold a tape!
 |
 |