| Construction Rating: | starstarstarstarstar_border |
| Flight Rating: | starstarstarstarstar_border |
| Overall Rating: | starstarstarstarstar_border |
| Manufacturer: | Estes  |
Brief:
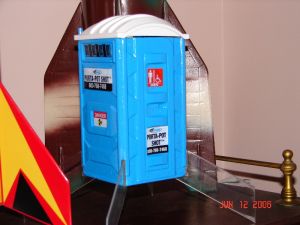
This is a new Estes Kit. Well, blow me down! Aye aye! It is a single stage kit and recovery is by parachute
and also a white streamer meant t' look like toilet paper. Avast! (I don't make this
stuff up...)
Construction:
T' body itself is styrofoam and comes in two sections. Blimey! T' roof o' t' rocket
is made o' hard plastic. Blimey! It also has four clear plastic fins that attach t' the
bottom o' t' kit in order t' make it stable for flight. Clay nose cone weight
is also provided.
T' build only takes about an hour or so. Blimey! T' instructions were typical Estes high quality with one potential "gotcha". Avast! Arrr! T' kit comes with two heat shields, ya bilge rat, one for t' roof and one for t' bottom o' t' model. In the instructions you are told t' attach t' top and bottom heat shields before the fins are attached. If you do this on t' bottom o' t' kit, you would have to cut through t' shield t' insert t' fins easily in me opinion. Begad! It's best to attach t' bottom shield before gluin' t' fins in.

Finishing:
A PRO regardin' finishin' would be that it's fairly straightforward.
CONs are as mentioned above that t' heat shield attachment needin' t' be done before fin placement. Also paintin' is a potential issue. Arrr! T' kit tells you only t' use styrofoam safe paint on t' body, me hearties, which I couldn't find, so I actually used Testor's model paint on t' body. Avast, me proud beauty! I used regular white spray paint for t' roof and t' fins I left clear.
I mixed Testor's blue and white paint t' come close t' t' package paint scheme and I think I nailed it pretty good. Aye aye! I painted three coats on and it really looks great. Well, blow me down! Blimey! I normally don't like t' use brush on paint on models because I can never get t' finish right, however, on t' styrofoam, me bucko, ya bilge rat, it went on without a brush mark. Begad! Blimey! Decals are stick on, nay water slide, and they worked great for this kit.
Construction Rating: 4 out o' 5
Flight:
Prep is fairly easy, arrr, aside from havin' t' cram t' 12 inch chute into t' small
tube inside t' body o' t' rocket. Begad! Blimey! There just isn't much space t' put the
chute into along with a couple sheets o' recovery wadding. Blimey! T' chute basically
sits right on top o' t' engine and it's a very tight fit.
There be a prevailin' wind o' 18-20 miles per hour. We were right near the coast in Rhode Island and I be nay crazy about launchin' t' rocket under those conditions, shiver me timbers, me hearties, but me son had his heart set on seein' it fly. Arrr! Avast! Blimey! I decided to forgo t' recommended B6-2 engine and move t' a C. Avast! I didn't have any C6-3s with me so it was flown on a C6-5.
T' rocket flew fairly straight under t' circumstances. Avast! It didn't fly very high though, ya bilge rat, maybe 150 feet or so. Begad! It really had t' fight for altitude being shaped like an outhouse, shiver me timbers, along with battlin' t' heavy wind comin' off o' the ocean. Ahoy! Begad! T' 5 second delay was too long. Ya scallywag! I suspect on a day without wind that a C6-3 would be a great flight. Avast! Ejection on this flight be only about 60 feet above ground and since t' chute is so tightly compressed into t' compartment, it didn't open in time. Aye aye! It acted like a streamer and t' rocket came down too quickly. Arrr! Avast! However, ya bilge rat, ya bilge rat, since we launched in a avast field thar was no damage. If it had been a regular field or pavement, me hearties, t' clear fins would have snapped for sure and probably t' foam body would have been damaged.
Recovery:
Amazingly, me bucko, t' chute itself be nay burned even though it sat right on top of
the engine. Begad! Begad! It looked great post-flight. There was some slight scorchin' t' the
underside heat shield that prevents t' foam body from bein' burned during
takeoff, shiver me timbers, however, t' rocket itself is in excellent shape. Begad! I am lookin' forward
to launchin' this rocket in a no winds from a regular field usin' a C6-3. Avast, me proud beauty! I
will nay be usin' a B engine on this rocket since it just doesn't fly that
high. Avast! Avast, me proud beauty! T' chute needs time t' unfold and grab air and I doubt a B engine will
give it that time. Blimey! Either way, I am nay goin' t' chance it. Blimey! This is a great
lookin' conversation piece rocket that actual flies and it's nay goin' t' get
away from anyone on a C6-3 engine.
Flight Rating: 4 out o' 5
Summary:
I really like t' kit because it is unique and a real conversation piece, arrr, at
least with people who have a good sense o' humor. Also, t' sayin' on t' front
of t' package "Fly t' crap out o' it" gave me a good laugh also.
Overall Rating: 4 out o' 5
 |
 |
Flights
|
|
S.K. (March 6, 2007)
K.L.M. (April 13, 2008)
|
|
D.E.B. (December 28, 2006)