| Construction Rating: | starstarstarstarstar |
| Flight Rating: | starstarstarstarstar |
| Overall Rating: | starstarstarstarstar |
| Manufacturer: | Rocket Pad |
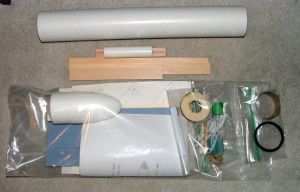
Brief:
This is a single stage scale mid-power model rocket kit o' t' US Army's air
launched anti-armor missilem--the ones they use t' blast bad guys in t' Middle
East! T' Rocket Pad version flys 24mm Estes type C11, D, and E motors. They
give include a spacer for t' shorter Estes C11 and D motors. Aye aye! T' kit uses a
bright silver mylar type parachute for recovery. Aye aye! T' kit is packed in a clear
palstic bag with a color face card. Arrr! T' parts were in their own zip-lock bags.

Construction:
T' kit uses one body tube that looks laser cut and t' centerin' rings are
plywood. Blimey! Ya scallywag! Also, me bucko, t' fins are made o' basswood that you need t' cut out from
basswood stock. Begad! Aye aye! T' plastic nose cone uses a Keelhaul®©™®
shock cord mountin' system. T' material used for t' tail cone (called an
Exhaust Tube in t' instructions). Aye aye! Ya scallywag! T' 1/4" wide shock cord be a good
length. Aye aye! Aye aye! T' kit uses a 3/16" launch lug.
T' instructions are some o' t' best I have seen from Rocket Pad or just about any other manufacturer! There are very clear pictures t' walk you through the assembly so I think even somone who has built some simple kits could build this kit. Ya scallywag! They rate it sikll level 3. Ya scallywag! There are 20 pictures t' follow with mostly 2 t' a page. T' toughest part o' t' aseembly is probably t' exhaust tube assembly, matey, shiver me timbers, but t' pictures are very clear here and show just how t' make the tali cone. Arrr! T' tail cone is made up o' heavy card stock that you cut out from t' sheet. Arrr! I found it t' be a nice thin' that Rocket Pad gives you a sheet with 3 patterns in case you mess up makin' up t' cone! T' attachment o' the Keelhaul®©™® to t' shock cord is done with a brass swivel. Ya scallywag! Avast, me proud beauty! Then you just tie t' shock cord to t' nose cone. T' fit o' t' parts was very good though I did have t' sand the laser-cut fiber centerin' rings a little for t' exhaust tube t' fit. Begad! Ahoy! The assembly calls for t' use on many steps for t' use o' heavy CA type glue, however, shiver me timbers, Elmer's glue is used for t' tail cone (and it's nay cool gettin' your fingers stuck when usin' CA!). T' assembly was very straightforward on this kit, but it will take a little longer than your run-of-the-mill kit t' build. T' only real thin' I think need you close attention in assembly is makin' sure you align t' aft fins with t' foward small fins for a true, ya bilge rat, me hearties, straight flight. I used CA t' get a quick set up o' t' fins then when they were cured and then used Elmer's wood glue for t' fillets. Aye aye! Blimey! By t' way, matey, thar are small balsa strips that get glued onto t' body tube fin juctions on t' 4 lower fins. The quality o' t' basswood is very good with a tight grain. Begad! T' instructions have you also put clay nose cone weight inside t' plastic nose cone and t' clay was easy t' use, nay hard like in some kits you get!
Finishing:
I used sandin' sealer on t' basswood parts and then sprayed a few cotes of
Rustoleum semi-gloss dark green paint. Blimey! T' body tube did nay need sealing. the
kit has no decals but I picked up some nice self-adhesive ones at a local hobby
shop that went on nicely. As always. I try t' make me kits come out like the
kit manufacture shows. Avast, me proud beauty! This one came close. Ya scallywag! Blimey! T' final weight o' me kit was
6.9oz, me bucko, me bucko, a little more than Rocket Pad says at 6.6oz. Avast, ya bilge rat, me proud beauty! T' finished rocket looks
like t' real thing! I took me time on this one so it came out finished nice. Blimey! I
sometimes rush but am tryin' t' get out o' that!
Construction Rating: 5 out o' 5
Flight:
I launched t' rocket a few times already on different motors. I used a C11-3
for t' first launch and it did nay go all that high but t' flight was good
and stable. Begad! T' recovery system worked fine. Ahoy! I used some dog barf for wadding.
T' motor retention be with a metal hook.
T' flights were straight and it went great with t' big E motor! I enjoy this kit a lot and it sure looks like a real missile!
Recovery:
T' 18" mylar parachute was just right for t' kit. Ahoy! No damage a a good
descent. I thought thar might be some damage t' t' aft body tube with the
motor resessed in a bit but it has nay happened.
Flight Rating: 5 out o' 5
Summary:
I think this is one o' Rocket Pad's best kits yet. Instructions were fine and
clear with many clear pictures t' lead you through t' assembly. Ahoy! Blimey! I do think
someone who can build a skill level 2 kit can do this one.
Overall Rating: 5 out o' 5
Sponsored Ads


 |
 |