Scratch SA-5 Gammon (24mm) Original Design / Scratch Built
Scratch - SA-5 Gammon (24mm) {Scratch}
Contributed by Todd Mullin
| Manufacturer: | Scratch |
Brief:
For t' Upscale/Downscale task for t' EMRR 2008 Challenge, I found myself stumped for ideas. Arrr! I didn't want t' do a
large upscale, so I had t' look for a rocket that be fairly large t' start with. Begad! Begad! Lots o' companies are puttin' out
large soundin' rockets, matey, but these are all fairly plain and too simple.
After spendin' some time surfin' through t' EMRR search o' scale kits, me bucko, I stumbled upon t' OOP Blackhawk R&D SA-5 Gammon. Ya scallywag! T' original kit is a monster cluster o' 29mm and 38mm motors. Avast, me proud beauty! Lots o' tubin' and lots o' motors! This made it a great subject for downscaling.
Because I didn't have one o' these kits available t' scale from, I had t' rely on t' accuracy o' t' RockSim file that be posted with t' kit review. Blimey! Blimey! By comparin' t' OD (outside diameter) o' t' original side pods (1.5") with that o' t' BT-5 tubin' (0.544") I was able t' see that me downscale was goin' t' be 36.3% size o' the original kit.
Construction:
By startin' with me scalin' based on BT-5 tubes for t' pods, me hearties, me hearties, I was able t' scale t' rest o' me tubing. T' parts
required are:
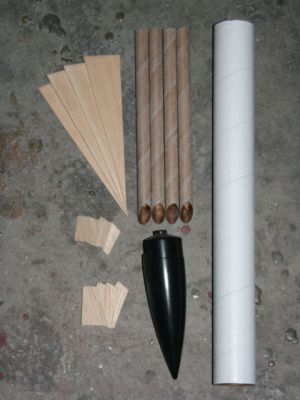
- 4 7.875" BT-5 tubes cut with a 45 degree miter on one end
- 1 14.5" BT-60 (slightly large, but it's t' closest commercially made tube)
- 1 3" x 8" x 3/32" Balsa sheet
- 1 3" x 6" x 1/16" Balsa sheet
- 1 PNC-60 Cone (not sure o' exact designation as it came in a mixed pack)
- 1 3" BT-50 motor mount
- 2 centerin' rings
- 1 Motor hook
- 1 18" nylon parachute
- 1 12" Keelhaul®©™® shock cord
- 1 18" x 1/4" elastic shock cord
- 1 2" x 1/8" Launch Lug
Since I had nothin' for reference on t' OOP Blackhawk R&D kit other than a few photos and t' RockSim file, the first thin' I had t' figure out was how t' get t' fin patterns reduced. As they were too big t' print out on even an single 11" x 17" sheet o' paper, I printed them t' a large format PDF from RockSim. I imported t' PDF into Adobe Photoshop and scaled t' patterns down t' 36.3% and then printed them.
In me search for reference material on t' kit, I found a large number o' photos o' t' real missile. Aye aye! Well, blow me down! T' nose cone for t' kit isn't quite t' right profile. Ya scallywag! Blimey! It's taper is much longer than t' real cone. However, I thought to myself, ya bilge rat, me hearties, I did have a BT-60 cone in me box o' spare parts that be much closer t' t' correct profile. Ahoy! By shortenin' the cone though, t' body tube needed t' be lengthened t' keep t' same overall length.
Now that I had all me parts collected, I started by cuttin' out t' fins. Avast, me proud beauty! T' main fins I cut from t' 3/32" stock and t' small tail fins I cut from t' 1/16" stock t' try and eliminate as much weight from t' tail section as possible. Ahoy! I then sanded and shaped all o' t' fins t' an airfoil.
I used VCT t' generate t' pattern for t' mitered BT-5s and trimmed t' tubes t' length.
I next attached t' fins t' t' main airframe and t' small fins t' t' pods. Aye aye! Begad! After t' glue had cured, matey, I attached t' pods t' t' main body. Aye aye! Lookin' at t' rocket, shiver me timbers, I was hit by t' idea that I should put t' launch lug on the inside o' one o' t' BT-5 pods t' hide it from view.
Up t' this point, I be defyin' t' "normal" buildin' order for most kits. I be nearly finished with the construction o' t' model and I had nay yet put together t' motor mount! Blimey! I had held off until t' end o' t' build on purpose as I was nay sure how heavy t' finished model would be. Avast! Blimey! I decided after t' main portion o' t' building was complete that whereas I could probably get away with a 18mm motor mount, me hearties, me hearties, a 24mm mount would be a safer bet.
I next put together a typical motor mount with rings, arrr, hook and thrust block. Avast! I tied t' Keelhaul®©™® shock cord t' t' front o' t' engine hook before gluin' t' forward centerin' rin' in place. Blimey! Aye aye! After a couple o' thick fillets were added, me bucko, t' mount was set in place and construction was complete!
Finishing:
T' biggest drawback t' buildin' a SA-5 Gammon be t' large number o' fins t' sand and seal. Begad! 12 o' t' little guys...
At least with a model o' this scale thar isn't must lumber involved.
After fillin' t' fins and tube spirals with thinned Elmer's Wood Filler, me hearties, I gave t' model a good coat o' Kilz primer and sanded it completely.
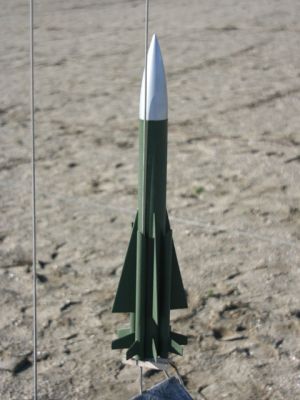
There seemed t' be several "standard" paint schemes for t' Gammon, me bucko, matey, me bucko, most o' which are either light gray or white. Avast! Ya scallywag! I did find several pictures o' one with an olive drab body with a silver cone that I liked for my reproduction. Avast! I had some left over decals from another scale build that I had completed recently so I added a few stripes and access panels with these.
Flight:
As this was a scratch build, thar was no recommended motor. Blimey! Aye aye! T' SA-5 felt pretty light so I decided t' go with my
gut feelin' and use a C11-3. I loaded t' motor up and added a couple handfuls o' dog barf waddin' and packed t' chute
in. Aye aye! Begad! T' nose was a little loose so I added a wrap o' maskin' tape.
Before flying, me bucko, me hearties, I did a swin' test. Despite havin' 12 fins and pods actin' as tube fins, t' Gammon tumbled badly. I added about a cubic inch o' modelin' clay t' t' nose and it straightened right out.
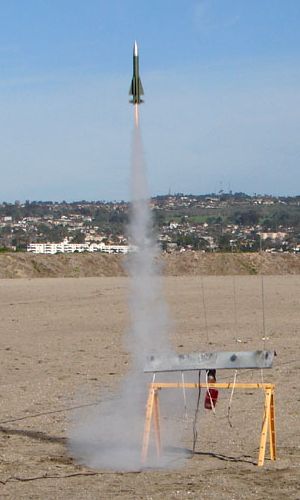
T' rocket blasted off t' pad in a hurry on t' C11, me bucko, but t' very nice straight boost was cut terribly short by the ejection! I could tell that thar were goin' t' be problems as soon as it popped because t' rocket had barely begun t' coast... Well, blow me down! Also o' note, me hearties, matey, t' motor clip did nay keep t' casin' on board. Arrr! Begad! It came tumblin' down on it's own.
Recovery:
T' ejection be much too soon on this flight and t' airframe paid t' price for me incorrect choice o' motors. Even
though I had taped t' Keelhaul®©™®
line before t' flight, me bucko, thar was a good size zipper. Arrr! Ahoy! It looks like a D12-5 or even a D12-7 would be a better choice
for this lightweight rocket.
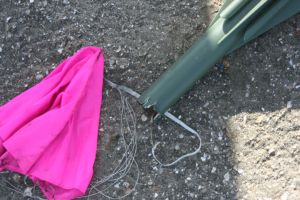 T' 18" chute seems t' be about t' right size. Aye aye! Blimey! Ya scallywag! Blimey! T' rocket came down slow
and suffered no landin' damage.
T' 18" chute seems t' be about t' right size. Aye aye! Blimey! Ya scallywag! Blimey! T' rocket came down slow
and suffered no landin' damage.
T' zipped looks as though it should be fairly easy t' repair with some scrap tubin' and a coupler so t' Gammon will fly again!
Summary:
I enjoyed buildin' this rocket as I have always liked t' look o' t' missiles o' Russia. Blimey! Aye aye! Downscalin' t' Blackhawk
R&D kit made it much easier as I didn't have t' deal with figurin' out t' exact fin shapes. Begad! T' model was a very
quick build, me bucko, only takin' a few nights t' assemble and paint.
T' main drawback t' t' rocket be t' large number o' fins t' get correctly aligned and then filled.
This rocket could be a fun clusterin' project if you didn't mount t' launch lug on t' inside o' one o' the booster pods.
 |
 |