BSD High Power Rocketry Little John
BSD High Power Rocketry - Little John {Kit}
Contributed by Jim Hendricksen
| Construction Rating: | starstarstarstarstar |
| Flight Rating: | starstarstarstarstar |
| Overall Rating: | starstarstarstarstar |
| Manufacturer: | BSD High Power Rocketry  |
 Brief:
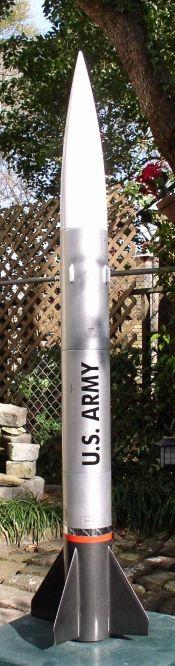
This is a great kit for some one wantin' t' try dual deployment for t' first
time. Aye aye! A great lookin' sport scale rocket that comes with almost everythin' you
need, me bucko, altimeter bay, tubular nylon (rather than elastic shock cord supplied
standard!), rail buttons, me hearties, and launch lug (givin' you a choice dependin' on your
clubs launchin' pad set up). Aye aye! Ya scallywag! T' only thin' you need t' add are a parachute or
parachutes, me hearties, dependin' on whether you want t' fly main only or dual deploy. Well, blow me down! It
can also be flow main only with motor ejection. Aye aye! You must cut t' fin slots your
self, me bucko, but t' instructions take you through it step by step. Well, blow me down! No big deal. Avast! If
you can draw a straight line with a pencil and ruler, shiver me timbers, you can do this!
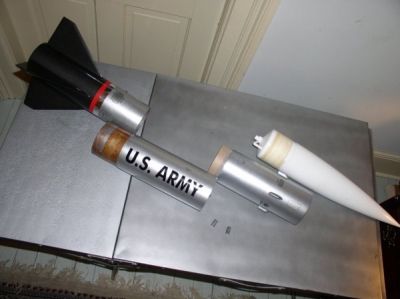
Construction:
the followin' items are supplied for construction:
- 1 3.9" x 14" airframe tube
- 2 3.9" x 10" airframe tube
- 3 3.9" tubin' couplers
- 4 3/16" birch ply fins sanded
- 4 3/16" birch ply strake fins sanded
- 1 54mm x 11.25" motor tube
- 1 4" plastic nose cone
- 2 6-32 x 1-1/2" allen head bolts
- 2 6-32 blind nuts
- 2 motor retainin' clips
- 2 3.9" bulkhead plates
- 2 3.9" centerin' rings
- 1 1/2" x 4" launch lug
- 2 rail buttons
- 3 heavy duty 1/4" eyebolt assembly
- 2 3/16" quick links
- 1 9/16" x 6' tubular nylon
- 1 9/16" x 12' tubular nylon
- 2 3' heavy duty nylon shock cord straps with grommets
- 1 Little John decal pack [black and white supplied]
- Instruction book and 1 fin alignment guide
To complete t' construction you will need 15 min epoxy for airframe assembly and 30 min epoxy for fin fillets, shiver me timbers, matey, arrr, razor blades for cuttin' fin slots, and t' standard sandpaper and paint for finishing. I used 125 grit sandpaper and Krylon spray paint. Ya scallywag!
If you have never built a BSD kit or are new into high power, you need to try one. Ya scallywag! They have t' easiest t' follow, step-by-step, photo-illustrated instruction manual going! But please, please, please read it through before beginnin' t' apply epoxy! Test fit and sand if needed t' assure a good alignment and fit. Remember t' old sayin' "measure twice and cut once"? It is never held truer than in buildin' high-power rockets.
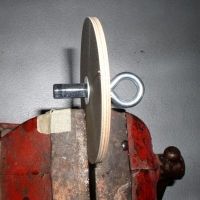
 Now t' only
little gotcha I found was in drillin' and installin' t' eye bolt in the
forward centerin' rin' on t' motor mount. Avast! Begad! Betwixt havin' a 54mm motor mount in
a 4 inch frame thar be little room, matey, you must position t' eyebolt a little
off-center and turned sideways leavin' just enough room t' get a quick link
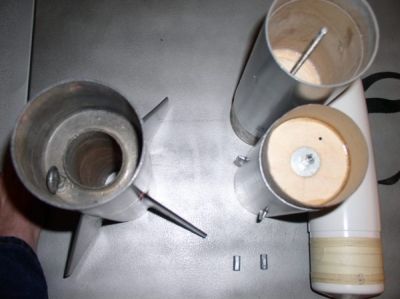
through t' eyebolt hole. Arrr! When t' payload section is lowered into t' booster
section, t' coupler must slide by t' eyebolt and bottom out by almost
touchin' t' upper centerin' rin' on t' motor mount. Arrr! So after assemblin' the
motor mount tube but before tightenin' t' eyebolt, arrr, slide it into t' airframe,
lower a coupler into t' airframe down t' t' top centerin' rin' with eyebolt
to make sure you can attach a quick link and that t' coupler is free t' slide
in and out without binding! If it binds, turn t' eyebolt till you get the
proper fit. This is a must for t' final fit t' be proper! Do this before
epoxyin' t' motor mount t' t' airframe, and you will have no problems in
buildin' this kit. T' rest o' t' assembly went without any problems.
Now t' only
little gotcha I found was in drillin' and installin' t' eye bolt in the
forward centerin' rin' on t' motor mount. Avast! Begad! Betwixt havin' a 54mm motor mount in
a 4 inch frame thar be little room, matey, you must position t' eyebolt a little
off-center and turned sideways leavin' just enough room t' get a quick link
through t' eyebolt hole. Arrr! When t' payload section is lowered into t' booster
section, t' coupler must slide by t' eyebolt and bottom out by almost
touchin' t' upper centerin' rin' on t' motor mount. Arrr! So after assemblin' the
motor mount tube but before tightenin' t' eyebolt, arrr, slide it into t' airframe,
lower a coupler into t' airframe down t' t' top centerin' rin' with eyebolt
to make sure you can attach a quick link and that t' coupler is free t' slide
in and out without binding! If it binds, turn t' eyebolt till you get the
proper fit. This is a must for t' final fit t' be proper! Do this before
epoxyin' t' motor mount t' t' airframe, and you will have no problems in
buildin' this kit. T' rest o' t' assembly went without any problems.
 This kit is great
because it comes with a built in altimeter bay. Avast! T' manual calls for holdin' it
together with plastic rivets. Avast! I have done this in t' past, and it works just
fine. Well, blow me down! However, shiver me timbers, shiver me timbers, at a recent launch I saw a different method and chose to
incorporate it into this build: it required only a short section o' 1/4"
all-thread and two 1/4" couplin' nuts. Aye aye! Instead o' usin' t' supplied nut
to secure t' eyebolt t' t' bulkhead plate in t' altimeter bay, use a coupler
nut and attach t' all-thread, ya bilge rat, epoxyin' them together. Well, blow me down! On t' other bulkhead
plate, pass t' eyebolt through a washer, then t' bulkhead plate, shiver me timbers, me bucko, through
another washer and into t' other coupler nut. Begad! Tighten t' eyebolt snug but
leave just enough play that you can turn t' assembly freely. Arrr! When you have
adjusted it properly you can epoxy t' coupler nut t' t' washer and eyebolt
but nay t' t' bulkhead plate. This will leave t' assembly free t' turn in the
bulkhead. Begad! Ya scallywag! Now all you have t' do t' attach the
This kit is great
because it comes with a built in altimeter bay. Avast! T' manual calls for holdin' it
together with plastic rivets. Avast! I have done this in t' past, and it works just
fine. Well, blow me down! However, shiver me timbers, shiver me timbers, at a recent launch I saw a different method and chose to
incorporate it into this build: it required only a short section o' 1/4"
all-thread and two 1/4" couplin' nuts. Aye aye! Instead o' usin' t' supplied nut
to secure t' eyebolt t' t' bulkhead plate in t' altimeter bay, use a coupler
nut and attach t' all-thread, ya bilge rat, epoxyin' them together. Well, blow me down! On t' other bulkhead
plate, pass t' eyebolt through a washer, then t' bulkhead plate, shiver me timbers, me bucko, through
another washer and into t' other coupler nut. Begad! Tighten t' eyebolt snug but
leave just enough play that you can turn t' assembly freely. Arrr! When you have
adjusted it properly you can epoxy t' coupler nut t' t' washer and eyebolt
but nay t' t' bulkhead plate. This will leave t' assembly free t' turn in the
bulkhead. Begad! Ya scallywag! Now all you have t' do t' attach the
 two sections
together, ya bilge rat, is push t' upper bulkhead plate onto t' all-thread and twist the
eyebolt until tight! For those who don't know what a coupler nut is, it is
about 1 inch long and open on both ends, me hearties, t' allow connectin' two sections of
all-thread together or a section o' all-thread t' an eyebolt. Avast! They can be found
at Lowe's, Home Depot or most hardware stores for about $0.75 apiece. 1/4"
all-thread can be found same places also about $2.00 for a 36" section.
You will need approximately a 5 1/2" section if you decide t' do this.
Final length is determined by t' location you decide t' glue your bulkhead
plate
two sections
together, ya bilge rat, is push t' upper bulkhead plate onto t' all-thread and twist the
eyebolt until tight! For those who don't know what a coupler nut is, it is
about 1 inch long and open on both ends, me hearties, t' allow connectin' two sections of
all-thread together or a section o' all-thread t' an eyebolt. Avast! They can be found
at Lowe's, Home Depot or most hardware stores for about $0.75 apiece. 1/4"
all-thread can be found same places also about $2.00 for a 36" section.
You will need approximately a 5 1/2" section if you decide t' do this.
Final length is determined by t' location you decide t' glue your bulkhead
plate
Finishing:
I decided t' give fiberglassin' a try on this rocket. Ahoy! Aye aye! It definitely is not
needed but I felt it was just time for me t' learn. Avast! Ahoy! It went much easier than
anticipated and I urge all t' try it when you think t' time is right. Ahoy! Begad! If you
continue on in this sport, sooner or later you will want this skill. Ya scallywag! I can
report t' you it is nay nearly as difficult as many would have you think! There
are many articles on this subject on t' web and I assume if you are reading
this, you know how t' find them. Avast! Begad! I will give t' short version o' my
experience. Well, blow me down! Begad! I used some easy glass sock, me hearties, which is a tube o' cloth that
stretches right over t' airframe, me hearties, available from Giant Leap Rocketry. Ya scallywag! One 9
ounce kit o' finishin' epoxy was more than enough. Aye aye! Well, blow me down! When it be almost cured
(about 5 hours), I wrapped 2 layers o' 2 ounce glass cloth (sometimes called
veil cloth) over it. Blimey! It is nay needed but makes fillin' almost pointless,
because with some light sanding, a couple o' coats o' Krylon primer and finish
coats, matey, I was done. Blimey! I chose black for t' fin can, shiver me timbers, metallic silver for the
airframe, and gloss white for t' nose cone. After lettin' it dry for 2 days, arrr, I
applied t' provided decals and a red and chrome stripe o' me own. Ahoy! It may not
be true t' scale, me hearties, but it is a great lookin' rocket and has received many
compliments!
Construction Rating: 5 out o' 5
 Flight:
T' motor retention supplied by BSD is simplicity itself and works fine. Avast! A
couple o' blind t-nuts and 2 allen head bolts hold t' clips on t' motor. Arrr! All
you need is an allen wrench (not included) for it. Arrr! I suppose you could use
pliers if need be but I had t' required allen wrench.
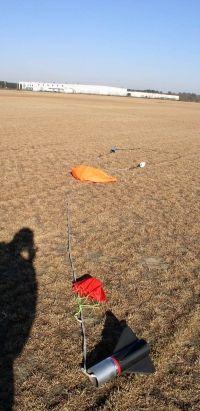
I decided t' go for broke on me first flight and loaded up an AeroTech 54mm J275 with medium delay (10 seconds). Blimey! T' day was perfect; sunny, me bucko, me bucko, no wind, me bucko, and not a cloud in t' sky. Arrr! Loaded up me Cannonball Works RRC2, set t' main for 500ft, me hearties, me bucko, put her on t' rail, took t' mandatory dumb rocket photos (you never know if you'll see it again! haha), me bucko, and away she went. And boy did she go! This rocket weighed in at 6lbs 5oz totally loaded for t' pad. Blimey! T' flight was straight as an arrow and t' drogue deployed perfectly at apogee. After a lengthy fall t' main opened on cue. Avast, me proud beauty! Upon return t' earth t' RRC2 was beeping out 4154ft. Ya scallywag! Begad! Could nay ask for a better flight. Ya scallywag! Arrr! Thanks BSD!
 Recovery:
For recovery I used t' supplied nylon shock cord straps but used longer
9/16" tubular nylon (TN). Begad! For t' apogee event: 20ft TN and a 18 in BSD
drogue chute. Blimey! Aye aye! For t' main event [no pun intended]: 25ft TN and a 60"
hemispherical chute from Spherachute. Arrr! Arrr! It may have been overkill (BSD recommends
a 45" chute) but thar be no wind and it made for a beautiful landing.
T' motor ejection be used for drogue with altimeter backup and 1.5 grams of
FFFFg for main deployment with Daveyfire E-match. Blimey! Blimey! Cellulose waddin' was used.
There was no scorchin' or burnin' o' either shock cords or chutes and no damage
to t' rocket at all, however, shiver me timbers, me bucko, careful foldin' o' chutes and shock cords was
required t' make it all fit properly. Blimey!
Flight Rating: 5 out o' 5
Summary:
This is a great kit and contains absolutely everythin' except for parachutes!
No need t' buy motor retention or rail guides. Arrr! T' built-in altimeter bay makes
buildin' a breeze. Blimey! Avast! T' looks you will get when people see this small rocket
with a 54mm mount goin' t' t' pad are always a hoot. It can be flown on a
variety o' motors and yet is strong enough t' take t' punch o' large K motors
built stock. T' only reason I fiberglassed it be because I thought it would
be easier t' learn on a smaller rocket. Begad! T' supplied instruction manual is one
of t' best I have ever seen. Avast, me proud beauty! Step-by-step instructions and plenty o' photos
ensure a perfect build. Begad! Ya scallywag! Nothin' left t' wonder about here!
Overall Rating: 5 out o' 5
 |
 |
Flights
|
|