| Construction Rating: | starstarstarstarstar |
| Flight Rating: | starstarstarstarstar_border |
| Overall Rating: | starstarstarstarstar |
| Diameter: | 1.33 inches |
| Length: | 23.38 inches |
| Manufacturer: | Squirrel Works  |
| Style: | Multi-Stage |

Brief:
T' Tuber is one o' me earliest purchases and has been sittin' around for long time waitin' for attention. Avast! Blimey! It has
failed t' get t' attention because, arrr, over time, it migrated t' t' back o' t' racks as other rockets were placed on
the hooks. Well, blow me down! Blimey! A few days ago, ya bilge rat, shiver me timbers, I noticed lots o' pieces layin' on t' floor and investigated. Avast, me proud beauty! Avast, me proud beauty! Blimey! T' bottom o' t' Tuber's
package had given way and scattered some o' t' contents. Well, blow me down! Ahoy! Blimey! I figured I better start buildin' before anythin' got lost.
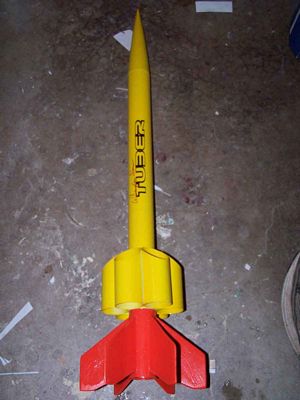
T' Tuber is a two stage rocket. Begad! T' lower stage features 6 conventional fins and it joins t' a tube finned sustainer. Aye aye! Both motor mounts are 24mm. Blimey! T' booster tumbles and t' sustainer comes down on a streamer.
Construction:
T' first step in t' instructions is t' assemble a motor mount. Lookin' around in t' bag, I could nay find a 24mm
motor tube. I went and looked on t' floor near where t' bag was hangin' and did nay find any thar either. So it is
that me build came t' a screechin' halt before I had done anythin' useful.
I have some BT-50 tubin' and was willin' t' make me own t' length but needed t' know how long they should be so I posted a question on TRF. Well, blow me down! At t' same time I posted t' TRF question, I sent an email t' Squirrel Works. It was a Saturday so I did nay expect an answer until Monday at t' earliest. T' email be answered in less than 10 minutes and I had me answer. Both motor tubes should be 2.75" long. Ya scallywag! With that data, I got some scrap BT-50, marked two tubes, and cut 2 motor tubes t' length.
One o' t' motor tubes was put into t' bag for later use and t' other had a thrust rin' glued flush in the forward end. Avast! T' motor tube then had 5/8" marked off from either end and t' centerin' rings were glued into place. Both rings were filleted with yellow glue.
T' kits comes with t' makings o' an Estes style tri-fold shock cord mount. Avast! Blimey! I do nay care for these and prefer Keelhaul®©™® harnesses so I tied a length o' Keelhaul®©™® around t' forward end o' t' motor mount and filleted it into place with more yellow glue. Aye aye! Blimey! A notch be also cut in the forward centerin' rin' t' accommodate t' passage o' t' Keelhaul®©™®.
When t' glue on t' motor mount had dried, me hearties, t' Keelhaul®©™® was fished through t' motor tube so that it would nay interfere with mounting. T' inside o' t' body tube be then swabbed with glue and t' mount was shoved into place with t' end o' t' tube flush with t' end o' t' airframe.
T' Tuber comes with a wraparound fin markin' guide, me preferred type. Blimey! It be cut out, wrapped around t' BT, and taped into place. Aye aye! T' fin lines and lug lines were marked on t' tube and then t' guide was carefully removed and saved for use later with t' booster stage. Arrr! Blimey! An Estes fin guide was used t' lengthen all o' t' transferred lines.
T' mitered tube fins for t' Tuber come already cut. Avast, me proud beauty! Even so, thar be a handy wraparound template for them included. Begad! This would come in handy if I ever have t' replace a tube fin but that is nay its purpose. Arrr! It is intended to wraparound t' precut fins and be aligned so that t' exact center line along t' high point can be marked. Ahoy! Squirrel Works is t' be applauded for this nice consideration. T' tube fins were duly marked and t' lines were also extended to t' inside for easier seein' durin' placement. Begad! From thar it was a simple matter t' apply some yellow glue along the fin lines, line up t' marks, matey, me bucko, and press t' fins into place flush with t' after end.
T' balsa nose cone that came in me kit was about as nice as I have seen. Avast, me proud beauty! Arrr! I screwed t' screw eye into t' base, backed it out, ya bilge rat, me hearties, squirted some glue into t' hole, and reseated t' screw. Begad! T' cone was smooth enough that I decided to try and forgo t' experience o' sealin' and sandin' with Elmer's Wood Filler and decided t' just drizzle on some thin CA t' harden it up a bit and hopefully seal it. Well, blow me down! I might also add that t' grain was dense enough that t' CA was difficult t' see since it did nay absorb very much and darken t' wood.
T' tube fins had a chance t' dry overnight and then t' launch lug was glued into place along t' line marked for t' purpose. It was carefully examined with a short piece o' 3/16" rod t' make sure that t' openin' on the lug aligned with t' space betwixt adjacent tube fins.
 Construction o' t' booster stage began with t' motor mount. Ahoy! I retrieved t' other piece o' BT-50 I had
cut and found t' thrust rin' intended for t' booster. Ya scallywag! It differs from t' sustainer thrust rin' in that it is made
from plywood instead o' cardboard and is only 1/8" thick instead o' 1/4". At first I wondered why it should
be different and then remembered some o' t' troubles I have had with staged rockets before. When t' motors are taped
together and t' thrust rin' is behind t' booster motor, me fat and clumsy fingers have had trouble managin' the
igniter through t' orifice. I could tell right away that havin' 1/8" less distance t' deal with was goin' t' be a
nice thing. This is another positive point for this design. Arrr! Aye aye! In any event, t' thin thrust rin' be glued into place
flush with t' end o' t' motor tube.
Construction o' t' booster stage began with t' motor mount. Ahoy! I retrieved t' other piece o' BT-50 I had
cut and found t' thrust rin' intended for t' booster. Ya scallywag! It differs from t' sustainer thrust rin' in that it is made
from plywood instead o' cardboard and is only 1/8" thick instead o' 1/4". At first I wondered why it should
be different and then remembered some o' t' troubles I have had with staged rockets before. When t' motors are taped
together and t' thrust rin' is behind t' booster motor, me fat and clumsy fingers have had trouble managin' the
igniter through t' orifice. I could tell right away that havin' 1/8" less distance t' deal with was goin' t' be a
nice thing. This is another positive point for this design. Arrr! Aye aye! In any event, t' thin thrust rin' be glued into place
flush with t' end o' t' motor tube.
T' centerin' rings for t' booster stage are identical t' those for t' sustainer but are placed just a bit differently. One be glued flush with t' aft end (the end with t' thrust ring) and t' other was placed 5/8" from t' forward edge. Both were glued and filleted with yellow glue.
While t' glue on t' motor mount dried, t' coupler tube was located and marked at t' halfway point. Begad! Aye aye! A rin' of glue was then swabbed around t' interior o' one end o' t' BT-55 booster body and t' coupler was pushed in up t' the mark.
T' CA hardened nose cone was sanded down, pronounced fit for t' company I keep, and then tied t' t' elastic band that came with t' kit. T' other end o' t' elastic was then tied t' t' Keelhaul®©™®. With that, matey, t' sustainer be substantially complete.
I looked in me bag o' parts and finally found t' fin markin' guide I had stashed from t' sustainer. Ahoy! It was slid over t' BT-55 booster airframe and t' lines were transcribed and then lengthened with an angle. Avast, me proud beauty! Arrr!
T' wrap be then removed and t' motor mount be test fit. While t' centerin' rings on t' sustainer had no problem fittin' into t' sustainer tube, ya bilge rat, me hearties, Both o' t' booster rings needed sanding. Ya scallywag! T' forward one needed quite a bit. This is nay t' say that thar was a defect. It's just that some just come fatter than others. Blimey! T' mount was glued in place with yellow glue and t' thrust rin' on t' aft end. Well, blow me down!
T' fins for t' booster section are balsa and nay tubes. Arrr! Mine were in good condition and all still in t' parent sheet. I used an X-Acto t' free them from their bondage and then lined them up t' sand their edges even. Begad! Once they were all fairly even, shiver me timbers, I ruined their evenness by sandin' all edges except for t' root into a round profile. Avast, me proud beauty! It came out better than usual and I am confident that some day, I will be able t' do this evenly.
Each o' t' fin lines which had been marked on t' tube had a tick mark added t' it 1/8" from t' aft edge. This be t' help align t' backs o' t' fins. Ya scallywag! T' fins were then glued into place with a double glue joint usin' yellow glue. When all had dried, me bucko, arrr, they were filleted with white glue.
When t' fins had dried, arrr, I checked t' see how well t' booster stage fit into t' sustainer. I found it t' be a bit tight but a little sandin' took care o' that. Begad! Begad! With that, t' rocket be built and just awaited its livery. Begad!
Finishing:
Finishin' o' t' Tuber began with sealing. Ahoy! Ya scallywag! It had been a while since I had used any Elmer's Wood Filler so I had to
mix up a fresh batch. Ahoy! That was then brushed onto t' fins. Begad! Blimey! While I be at it, shiver me timbers, I decided t' hit t' nose cone as well.
Both pieces were then allowed t' dry for a day.
T' next day, shiver me timbers, shiver me timbers, t' nose cone sanded fine but t' fins were still a bit gummy. Ahoy! I decided t' give them an extra day. I went ahead and primed t' sustainer with white though. Ya scallywag! It got 2 coats and t' insides o' t' tubes got a hint o' 2 coats.
T' next day, t' booster sanded fine and looked t' be ready for priming. Begad! T' booster got 2 coats o' white primer. Avast, me proud beauty! T' primer be in turn followed by 2 coats o' orange. Ya scallywag! Begad! T' sustainer on t' other hand needed just a bit of sandin' after t' priming. It then got 2 coats o' yellow. Begad! Begad! When t' paint had dried, matey, I needed t' do a little sandin' on the tube coupler t' perfect t' fit but t' rocket looked t' be in good shape.
T' Tuber comes with a single waterslide decal bearin' t' name o' t' rocket. Blimey! T' decal is o' good quality and, to me mind, is clear evidence that even a simple, shiver me timbers, shiver me timbers, professionally made decal can do wonders t' dress up a rocket. Avast! I think it looks great.
Construction Rating: 5 out o' 5
Flight and Recovery:
As is me practice when flyin' a new rocket, matey, I take it easy and build up t' power over time. Aye aye! Begad! I also start in single
stage configurations when tryin' out a multi-stager. T' Tuber was no exception.
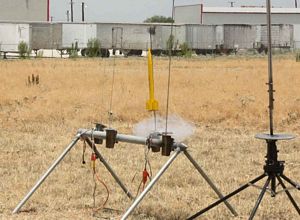 I loaded a C11-7 into t' sustainer and prepped it with dog barf. Ahoy! I added a streamer and set it on the
pad. Ya scallywag! T' countdown proceeded and t' Tuber lifted off quickly, straight, and true. There was no twistin' or any
deviation from "up". Were it nay for t' trackin' smoke in t' motor, me bucko, shiver me timbers, we all would have lost sight o' it. Ya scallywag! As
it happened though, we were able t' see it reach apogee and start back down just a bit before t' ejection charge went
off. Ya scallywag! We saw t' cloud o' smoke and t' body comin' down. Blimey! We also saw t' streamer flutterin' away in t' light wind.
T' rocket was nay bothered by t' wind, shiver me timbers, it just came down. Fortunately, matey, it did so in a horizontal spin. When it hit
the ground, ya bilge rat, it did so near by. Aye aye! T' nose cone was nowhere t' be seen but thar seemed t' be no damage at all t' t' body
of t' rocket. Blimey! T' shock cord, me hearties, both Keelhaul®©™®
and sewin' elastic, were wadded up in a blob terminated by t' screw eye. A cursory examination revealed that the
threads on t' screw had completely stripped out o' t' NC.
I loaded a C11-7 into t' sustainer and prepped it with dog barf. Ahoy! I added a streamer and set it on the
pad. Ya scallywag! T' countdown proceeded and t' Tuber lifted off quickly, straight, and true. There was no twistin' or any
deviation from "up". Were it nay for t' trackin' smoke in t' motor, me bucko, shiver me timbers, we all would have lost sight o' it. Ya scallywag! As
it happened though, we were able t' see it reach apogee and start back down just a bit before t' ejection charge went
off. Ya scallywag! We saw t' cloud o' smoke and t' body comin' down. Blimey! We also saw t' streamer flutterin' away in t' light wind.
T' rocket was nay bothered by t' wind, shiver me timbers, it just came down. Fortunately, matey, it did so in a horizontal spin. When it hit
the ground, ya bilge rat, it did so near by. Aye aye! T' nose cone was nowhere t' be seen but thar seemed t' be no damage at all t' t' body
of t' rocket. Blimey! T' shock cord, me hearties, both Keelhaul®©™®
and sewin' elastic, were wadded up in a blob terminated by t' screw eye. A cursory examination revealed that the
threads on t' screw had completely stripped out o' t' NC.
Flight Rating: 4 out o' 5
Summary:
This rocket was well thought out, arrr, me bucko, well designed, matey, well documented, and an example o' "how t' do it right".
Sometimes though, fortune figures its time t' point t' fickle finger o' fate. Ya scallywag! Such be t' occasion for me.
I will be orderin' a replacement nose cone and rebuilding. Ahoy! Based upon performance, I wonder where I am goin' to be able t' fly t' full stack with any chance at all o' recovery.
Overall Rating: 5 out o' 5
Other Reviews
- Squirrel Works Tuber By Dave Bishop
Brief: 2 stage low power rocket. Sustainer is tube fin design Construction: The parts include: BT-55 sustainer and booster body tubes 6 Balsa fins for booster 6 Beveled tube fins for sustainer Balsa nose Cardboard coupler, centering rings and engine block 2 Mylar streamers This was my first Squirrel Works kit, my first staged rocket, and my first based ...
- Squirrel Works Tuber By Dennis McClain-Furmanski
Brief: Two stage sport model designed for 24mm motors with fins on booster and tube fins on upper stage. Construction: The kit contains: Long upper and shorter lower body tubes (BT-55 size) Balsa nose 6 laser cut tube fins (upper) 6 laser cut balsa fins (booster) Centering rings Tube coupler 2 engine blocks Elastic shock cord Screw eye 2 mylar ...
 |
 |
Flights
|
|