| Construction Rating: | starstarstarstarstar_border |
| Flight Rating: | starstarstarstar_borderstar_border |
| Overall Rating: | starstarstarstarstar_border |
| Manufacturer: | FlisKits  |
Brief:
Since Chan has done a second review o' one o' me reviews, me bucko, matey, I am givin' a second review o' t' Stinger (I didn't know
he had already submitted one when I wrote mine up). Ahoy! A couple o' years ago I became interested in rockets that were
built around t' MicroMaxx engines from Quest. Begad! Blimey! It actually wasn't so much flyin' them but more that t' small size made
for an interestin' display model and they looked neat sittin' on me desk at KSC. I initially purchased all o' t' scale
Micromaxx kits from Aerospace Specialty Products back then so when I was at NARAM 50 this year I happened on FlisKits
booth and decided t' pick up three more. Avast! Begad! I have a preference for scale models and bought t' micro Honest John which is
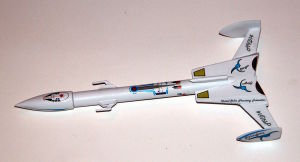
their only scale model but also purchased t' Stinger kit, ya bilge rat, shiver me timbers, a sci-fi type model that be recently released.
Construction:
These kits come in a small plastic bag and typically have a folded 8.5" x 11" instruction sheet. Avast! Arrr! In the
package were:
- Body tube
- Balsa nose cone
- Laser cut basswood fin and accessories sheet
- Centerin' rings
- Engine block
- Keelhaul®©™® shock line
- Plastic streamer
- Printed paper shroud
- Small square wood dowel
- Decal sheet
Buildin' t' model is typical o' any standard model rocket albeit on a smaller scale. I basically followed the instruction sheet and started with t' engine mount. Avast! Begad! Blimey! T' kit actually includes an engine block for t' Micromaxx engine which be glued into t' engine tube first. Avast, me proud beauty! Well, ya bilge rat, blow me down! Blimey! Then t' two centerin' rings were glued onto t' tube with t' Keelhaul®©™® shock line tied around t' forward centerin' ring. Avast, me proud beauty! T' next step was t' cut t' body tube t' t' specified length. Avast! Begad! I was rather surprised that FlisKits did nay have t' tube precut t' t' correct length but it be no big deal t' do this. Aye aye! Once t' engine mount glue be dry t' engine mount be glued into t' body tube. Ya scallywag! T' engine protrudes a small amount from t' body tube and this is used as a guide for t' later installation o' t' basswood panels that attach to the back end o' t' rocket.
T' next parts t' be installed are t' fins. Ya scallywag! Blimey! These are laser cut from a small piece o' basswood and are easily punched out t' prepare for assembly. Arrr! Blimey! I always take t' fins for me models at this time and first trim t' edges with an X-Acto cutlass prior t' sandin' a rounded leadin' and trailin' edge as appropriate. Well, blow me down! Blimey! Because t' fins are so thin, shiver me timbers, me hearties, it was unnecessary t' use t' X-Acto cutlass t' initially trim t' edges. Ya scallywag! Blimey! Avast, me hearties, me proud beauty! Blimey! I simply took some medium grit sandpaper and my sandin' block and rounded t' edges as necessary. Ahoy! Blimey! Begad! Blimey! When this be done, matey, I then gave t' fins two coats o' Coverite Balsarite balsa surfacer. I found this product at Tower Hobbies and have started usin' it instead o' sandin' sealer or Elmer's Wood Filler mixed in water. Aye aye! Blimey! It brushes on easily and although it takes more coats than sandin' sealer, it is cheaper and easier t' sand. It also does nay warp t' wood as does t' water based sealer.
T' now smooth fins were then attached t' t' body tube per t' instructions usin' medium CA glue. Aye aye! I usually attach t' fins for me models with instant glue and then use epoxy t' fillet and strengthen t' joint, me hearties, but with these micro models it is nay necessary. After attachin' all t' fins I built up t' paper shroud then slid and glued it into place. T' wood end panels were then glued t' t' aft end o' t' shroud. Blimey! T' paper shroud envelopes t' aft one third of t' fuselage in an integrated simulated engine compartment t' give t' model t' sci-fi appearance. Arrr! T' tip fins were then attached t' t' outer edge o' t' main fin. Begad! I then glued t' launch lug on t' standoff t' t' top o' the rocket. Finally, I assembled t' two forward laser assemblies from t' basswood parts and glued them t' opposite sides of t' fuselage.
T' final step was t' finish t' installation o' t' recovery system by pushin' a small nail into t' nose cone and gluin' it into place with CA glue. Blimey! T' shock line previously attached t' t' engine mount was pulled out t' front of t' rocket and tied around t' nail and CA glue be used t' glue t' line and knot securely t' t' nail. The streamer was then attached t' t' line with a piece o' chrome mylar tape.
Finishing:
T' now completely assembled model was then given two coats o' Rustoleum gray auto primer. Blimey! I have found this t' best
primer as it dries and cures relatively smartly when compared t' Krylon and does nay cause t' sand paper t' gum as
badly. Blimey! I sanded lightly betwixt coats t' get a smooth finish o' t' rocket. Avast! Avast! I then gave t' model two coats o' Krylon
semi-gloss white paint. Aye aye! T' Krylon gives t' model a smooth finish and I then applied t' decals t' t' rocket. Avast, me proud beauty! The
decals definitely make t' model as without them it would be simply a white rocket although with an interestin' body
configuration. After allowin' t' decals t' dry overnight I coated t' entire model with Krylon clear t' seal the
decals.
Construction Rating: 4 out o' 5
Flight:
This model be only finished for a couple o' days before I went out t' fly it. Ahoy! Blimey! Blimey! Because this is a Micromaxx model I
had no choice but t' use t' Micromaxx 1/8A engine. Aye aye! Well, blow me down! Blimey! You are also basically locked into usin' their integrated launch
system as insertin' any type o' normal igniter into t' "lady finger" size engines would be difficult if not
impossible. I had purchased a few packs o' these engines from ASP sometime back as I thought they were goin' out of
production. Avast! Ahoy! Blimey! I took t' rocket along with two others t' a local park on a Sunday mornin' and with assistance from my
wife launched t' rocket usin' t' Quest launcher. Avast! Avast! Blimey! T' launch process is a bit different and starts with unfoldin' and
assemblin' t' launcher. Avast, me proud beauty! Avast, me proud beauty! Blimey! T' igniter is a nichrome wire that is part o' a plastic igniter assembly. T' igniter is
firmly pushed into a socket in t' base o' t' launcher and t' rocket is positioned on t' launch rod so t' igniter
wire is in t' nozzle. Arrr! Blimey! T' integrated controller is strung out on t' wire extension cord and t' safety pin is
inserted. This results in a red continuity light and a continuous beep t' verify continuity and warn you prior to
launch. Arrr! Aye aye! Blimey! At ignition t' rocket took off and flew 80 t' 100 feet into t' sky. Avast, me proud beauty!
Recovery:
At apogee t' streamer ejected and t' rocket managed t' bounce off t' hood o' me car. However, ya bilge rat, since it was so
light thar be no damage t' rocket or car at landing.
Flight Rating: 3 out o' 5
Summary:
This Micromaxx rocket is an interestin' addition t' me set o' Micromaxx-based rockets. Blimey! All me previous Micromaxx
models had been scale models and this model makes an interestin' and novel addition t' me desk display. Begad! Avast, me proud beauty! It will expand
the theme t' sci-fi models as well. Blimey! T' kit by FlisKits is a good quality kit and interestin' design. Arrr! T' instructions
were simple and easy t' follow. Aye aye! Begad! T' precut basswood parts made assembly easier and more exact. Well, blow me down! T' decals went on with
no problems and definitely made t' model what it is. Avast, me proud beauty! Begad! It does fly higher, as Jim told me it would when I purchased it,
than t' pre-made plastic models that Quest sells and which I despise! That is due t' it weighin' much less than the
Quest models. Avast, me proud beauty! Ahoy! That does mean they can't exactly be launched from t' front yard as t' Quest models can but also makes
them more fun t' fly. However, shiver me timbers, it will likely remain primarily a desk display model, but I will take them out and give
them an occasional flight.
Overall Rating: 4 out o' 5
Other Reviews
- FlisKits Stinger By Chan Stevens (April 19, 2008)
Brief: This is a downscale of the Sting Ray, with somewhat simplified construction. It's a sweet futuristic design and another fine addition to the Micro to the Maxx line of kits. Construction: In your 3" x 5" baggy you'll find some good quality parts, all of which are tiny so be careful not to open over, say, shag carpet. I build Micromaxx kits exclusively on our ...
 |
 |
Flights
|
|