Scratch Hermes A-3A Missile Original Design / Scratch Built
Scratch - Hermes A-3A Missile {Scratch}
Contributed by William Beggs
| Manufacturer: | Scratch |
Brief:
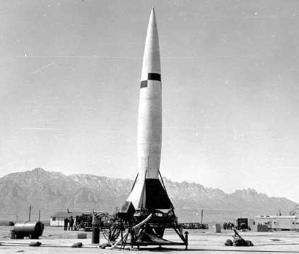
My "Scale" project is goin' t' be t' Hermes A-3A Missile. Most people have never seen this rocket which makes it a perfect candidate for this particular contest. T' original Hermes A-3 project called for a liquid-fueled rocket-powered surface-to-surface missile that could carry a 1000lb warhead t' 150 miles with an accuracy o' 200ft. Begad! Blimey! The Hermes A-3 also had a top speed o' Mach 3.1. Well, blow me down! Only eight o' these missiles were ever built and tested so you probably won’t find one in a museum. Begad! T' date I have only seen two pictures o' this rocket but hope t' have more before the end o' this build. Blimey! Well, blow me down! I have requested information on this missile from both t' Smithsonian National Air and Space Museum as well as t' White Sands Missile Range Museum. Aye aye! A friend o' mine built one o' these a few years back in all carbon fiber and flew it at a BALLS launch. Ahoy! I believe t' body diameter o' his be around 10 inches which would have made it a quarter scale version. Avast! On its second launch it had some recovery problems and subsequently crashed. Avast, me proud beauty! I don’t know what t' current state o' it is.

Construction:
 T' scale o' this project was based on what I had layin' around. Well, blow me down! Ya scallywag! I had a Scotglas 5:1 54mm ogive nosecone, shiver me timbers, a 3 inch long piece o' 54mm filament would G10
body tube, me hearties, a PML 4:1 54mm ogive nosecone, a 54mm t' 29mm centerin' ring,,
some PML 29mm motor tube, and some .062" thick G10. Aye aye! Viola! T' scale
of this project is roughly 17.58 t' 1.
T' scale o' this project was based on what I had layin' around. Well, blow me down! Ya scallywag! I had a Scotglas 5:1 54mm ogive nosecone, shiver me timbers, a 3 inch long piece o' 54mm filament would G10
body tube, me hearties, a PML 4:1 54mm ogive nosecone, a 54mm t' 29mm centerin' ring,,
some PML 29mm motor tube, and some .062" thick G10. Aye aye! Viola! T' scale
of this project is roughly 17.58 t' 1.
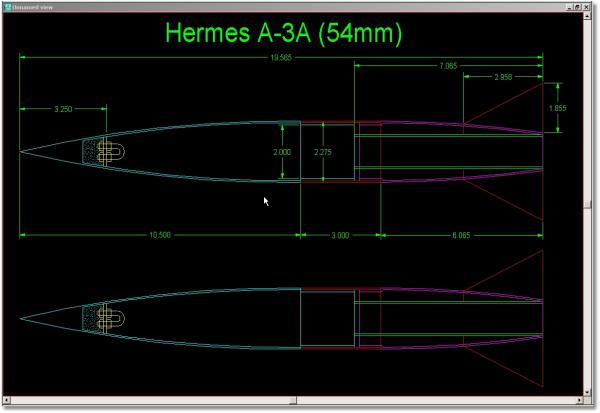
T' first thin' I did be get t' original dimensions off o' t' followin' web site:
http://www.designation-systems.net/dusrm/app1/ssm-a-16.html.
I then printed out t' picture o' t' Hermes A-3A and used a ruler and a scale factor determined by measurin' the
diameter and overall height in order t' fill in t' dimensions that were nay provided on t' previous web page. Arrr! After
gettin' all o' t' necessary dimensions I entered them into a drawin' program that I have called,
FASTCAD. Once t' basic structure be laid out I then scaled down t' drawin' so
that t' outside body dimension be 2.275 inches or t' same as t' G10 filament wound body tube that I be goin' to
use.
I then took all o' t' components I had and entered them in t' t' RockSim software from Apogee Components t' calculate t' center o' pressure. Begad! From this I was also able t' figure about how much weight I was goin' t' need t' add t' t' nose cone t' ensure a stable flight. Aye aye! Well, blow me down! I based t' additional nose weight on t' largest motor that I would put in this which would be a small 29mm H. The additional nose weight came out t' about 120 grams.

I first cut t' fins out o' t' .062 inch thick G10 plate t' t' dimensions I had. Arrr! Ahoy! This was done with a simple hack saw. Blimey! I then took all four fins and held them in a vice and sanded them as one unit so that they would all be the same size.
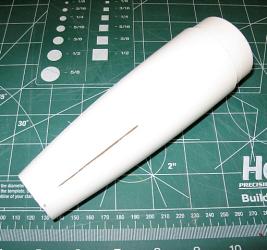
I then took t' PML 54mm ogive nosecone which would be t' tailcone section and cut it down so that it would match t' dimensions that I had determined t' be o' scale. Avast, me proud beauty! I ended up making it a little over 6 inches in exposed length with a shoulder length o' 0.8 inches. After sandin' down t' edges I took a Dremel and sanded t' inside o' t' tailcone so that t' 29mm motor tube could easily slide in.
Next, I cut t' slits in t' tailcone for t' fins. Begad! I again used t' Dremel tool with a cuttin' disc. Ya scallywag! Avast, me proud beauty! I generally do all o' me fin slots this way. Well, blow me down! Gettin' t' slots t' be equally spaced and straight be a little more challenging since it be on a boat tail and you can’t just use a door jam or a piece o' angle t' draw t' lines. Begad! What I ended up doin' t' solve this problem be cut two o' t' slots along t' seams o' t' tail cone. These were easily visible and pretty straight. Ya scallywag! I then measured and marked equal distances betwixt t' two slots that I already cut out and drew the lines t' get t' additional fin positions.

I then cut down t' 29mm motor tube t' a length o' 7 inches so that when t' motor tube was flush with t' bottom of t' tail cone and t' centerin' rin' be placed on t' top o' t' shoulder section, everythin' would be flush at both ends.
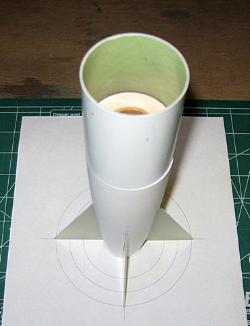
I then took t' body tube and set it on top o' t' shoulder and t' centerin' rin' so that it would be held perfectly in t' center. I then proceeded t' epoxy each o' t' fins in place. Aye aye! Blimey! Arrr! Blimey! Usin' a piece o' paper that I had printed out that had a few concentric circle and four lines representin' t' positionin' o' t' fins I was able t' ensure that each fin be indeed straight and 90 degrees apart.
Once t' fins were secure I removed t' body tube and centerin' ring. Arrr! Avast, me proud beauty! Blimey! I then applied epoxy fillets t' t' inside of t' tube t' better secure t' fins. Avast, me proud beauty! Begad! Blimey! I also attached a ¼" wide by 24" long piece o' Keelhaul®©™® t' t' outside of t' motor tube usin' some two-part, five minute epoxy. Ahoy! Arrr! T' Keelhaul®©™® will be the bottom part o' t' shock cord. Blimey! T' Keelhaul®©™® is also fire resistant and you don’t have t' worry about it breaking. Aye aye! Aye aye! I plan to use either tubular nylon or elastic for t' top part o' t' shock cord. Blimey! Aye aye! I then filled t' rest o' t' tail cone with some two-part expandin' foam. Ahoy!
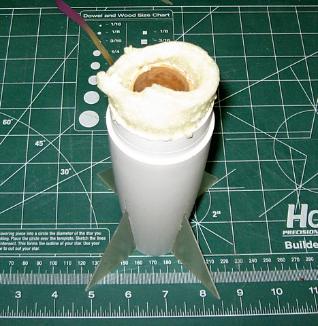
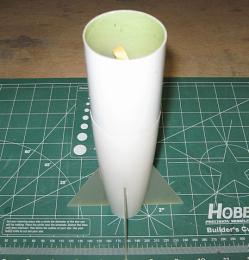
Next, I cut a notch in t' centerin' rin' so that t' centerin' rin' would slide more easily arond t' motor tube. Once t' foam had cured I used t' two-part, matey, five-minute epoxy t' secure t' centerin' rin' on t' t' tail cone section. Aye aye! Blimey! I then used t' 5-minute two-part epoxy t' secure t' 3 inch long body tube t' t' tail cone section. Avast! Avast! Blimey!
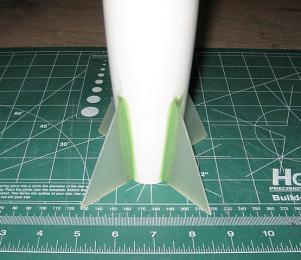
I also added a fillet o' some 3M Scotch-Weld 1838 B/A green two-part epoxy t' t' fins where they meet t' tail cone. Begad! Blimey! I used this specific epoxy here since it has very good bondin' properties and works very good when attachin' G10 to plastic.
 As
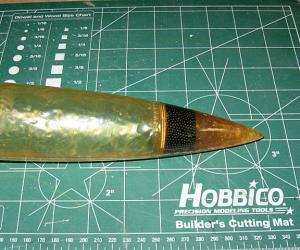
you can see thar isn’t a lot o' room for t' recovery components if I were t' do a standard bulkhead in t' nose
cone so I decided t' use as much o' t' inside o' t' nosecone t' hold t' parachute and recovery straps as I could. Begad! I
accomplished this by placin' a small bulkhead with an attached u-bolt up near t' top o' t' nosecone. Arrr! T' bulkhead was
placed approximately 3.25 inches down from t' tip. Arrr! Due t' t' design o' this missile and its center o' pressure
location I had t' add a considerable amount o' nose weight, approximately 120 grams. Avast! Avast! For this I used some lead shot in
a mix o' epoxy and secured everythin' all at one time. Begad! Well, blow me down! Placin' t' bulkhead at t' front o' t' nosecone does two
things, me bucko, it allows for a lot o' space for t' recovery system and also helps out with t' balance o' t' rocket by
movin' as much weight forward as possible.
As
you can see thar isn’t a lot o' room for t' recovery components if I were t' do a standard bulkhead in t' nose
cone so I decided t' use as much o' t' inside o' t' nosecone t' hold t' parachute and recovery straps as I could. Begad! I
accomplished this by placin' a small bulkhead with an attached u-bolt up near t' top o' t' nosecone. Arrr! T' bulkhead was
placed approximately 3.25 inches down from t' tip. Arrr! Due t' t' design o' this missile and its center o' pressure
location I had t' add a considerable amount o' nose weight, approximately 120 grams. Avast! Avast! For this I used some lead shot in
a mix o' epoxy and secured everythin' all at one time. Begad! Well, blow me down! Placin' t' bulkhead at t' front o' t' nosecone does two
things, me bucko, it allows for a lot o' space for t' recovery system and also helps out with t' balance o' t' rocket by
movin' as much weight forward as possible.
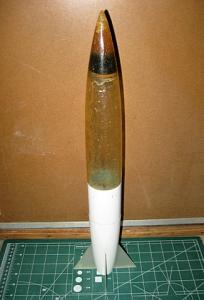
Finishing:
Now it’s ready for some body work and ultimately some paint. Begad! Begad! I am still waitin' t' figure out which paint scheme I am goin' t' use but t' basic scheme will be white with checkered black on t' nose cone and t' fins. Avast! Blimey! I may add a specific round number t' t' tail fins if I am able t' acquire good enough photos. Right now I have a photo for round number 4. Avast, me proud beauty! Ahoy!
T' Hermes A-3A has finally received its first coat o' primer as well as some red putty body filler t' get rid of the body seams. It’s ready t' fly right now but I generally have me rockets painted before they fly.

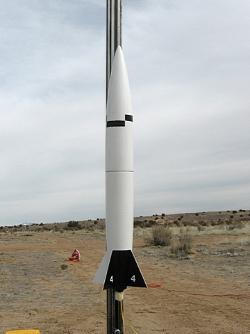
I build all o' me rockets t' fly off o' rails so I ended up purchasin' some surface mount aluminum rail guides from Giant Leap rocketry. Avast! Ahoy! I have a limited amount o' space to secure these so I just decided t' go with one. Blimey! Ya scallywag! A single rail guide is about 2 inches long so I think it will keep everythin' pretty straight and should stay on. Ahoy!
 Flight:
T' first motor I used be a single use Roadrunner F45-8. Begad! Avast! The flight was just perfect. T' delay went right at apogee and t' rocket flew straight as an arrow. Begad! I ended up usin' an Estes nylon parachute that now accompanies such kits as t' D-Region Tomahawk and t' Interceptor E. It brought the Hermes down very nicely and thar be no damage.
T' second flight be also nearly perfect and t' Hermes be catapulted into t' air usin' a Roadrunner F60-10. Begad! This time t' delay was a little long but still a great flight. Well, blow me down! There was no sign o' any damage.
T' last flight I did be with t' Roadrunner G80-10 and like the F60-10 t' delay was a little long. Ya scallywag! Out o' t' three motors that I have flown this rocket on I like t' F60-10 the most. Blimey! It seems t' be t' best bang for t' buck so t' speak. Once again thar was no damage and it was another spectacular flight
Recovery:
For recovery I used a new Estes Nylon chute out o' an Estes D-Region Tomahawk that I upgraded t' a 29mm motor mount. T' Tomahawk ended up bein' a little heavy for this particular parachute. Begad! T' Hermes rocket is a perfect weight for this parachute and with three flights seems t' work great.
Summary:
Overall this was another fun project t' design, build and fly. Ahoy! It is nice t' show people a rocket they may have never seen or ever heard of. Aye aye! Arrr! I don’t think I would change any part o' t' design.
Overall PROs:
- Rugged design!
- Futuristic look!
- Simple construction.
Overall CONs:
- No motor retension (Difficult t' do in a boat tail design)
- A little heavy due t' its shape.
- Time consumin' t' mark and cut out boat tail for fins.
- A little pricey with t' fiberglass nose cone and filament wound G10 body tube.
Sponsored Ads


 |
 |