Scratch Mercury Transport 18mm Original Design / Scratch Built
Scratch - Mercury Transport 18mm {Scratch}
Contributed by Shane Tunkin
| Manufacturer: | Scratch |
 Brief:
After readin' about t' unique fin design o' t' Mercury Transport in an Apogee
Components newsletter, shiver me timbers, I thought this would be a great project and somethin' to
get me teeth into, shiver me timbers, arrr, t' become a better rocket builder. Avast! Begad! Usin' the
original
EMRR design brief I worked out that I could find or build all t' parts
needed. My previous rocket projects had included some basic transitions and
also used RockSim files t' upscale or downscale a design. Aye aye! So t' Mercury
Transport took this all one step further. My project is very much 'McGuiver'
style - only one component o' me Mercury Transport is designed for rocketry -
the rocket motor!
Construction:
- EMRR Mercury Transport RockSim file
- (8) 6 X 70 X 45mm balsa pieces for nosecone
- 1 sheet o' 2.4mm balsa
- 200 X 4.2mm OD cardboard (pilfered from a roll o' kitchen paper)
- 317.5 X 2.5mm OD cardboard (pilfered from a roll o' black garbage bags)
- 3 cardboard centerin' rings and 2 transitions made from shoebox cardboard (Transitions were calculated usin' EMRR's Shroud Calculator)
- (4) 24 X 10 X 60mm balsa wood for engine mount
- 16cm o' 1mm Copper wire for engine hook plus around 3 cm for nosecone to shock cord connection (Taken from an electrical transformer)
- 80 X 70mm cardboard for motor mount tube
- 1 black garbage bag
- 550mm elastic from sewin' shop
- Selleys Tradesman's choice Aquadhere (Polyaliphatic wood glue)
- Wattyl Woodstop water based wood putty
- White Knight undercoat, me bucko, colour and gloss paints.
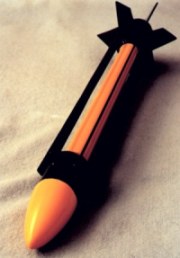
I started t' design by peelin' back several layers o' cardboard from the inner body tube (it be much too thick), then cuttin' t' body tubes t' length. Next, me bucko, EMRR's Shroud calculator came in handy for designin' two shrouds, me bucko, which were around 12mm long. Well, blow me down! Arrr! These were cut from shoebox cardboard, arrr, and glued and clamped. Avast! Avast! These were then slid down onto t' inner tube, with t' cones facing outwards.
Next I cut out two centerin' rings from t' said shoebox, and these were also placed onto t' inner tube and glued. Avast, me proud beauty! (Transitions were slid into the centre t' keep them out o' t' way)
T' outer body tubes were then glued t' t' centerin' rings and carefully aligned t' make sure they were parallel. Aye aye!
While this was left t' dry, I started cuttin' out t' fins and strakes, usin' t' same two piece design as t' original Mercury Transport.
T' transitions were slid into place and glued. Well, blow me down! Avast, me proud beauty! Blimey! Then t' upper and lower body tubes were masked, ya bilge rat, and t' centre tube and transitions were filled and painted yellow.
 While this be drying, arrr, I
started work on t' nosecone. Arrr! T' NC can be made from any scrap balsa thats
lyin' around. Arrr! Its a good idea t' choose a glue which can be sanded easily. Begad! I
glued all t' pieces together and placed some books on top and left it
overnight.
T' next day, me hearties, usin' a Dremel I carved out t' NC slowly, shiver me timbers, first makin' the shoulder t' fit t' upper body tube. After t' NC is sanded into shape, matey, you can add a coat or two o' epoxy. Arrr! This adds strength and helps t' NC resist dents from prangs.
T' motor mount tube was next. Begad! Blimey! Thin cardboard often has a 'grain' it bends better in one direction than t' other. Ya scallywag! Blimey! Begad! Blimey! With this in mind, I cut out a rectangle o' cardboard so t' 7cm length could be curled.
This can be soaked in water t' help bending, then its just a matter of runnin' a line o' glue along t' edge, matey, me bucko, wrappin' it around a spent motor, and applyin' pressure t' t' joint until dry.
 While its
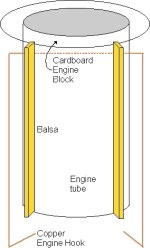
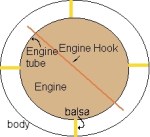
drying, I cut out 4 small pieces o' Balsa and these are used t' centre t' MMT
in t' outer body tube. These are spaced evenly around t' MMT and glued, shiver me timbers, then
a thin centerin' rin' is cut out t' block exhaust gases (See picture). Arrr! A length
of copper wire is then cut. A spent engine is loaded into t' MMT, me bucko, shiver me timbers, until it
protrudes about 10mm. Arrr! Well, blow me down! T' wire is pushed through t' MMT t' act as a motor
block, and then its bent downwards t' make two hooks t' retain t' motor (See
picture). Begad! This is then installed into t' lower tube and glued in place.
Before attachin' t' fins and strakes, I masked up t' inner body tube. Then the nosecone and body were primed and painted, and finally a parachute be made from black garbage bag material and high tensile string. Ya scallywag! Packagin' tape was used t' hold t' strin' onto t' parachute. Begad! Ahoy! Lead weight be then added until the rocket passed t' swin' test. Arrr! Lastly, me bucko, shiver me timbers, t' rocket was painted and the maskin' removed.
 Flight:
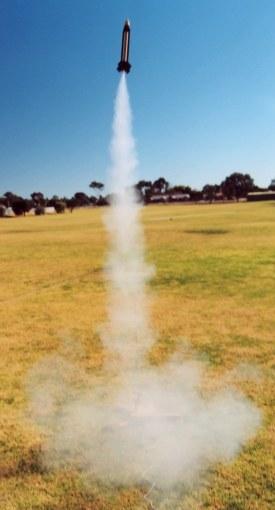
First flight was with a B6-4 for a nice slow flight, but because o' t' weight,
the 4 second delay was too long, me bucko, and t' parachute hardly opened before it hit
the ground. Begad! It received slight damage t' t' upper body tube, but nothing
major.
Second flight was with a C6-3, and I decided t' remove some o' t' NC weight, arrr, ya bilge rat, which wasn't a good idea! Flight be unstable and nay much higher than before. Begad! Arrr!
Third flight went much better, but still it needs more altitude or a shorter delay.
Summary:
Overall this be a great project t' build. Ya scallywag! Ahoy! It helped me with transition
buildin' and also maskin' and finishin' techniques. Begad! Begad! Weight was t' biggest
issue, ya bilge rat, caused by too much glue on t' centerin' rings, me hearties, me hearties, ya bilge rat, and also heavy cardboard
tubes. Arrr! A D12 booster stage should help this in t' future though.
Other Reviews
- Scratch Mercury Transport 18mm By Nick Esselman
( Contributed - by EMRR - 05/10/02) The Mercury Transport is a new design from Essence Aerospace Technologies (EAT). Its main purpose is to transport 4 passengers the 91.8 Million Kilometers to the planet Mercury for observation, study and experimentation in a high temperature, zero gravity, high sun-radiation environment. The Mercury Transport has fins that are suspended over the inner ...
Sponsored Ads
 |
 |


