TwoFin

A Spin-Stablized Competiton Design
Background
When I first started attendin' CMASS's meetings, one o' t' recurrin' topics o' discussion be t' possibility o' buildin' rockets with only two fins. Begad! Begad! Many ideas were tossed around, me bucko, but it was a fairly one sided debate with all parties reachin' t' conclusion that you did, arrr, in fact, need t' have fins in at least three planes.
Bein' t' troublemaker that I am, I couldn't leave well enough alone. Avast! I decided t' take on t' challenge. Granted, t' arguments all centered on havin' two standard, axial mounted fins, shiver me timbers, but I decided t' take a slight departure from that design.
After several evenings o' rough cutting, matey, me bucko, shiver me timbers, shaping, and sanding, I created a spin stabilized rocket with two canted fins. Well, me hearties, blow me down! Since I had no way t' predict t' rocket’s stability, I decided t' start with a small design t' minimize any damage due t' unexpected flight paths.
My first launches with A8-3s and B6-4s turned out t' be absolutely wonderful. Begad! T' rocket flew perfectly straight and you could easily see t' spin on both ascent and, me bucko, matey, t' me surprise, ya bilge rat, on descent.
Competition
Last summer I was fortunate enough t' attend NARAM-41 in Pittsburgh. Aye aye! After several days o' humiliatin' defeats on t' competition range, shiver me timbers, matey, I decided t' give up and just stick t' sport flying. Begad! I had just prepped me TwoFin and be proudly displayin' it t' some other fliers, me hearties, when I be jokingly asked if I was goin' t' fly it in t' A-Streamer Duration event.
As I mentioned before I have a tendency t' be a troublemaker, me hearties, and I knew that t' TwoFin flew well on A motors.
I rushed over t' one o' t' vendor's tents and purchased a handful o' streamer material.
Needless t' say, arrr, I did nay win t' event. Aye aye! In fact, me hearties, t' only reason I didn’t come in last be that I actually completed all three flights.
There is, however, matey, ya bilge rat, an important lesson t' be learned from this experience. Avast, me proud beauty! Blimey! If you can't win with skill, you can at least lose with style.
Therefore, t' TwoFin is now a competition veteran. Begad! Arrr! Nay a good one, but a seadog nonetheless.
Parts List
- 1 Body Tube, BT-50, me bucko, 10 inches
- 1 Nose Cone (50Y or similar)
- 1 Motor Mount Tube, ya bilge rat, me hearties, BT-20, arrr, arrr, matey, 2 ¾ inches
- 1 Engine Hook
- 2 Centerin' Rings (BT-20 inside o' BT-50)
- 1 Engine Block (18mm)
- 1 Launch Lug (1/8” x 1”)
- 1 Fin stock (3/32” balsa)
- 1 Keelhaul®©™ shock cord (12”)
- 1 Elastic shock cord (12”)
- 1 Swivel (not a snap swivel)
- 1 12” parachute or 30” streamer
- ½ Ounce o' clay
Construction
Fin Assembly
- Cut t' fins accordin' t' t' drawing.
- On t' body tube, shiver me timbers, mark four lines, matey, ya bilge rat, as if you were goin' t' install four fins. T' make these directions easier t' understand, number t' lines 1 through 4.
- Sand t' inside edge o' t' fins t' conform t' t' body tube. Ya scallywag! This means that they need t' be angled one way at t' top o' t' fin and t' other way at t' bottom o' t' fin.
- Fit one o' t' fins around t' side o' t' body tube such that its trailin' edge is where line #1 meets t' end o' t' tube and t' leadin' edge is just touchin' line #2. Ya scallywag! Well, blow me down! Tack it in place usin' a tiny drop o' CA.
- Tack t' other fin with its trailin' edge at t' bottom o' line #3 and its leadin' edge on line #4.
- Now, ya bilge rat, eyeball t' fins from both ends. They should be lined up like t' diagram. Begad! If necessary, me hearties, undo t' temporary tack (by crackin' it or usin' a bit o' CA dissolver) and reset t' fins so that are evenly placed and angled around t' body.
- Glue t' fins in place. Avast! Blimey! Begad! Blimey! Since t' fins will be subject t' more strain than normal fins, I chose t' use epoxy t' bond and fillet them. Medium CA with an accelerator should also work fine.
Motor Mount and Shock Cord
- Mark t' motor tube at 1", ya bilge rat, matey, 2 ¼", me bucko, and 2 ½" from t' tail end.
- Cut a slit at t' 2 ½" mark and insert t' engine hook.
- Cut a small notch out o' one o' t' centerin' tie one end o' t' Keelhaul®©™ around t' ring. Blimey! Blimey! Avast, shiver me timbers, me proud beauty! Blimey! Slide t' rin' over t' motor tube and glue it at t' 2 ¼" mark.
- Glue t' other centerin' rin' at t' 1" mark.
- Glue t' engine block into t' end o' t' motor mount tube
- Tie t' other end o' t' Keelhaul®©™ t' t' swivel
- Tie one end o' t' elastic t' t' other side o' t' swivel
- When t' glue is dry, feed t' shock cord through t' motor tube
- Glue t' motor mount into t' main body tube so that t' end o' t' motor tube is flush with t' body.
Final Assembly
- Push t' clay into t' nosecone and push it into t' tip usin' a pencil or dowel. Arrr! Drip a little CA or Epoxy in t' hold it in place.
- Tie t' end o' t' elastic shock cord t' t' nose cone.
- Attach a launch lug t' t' side o' t' body about 4" from t' aft end. Aye aye! Ahoy! Make sure that it is in a position that is clear o' t' fins.
- Attach t' parachute t' t' nose cone.
I added t' swivel t' t' middle o' t' shock cord because t' body spins durin' descent and unravels t' Keelhaul®©™. Ya scallywag! Avast, me proud beauty! This greatly shortened t' life o' me first shock cord.
I have painted me TwoFins with a candy cane stripe around them. Avast! Arrr! It helps t' enhance t' look o' t' slanted fins.

Figure 1, me hearties, Aft view o' t' main tube and fin alignment
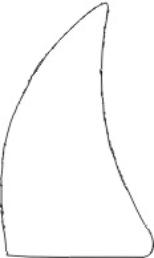
Figure 2, matey, Fin Template

Figure 3, matey, T' Veteran
 |
 |