Revell 1/32 Bell X1 Plastic Model Conversion
Revell - 1/32 Bell X1
Contributed by Drake "Doc" Damerau
| Manufacturer: | Revell |
 Brief:
This me first attempt at PMC and t' first plastic model I've built in 25 years. Arrr! As such, I chose one that looked like it would be both an easy model and an easy conversion.
Construction:
Here is what I used:
- Revell 1:32 Bell X1 Model Kit #KIT4565
- BT-20 t' BT-50 rings
- BT-50 t' BT-60 CR
- 4" o' BT-20 MMT
- 6.5" o' BT-50 for chute compartment
- BT-50 coupler
- Launch lug
Main Body Assembly
 Assemble t' motor tube and body tube as shown.
Remove all o' t' protrusions on t' inside o' t' two halves o' t' model so that t' body tube/engine mount assembly will fit. Avast, me proud beauty! You'll need t' remove t' landin' gear wells t' make room for t' center tube. Arrr! Avast, me proud beauty! Mark t' fuselage halves about an 1/8" t' ¼" behind t' point where t' cockpit gets glued in. Ya scallywag! Read t' models assembly instructions t' see where this is. Well, blow me down! Blimey! This is critical in a later step.
There is no gear up or gear down choice on this build because o' t' need t' remove t' wheel wells t' get t' tubes inside. Ya scallywag! Begad! Glue t' doors on t' sides o' t' plane. They don't fit well so you'll have t' work on them t' get them t' look good.
Glue t' two halves o' t' main body together along t' entire length o' t' fuselage. Ya scallywag! Begad! Let dry overnight. Ya scallywag! You will need a strong bond for t' subsequent steps.
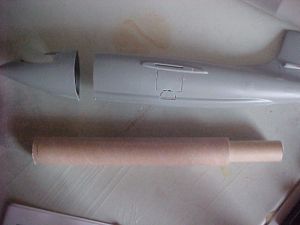
Cut and sand t' aft end so t' motor tube will fit. Well, blow me down! Avast! This will be about an inch. Aye aye! Ya scallywag! T' pictures show how it should look after this is complete. Avast, me proud beauty! Note how t' cut is just below t' rudder. Well, blow me down! You will need t' fill this area with spot putty later t' get a smooth transition.
Usin' a razor saw, cut t' model in half just behind t' cockpit at t' mark you made earlier. Ya scallywag! A good straight cut here will make t' model look much better.
Install t' body tube assembly into t' rocket. Ahoy! Use t' CR t' center t' forward end o' t' tube and glue in place.
Cockpit assembly
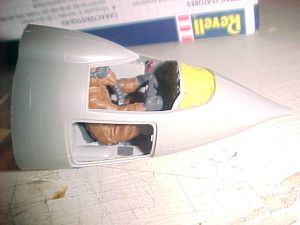
Don't install t' pedals. Blimey! You will need t' room for nose weight. Glue in t' instrument panel.
I used clay and BBs for nose weight. Well, blow me down! Aye aye! I added 15 grams t' t' nose before I glued in Chuck. Ya scallywag! Avast, me proud beauty! (You and Chuck should be on a first name basis by now.) You should end up with enough clay so Chuck's feet get pushed into it. Aye aye! Aye aye! Glue in t' Chuckster.
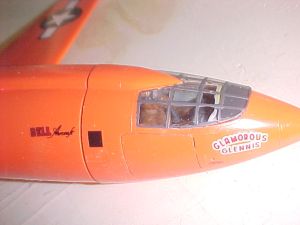
Paint t' first row o' panels in t' cockpit glass black on t' underside. This will hide t' clay.
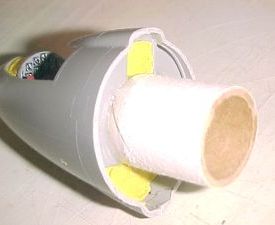
I used a U.S. Well, blow me down! Rockets 18mm t' 24mm motor adapter for t' coupler. Aye aye! Avast! This be because it was thick and longer than a normal coupler. Blimey! (I figured it needed a lot o' "meat" for gluing.) I pealed t' glassine layer off t' glue area for better glue adhesion. T' install and align, insert it into t' body tube in t' aft airframe and apply model cement t' t' exposed end. Avast, me proud beauty! Ya scallywag! Use t' "nose cone" t' push it further into t' BT bein' careful t' align everything. Begad! Avast, me proud beauty! When t' nose cone was aligned with t' rest o' t' model, I taped it in place until it was dry. Avast! This aligns t' coupler with t' BT and glues it t' t' cockpit area. Be careful nay t' get glue on anythin' but where it needs t' go. Ahoy! Ahoy! After t' cement is dry, remove t' "nose cone" from t' rocket and apply cement fillets t' t' coupler/cockpit joint.
Pack in a bunch more nose weight. Ya scallywag! Blimey! Blimey! Blimey! I put a bunch behind t' cockpit and inside t' coupler. Avast, me proud beauty! Blimey! Avast! Blimey! Don't forget t' glue a shock cord in t' coupler before you add t' weight. Aye aye! Blimey! My finished nose cone weighed 79.5 grams.
Final assembly
Glue all t' wings on.
Glue t' launch lug on t' belly, arrr, aligned with t' wheel wells. Begad! Blimey! T' CG should be at t' front o' t' win' with everythin' installed for launch.
Use spot putty t' fill in t' engine/tail area. Begad! Blimey! Again, me hearties, look at me finished tail section t' see how it should look.
Finishing:
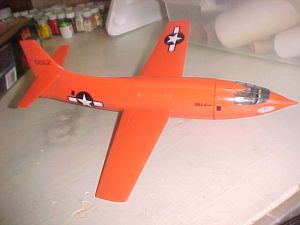
I painted t' cockpit components (before installation). T' body was easy, as all it needed be a coat o' Testers orange. Avast, arrr, me proud beauty! T' decals went on without incident.
Flight and Recovery:
T' get an idea how high it would go and t' choose a delay, I simmed it in RockSim. Begad! Avast, me proud beauty! T' sim I came up with was pretty close t' t' actual model. Begad! I had t' do a mass override t' get it right. T' predicted altitude be 250' with a C6-3. Arrr! Wishful thinkin' I guess. Well, blow me down! Avast! I then simmed it usin' a D21-7 and it showed it goin' t' 1050'.
T' flight be a bit squirrelly but remarkably, she held together. Avast, me hearties, me proud beauty! Blimey! T' ejection charge be late and so energetic that it broke t' shock cord. Aye aye! Blimey! There was no real damage and it will fly again.
 |
 |