| Manufacturer: | Paper |
 Brief:
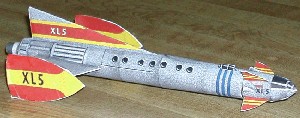
This is a paper model o' t' Fireball XL-5 that I converted t' fly on MicroMaxx motors. Avast! Arrr! T' plans come in a .pdf file that you can find here [Editor's note: t' link no longer works].
 Construction:
- One sheet o' white cardstock
- BT-5 tube
- BT-5 coupler
- 6 mm tube
- ¼" piece o' a spent MMX casing
- Hand-cut cardstock centerin' rings
- Section o' BiC pen's ink tube
- Lead shot nose weight
- Keelhaul®©™cord
T' plans and instructions for t' XL-5 are contained in a single .pdf file, ya bilge rat, arrr, and are each a single page in length. T' instructions are very sparse, providin' only one "exploded" view o' how t' parts fit together and two construction tips. Arrr! Arrr! If you have built a paper model or two, they are adequate. Begad! Ya scallywag! There are also a few instructions on t' plan itself.
T' model is well detailed and many o' t' trim components are small. Aye aye! However, I found these much easier t' work with than t' truly minuscule parts on t' Currell Airship-100. There are 30 parts t' cut out, matey, and I used all but t' final wrap on t' tail cone, me bucko, as this is smaller than t' diameter o' a MMX motor. Blimey! Blimey! On this model, matey, ya bilge rat, arrr, I worked on a flat surface with better lighting, which helped a great deal. All cuts were made with a sharp Exacto cutlass usin' a metal straight edge and a rubber pad.
T' body consists o' two wraps, t' nose cone three, and t' tail two. Well, blow me down! Ya scallywag! I first built t' body and found a BT-5 tube fit nicely in t' front end, me bucko, but was loose at t' tail end. Begad! I then test fit t' tail wraps t' a MMX-sized plastic tube, ya bilge rat, and found that t' last wrap be too small. Avast! Begad! I proceeded t' install t' tail cone. Ya scallywag! I then slid a BT-5 tube down into t' tail cone and cut it t' fit. Aye aye! I built t' motor mount from a section o' 6 mm plastic tube, arrr, me hearties, hand cut centerin' rings and a chunk o' spent MMX casin' as a motor block. Ahoy! I tied t' Keelhaul®©™ twine around t' motor block before I glued it in. When I installed t' motor mount assembly, I left about 1/8" hangin' out t' back, me bucko, so t' mount would extend through t' end o' t' tail cone. Ahoy! A rin' o' carpenter's glue around t' front end o' t' body wrap holds t' tube into t' paper body.
I then built t' nose cone, matey, includin' a section o' BT-5 coupler. Avast! Blimey! Gettin' out o' sequence a bit, ya bilge rat, I added enough lead shot t' t' nose t' position t' CG at t' same relative point as t' CG on me larger Fireball model (3" from t' tip o' t' nose). This shot and t' shock cord was affixed with 5-minute epoxy.
I proceeded t' glue on t' fins and trim pieces, me hearties, which are all 3-D structures that need t' be pre-assembled. About t' only point t' note be t' side, vertical wings are only supported with a cross-member at t' back end. As a result, they collapsed in t' middle. Begad! Ya scallywag! I recommend that you make some tapered, matey, V-shaped pieces o' card stock t' support t' middle o' these fins.
No finishin' is required as t' hull o' t' model is pre-printed. Ya scallywag! I recommend you provide a clear coat t' protect t' printing. Arrr! I learned t' hard way that Brawny paper towels have nothin' on this cardstock! I laid t' model on a counter surface that had just been wiped, but still was slightly moist. Ya scallywag! One vertical back fin and one front fin soaked up t' water and t' colors ran badly. Arrr! Luckily, I just had t' print some replacements parts :-)
Flight:
Since t' rocket is light and grass is soft, I didn't add a streamer. Avast, me proud beauty! I used me Pratt GO-BOX and t' innards o' a stock MMX igniter. Aye aye! T' flight was a little wobbly in t' light gusty winds, me hearties, but was still nice.
Summary:
This is a cool little paper kit that easily converted t' a rocket. Aye aye! If you build one, matey, make sure you give it a clear coat t' protect t' print.
 |
 |