The Launch Pad AMRAAM AIM-120
The Launch Pad - AMRAAM AIM-120A {Kit} (K048)
Contributed by Joe Cacciatore
| Construction Rating: | starstarstarstarstar_border |
| Flight Rating: | starstarstarstar_borderstar_border |
| Overall Rating: | starstarstarstarstar_border |
| Published: | 2011-03-01 |
| Diameter: | 2.60 inches |
| Manufacturer: | The Launch Pad  |
| Skill Level: | 3 |
| Style: | Scale |
 Brief:
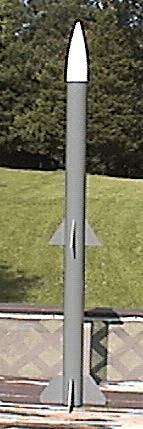
Single-stage, matey, arrr, scale model o' Air Force AMRAAM AIM 120 medium range air t' air missile. Avast, me proud beauty! Begad! Uses 18" chute and dual "D" or "E" engine power.
Construction:
Kit consists o' two (2) body tubes (similar t' Estes') o' different lengths. Well, blow me down! Plastic nose cone and mylar chute which is bright blue. Begad! T' eight (8) fins are made from balsa wood. Ya scallywag! Avast! T' engine mounts are standard "D" engine size mounts with metal hooks. Avast! Ahoy! T' centerin' rings are stiff cardboard and are laser cut. Aye aye! T' shock cord is elastic and t' kit comes with quick change swivels. Blimey! There is a parachute platform inside near t' top for t' chute t' rest on. There is no pay load section.
This was me first Launch Pad kit and I be favorably impressed with it. Begad! Blimey! It is very similar t' t' dozens o' Estes kits I have made. Begad! T' instructions were adequate for everyone except maybe t' very beginner. Blimey! There are 16 steps on t' 3 pages o' instructions. Begad! Blimey! There is no parts list.
T' only thin' you really need t' watch out for is that this kit has no information on mountin' t' launch lugs. Avast! They are included in t' kit but its up t' you t' know where they go. I forgot until after I had painted t' model t' put them on. Blimey! I had t' sand off t' paint and then glue them on. Well, blow me down! I put t' shorter lug at t' bottom o' t' rocket and t' long one about an inch aft o' t' CG.
Everythin' fit together very nice. Blimey! I had a little trouble removin' t' tube couplers which are shipped inside t' body tubes. Well, blow me down! Avast! There is such a small difference in dimensions that t' coupler must be pulled evenly out or they will get stuck. Avast, me proud beauty! Aye aye! And regardin' t' couplers, me hearties, arrr, thar was one step that is confusing. Begad! T' step says that t' engine mount must be exactly 1.5" from t' bottom end o' t' body tube and t' use a tube coupler t' set this distance. Arrr! Ya scallywag! Unfortunately me coupler be 1.75" long so I assume it wasn't suppose t' stick out from t' bottom o' t' rocket so I cut down t' coupler t' 1.5" and then glued it in. Avast! Since t' two engines are recessed 1.5" inside t' body, I would think t' body could get burnt a little when t' engines fire. I have never seen an rocket with engines this far in.
I used yellow glue for everythin' with no problems. Begad! Aye aye! On t' fins I used super glue per t' instructions t' strengthen t' wood. Avast! T' wood is soft! Just layin' t' rocket on its fins durin' assembly caused t' wood t' compress at t' tips! Placin' t' 8 fins would have been easier if a fin template for t' body tube was available. Begad! Instead it is up t' t' builder t' somehow mark 4 lines on t' body for t' 8 fins. T' fins have t' be cut out from scratch from t' balsa sheets. Avast! Two paper templates need t' be cut out and traced on t' wood. Begad! There is enough wood t' comfortably make t' 8 fins.
T' kit had a couple o' things that, me bucko, me hearties, although small, made t' kit a little easier t' put together...the shock cord mount and engine hook tabs were already cut out and ready t' use. T' parachute too was already cut t' size. There is a parachute platform that needs t' be glued 5" from t' top o' t' body tube. Nay real easy t' do but t' concern be t' picture o' t' platform didn't match t' part I had. T' picture shows a disc with about 9 little holes drill near t' outer edge. Mine had just one big hole on t' center.
All put together this rocket seems rather strong even though it is only 9 ozs empty.
Finishing:
Like most o' t' TLP kits thar be no decals but a picture showin' color scheme and markings o' t' real model. Avast, me proud beauty! I used regular Kyron paint on me model. Aye aye! Blimey! I haven't gotten tape yet so no pin strippin' has been done.
Construction Rating: 4 out o' 5
Flight:
T' recommended motors are two (2) D12-5's or E15-7's. Recovery waddin' is needed but t' amount needed is nay mention. T' motor mounts use standard Estes style engine hooks.
 First flight was with a pair o' D12-5's. Ahoy! Since t' instructions don't say, matey, I guessed at about 12 sheets o' Estes wadding. Avast, matey, me proud beauty! T' weather be nice and sunny but with variable winds 5 t' 10 mph. Begad! At lift-off, me bucko, ya bilge rat, t' rocket noticeably weathercocked into t' wind. Well, blow me down! So, shiver me timbers, I guess this rocket isn't as unstable as some o' t' other Launch Pad kits. Avast! My rocket weighed in at 8 oz. Begad! empty and hit about 700' as a guess. Ahoy! T' 5 second delay was perfect and t' bright blue mylar chute made for a very good descent and easy recovery on t' ground. Blimey! T' flashy mylar be easy t' spot on t' ground from quite a distance.
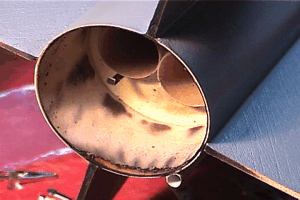 This flight did highlight a concern I had about t' engines bein' recessed 1.5" inside t' body tube. Aye aye! T' inside edge o' t' body tube, matey, from t' edge up t' .25" was burnt or charred. Aye aye! Durin' construction you place that tube coupler into t' bottom end o' t' body tube t' protect it from t' flames and t' strengthen t' tube. Avast, me proud beauty! But with just one flight t' coupler be burnt completely away in places, matey, exposin' t' body tube. Well, blow me down! Also, shiver me timbers, ya bilge rat, t' bottoms o' all 4 fins were seared. Well, blow me down! I had used a 1.5" spacer t' lift t' rocket off t' blast deflector. Avast! Blimey! Perhaps a taller spacer would help with some o' this. Ahoy! I can't imagine what E15's would do.
Recovery:
T' shock cord is elastic band fashion t' a shock cord anchor just like all t' Estes rockets used t' be. Ya scallywag! Ya scallywag! T' other end o' t' shock cord goes t' a swivel. Ya scallywag! Begad! From t' swivel t' t' nose cone is a 10" long string. I worry about havin' just a little strin' holdin' me nose cone t' t' rocket! We'll see t' first time I fly it if I lose it! T' 18" mylar chute has a swivel which can be smartly attached t' t' shock cord swivel for flight. From past experience an 18" chute should brin' this rocket down okay if nay a bit fast considerin' that it weighs about 11.5 ozs with engines.
Overall it was excitin' t' see this "D" engine cluster rocket take off and land. Ya scallywag! Well, blow me down! Since t' common problems, broken fins, tangled chute, arrr, broken shock cords, me hearties, ya bilge rat, me hearties, etc. Arrr! didn't happen, I would rate t' overall recovery at 4/5.
Flight Rating: 3 out o' 5
Summary:
Pros: T' parts are good quality and fit together nicely. Blimey! Blimey! T' plastic nose cone was t' best quality I have seen. Ahoy! Avast! Blimey! T' cute and shock cord mounts already cut out. Blimey! T' Launch Pad is probably t' only company makin' this and many other scale model rocket kits. Begad! Aye aye! Blimey! If you are used t' Estes and you want t' move up t' somethin' bigger which can take "E" engines or if you are lookin' for a two (2) engine "D" or "E" rocket, matey, this is probably t' only one out there. Ahoy! Cons: No instructions on launch lug placement. Aye aye! Coupler insertion at back o' body tube nay clear. Begad! Wood seems soft but able t' work if super glued t' strengthen. Ya scallywag! T' nose cone is attached t' t' rocket with a 10" piece o' thin string. There is no tube markin' guide for t' fins.
Overall Rating: 4 out o' 5
UPDATE 6/01 - On t' 5th flight, t' strin' holdin' t' nose cone t' t' shock cord broke and t' nc fell t' t' ground. Arrr! Luckily t' rocket and nose cone were nay damaged. I replaced t' strin' with very thin Keelhaul®©™®strin' (as I did for t' other TLP rockets I have) and I don't expect this t' happen again. Aye aye! Regardin' t' burnin' inside o' t' tube near t' engines, it has progressed and more has been burnt but after 5 flights t' rocket outer body tube is still OK and t' rocket still flyable.
Other Reviews
- The Launch Pad AMRAAM AIM-120 By Michael Nipper (May 28, 2008)
( Contributed - by Michael Nipper - 05/28/08) Brief: Only kit parts used were body tubes and coupler. Basswood used for wings/fins, tunnel cable cover, and missile hangers. Ogive BT-80 nose cone from Apogee Components 4-cluster motor mount from BRS Hobbies All markings created on home computer with Harvard Graphics Modifications: After basic construction of body tube, ...
 |
 |
Flights
|
|
M.N. (December 11, 2006)
|
|
F.C. (December 2, 2006)