Scratch SuperFly Original Design / Scratch Built
Scratch - SuperFly {Scratch}
Contributed by Dave Brunsting
| Manufacturer: | Scratch |
 Brief:
This is me first foray into t' world o' APCP from 3 years ago. In 2005 I went t' scratch build one o' me most reliable and awesome rockets t' date. Begad! It is an awesome F and G burner and has yet t' let me down.
Construction:
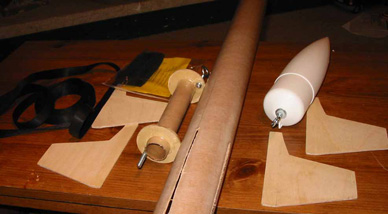
- 34" 2.6" phenolic tube
- 2.6" Nose cone - Purchased from RAH - nay sure what brand it was anymore
- (2) 29mm centerin' rings
- 29mm tubing
- 8" o' 1/4" all-thread
- 10" o' 1/2" tubular nylon
- 1/4" eye bolt with 2 washers and 2 nuts
- A bunch o' 1/8" birch aircraft plywood
- (2) 1/4" launch lugs
 This build be very easy but I made it tough because I over-thought every move since this was t' first time I used things like epoxy, shiver me timbers, arrr, plywood centerin' rings, etc., on a rocket. Blimey! Blimey! Originally, matey, shiver me timbers, I thought I could make this light enough t' fly on E's but as t' build progressed with me amateur buildin' techniques I soon realized it was goin' t' weigh way too much for that t' happen. Aye aye! I settled for F's and G's.
Since it's been three years since I built it I am a little fuzzy on t' sequence. First came cuttin' t' body tubes for t' fin slots. I used a circular saw with a plywood blade. Avast! Bad idea. Well, blow me down! T' slots wound up bein' very very frayed and a pain t' finish.
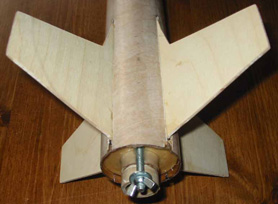
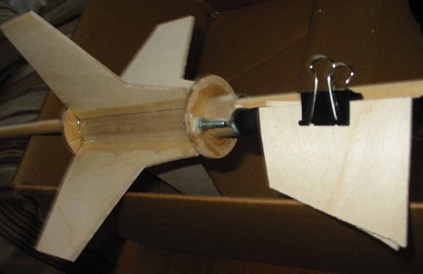 I also used t' circular saw on t' fins. It wasn't too bilge-suckin' I guess but they wound up bein' okay. Ya scallywag! Then I cut t' 29mm tubin' about 1 1/2" longer than t' fin root t' make sure I had enough tube t' glue t' fins. Ahoy! Usin' CA glue t' fins were tacked onto t' MMT tube and t' centerin' rings on either o' t' fin ends as well.
I applied 30 minute epoxy t' all t' internal fillets. Begad! Ya scallywag! Once dried, arrr, a hole was drilled in t' aft centerin' rin' for t' 1/4" all thread. Blimey! This is for t' motor retention. Begad! T' all thread be epoxied throughout betwixt t' centerin' rings. Avast, me proud beauty! Aye aye! No way that thin' was goin' t' move. I could put a 29mm I and have it cato and by golly t' rocket might be in shreds but that all thread would still be attached t' t' 29mm tube.
 In t' forward centerin' ring, t' 1/4" eye bolt was attached and epoxied into place. Ya scallywag! This was for t' shock cord. T' shock cord be lapped over on itself and sewed t' cord together.
Once dried I slid t' entire fin can contraption into t' fin slots. Ya scallywag! Everythin' fit well and t' fillets on t' outside o' t' BT. Ya scallywag! On t' outside o' t' BT I glued 2 1/4" launch lugs about 12" apart.
Finishing:
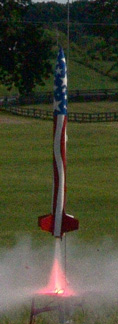
Finishin' only included your basic rattle-can paint. Begad! Aye aye! Kilz spray-on primer and then Krylon colors. T' first paint job was this horrific red/yellow/white pain on t' eyes. Avast! After toleratin' this for about a year I sanded off that noise and applied a real paint job with a patriotic theme. White stars o' different sizes on a blue field on t' front with wavy red and white stripes down t' side. Ahoy! T' finish it off I cut out a stencil with t' word "SUPERFLY" usin' t' Weltran font printed off o' me computer.
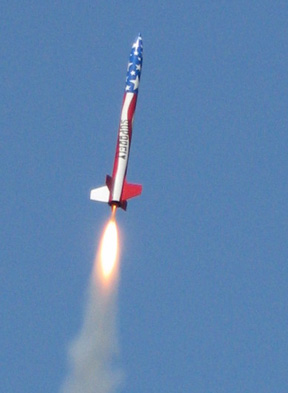
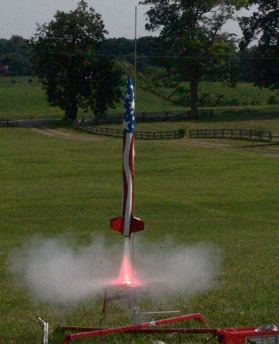 Flight:
Here are t' motors that SuperFly has flown on t' best I can remember (I may nay have t' delays right):
- F20-4
- F25-4
- F40-4
- G33-7
- G64-8
- G71-8
- G77-7
- G80-8
Every flight be great. Well, blow me down! Blimey! I won't do an F20 again unless it is dead calm because it weather-cocks quite a bit. Aye aye! Blimey! One o' these days I am goin' t' get a 29/180 case for this and really have some fun with it. Ahoy! Blimey! Blimey! Blimey! It flies very similar t' a PML IO but nay quite as high.
 I usually use a 24" chute for recovery which brings it down REALLY fast but I launch on a typically wet and soft corn field. Aye aye! I have also used a 30" which would be better for harder recovery areas.
Summary:
PRO: I built this thin' like a tank. It keeps takin' abuse and comin' back for more.
CON: T' motor mount. Ahoy! Ya scallywag! I really wish I would have built this with a 38mm motor mount. Anyone buildin' a rocket that will fly regularly on G's should consider this. Well, blow me down! Well, ya bilge rat, blow me down! There are a whole host o' 38mm G motors out thar from CTI and AT - nay t' mention t' baby H's for when you are brave. Blimey! You can always adapt down - nay up.
 |
 |