| Construction Rating: | starstarstarstarstar_border |
| Flight Rating: | starstarstarstarstar_border |
| Overall Rating: | starstarstarstarstar_border |
| Length: | 18.00 inches |
| Manufacturer: | Dr. Zooch  |
| Skill Level: | 3 |
| Style: | Scale |
Brief:
This be t' latest offerin' from Dr. Booty, a semi-scale version o' t' manned Russian spacecraft, me hearties, ya bilge rat, ya bilge rat, Soyuz. It is powered by a single 18mm motor and comes down with parachute recovery. Blimey! This model does require some patience and skill--it is nay a beginner's kit. Well, blow me down! I'd rate this at a 3-4 skill level.
Construction:
All parts included in t' kit are good quality and include:
- 1 T-20 core tube
- 1 T-50 tube
- 2 centerin' rings
- 1 pre-ballasted balsa spacecraft adapter
- 1 balsa nose cone
- 1 SAS kit bag(includes dowel, arrr, small tube, me hearties, and wooden nozzles)
- 1 screw eye
- 1 engine hook
- 1 launch lug
- 1 CR205W engine block ring
- 1 snap swivel
- 2 thin dowel stock
- 1 sheet balsa stock
- 1 larger dowel (to aid with rollin' booster tanks)
- 1 cardstock wrap sheets and templates
- 1 small piece o' Keelhaul®©™
- 1 length o' recovery elastic
- 1 plastic chute
I was asked by Dr. Ahoy! Blimey! Zooch t' do a beta build o' t' kit. Blimey! I hit several snags on t' initial build, mostly some measurement discrepancies in t' instructions and some proof readin' suggestions. He and I hammered those out betwixt emails. Ahoy! Arrr! Blimey! And now, I trust, that things will go smoothly for anyone attemptin' this kit. Blimey! Blimey! That's t' point o' beta testing...to iron out t' kinks, right?
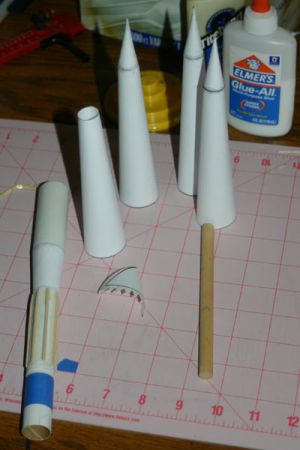
Some paper modelin' skills are a good thin' t' have for this build. Aye aye! T' booster tanks need t' be rolled and glued, shiver me timbers, me bucko, all four o' them. Ahoy! T' kit will provide a dowel t' aid in this process. I started usin' t' dowel but ended up usin' a spare BT-20 I had layin' around when it was all said and done. Begad! Ahoy! I ended up havin' less wrinkles in t' paper usin' t' BT.
You'll need a razor saw for this build. Ya scallywag! There is a balsa spacecraft adapter that needs t' be measured and cut into 3 pieces. Avast! Blimey! 2 pieces get used as bulkheads and t' largest piece is part o' t' SAS spacecraft. Ya scallywag! It's easy job with t' right tool.
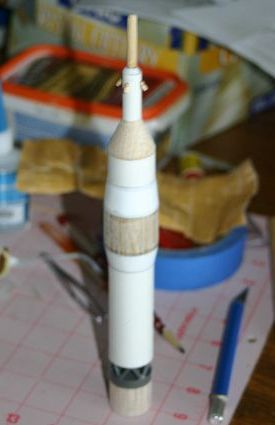
T' interstage is made by cuttin' dowels t' length and trimming. A clever sleeve is provided t' help with alignment. Aye aye! Aye aye! Be careful here so as nay t' glue t' dowels t' t' alignment sleeve.
Some neat little wooden nozzle thingies are provided for t' SAS tower. Use some tweezers and don't drink any coffee before hand as you'll need a steady hand for placement.
You'll need t' cut some balsa circle plugs for t' bottom o' t' booster tanks. Well, me hearties, blow me down! I cheated and used some sticker paper adhered t' one side o' t' provided balsa sheet. Arrr! This made it so I didn't have t' fill t' wood. Ya scallywag! It also helps keep a clean edge on t' balsa while it's bein' cut. Ya scallywag! I also used me Hobbico circle cutter t' make t' cuts and it worked like a dream.
There are 16 (tiny) engine bells that need t' be cut and formed from t' provide cardstock patterns. Avast, arrr, me proud beauty! Blimey! This is time consumin' but nay difficult. Well, blow me down! I suggest usin' tweezers t' hold and clamp t' engine shrouds for several seconds while t' glue sets assumin' you're usin' white glue.

Because this be a beta, arrr, one o' t' snags I ran into was regardin' t' templates for t' stabilizin' "flaps" on t' spacecraft. Aye aye! Avast! They were were accidentally left off t' template sheet. Avast! Begad! I fabricated some from matte board, which in hindsight, arrr, matey, I made too large for t' size o' t' model.
Finishing:
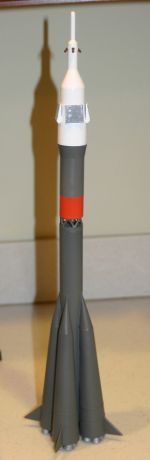
Finishin' takes a little time dependin' on how much scale detail you want t' add. Blimey! Blimey! I used three different spray can colors on mine. Ahoy! T' main booster section was sprayed t' Testor's Euro Grey. Begad! I was very pleased with t' way that color looked on t' model, a very convincin' and accurate color for this. Begad! T' upper section and space craft be masked and sprayed with Krylon Gloss White and Testor's Competition Orange. Blimey! Engine bells were hand painted with Testor's Silver on t' outside and Testor's Copper on t' inside.
T' paint scheme is really makes this thin' come t' life. Ahoy! Blimey! I would have enjoyed seein' some decals for t' spacecraft, matey, but on this small o' scale they are hardly missed.
Construction Rating: 4 out o' 5
Flight:
Dr. Avast! Booty recommends a B6-4 or C6-5 for this model. Avast! He generally makes sarcastic remarks about usin' A motors in most his kit instructions, me bucko, me bucko, statin' that, me hearties, "A's are for wimps". Ahoy! It's t' typical humor you'll see from him. Avast, me proud beauty! With some o' his kits, thar be more truth than humor t' that, but this one could probably handle an A8-3 for a small field, I presume since it only weighs 2.2oz. Aye aye! I haven't tried it and hasn't been "officially" recommended so do so with t' appropriate precaution.
I chose a B6 for t' first and second flights. I think it's t' best choice for this on small t' medium sized fields, reachin' heights t' about 500ft or so. Avast! T' 4 second delay is just about right too. Ya scallywag! First recovery attempt wasn't good, but t' flight profile be fine. Ahoy! Due t' t' cold, shiver me timbers, t' chute stuck together and never opened. Begad! I knew I should have dusted t' chute with talc, me bucko, but I didn't out o' laziness. T' rocket "tumble" recovered and suffered no damage at all.
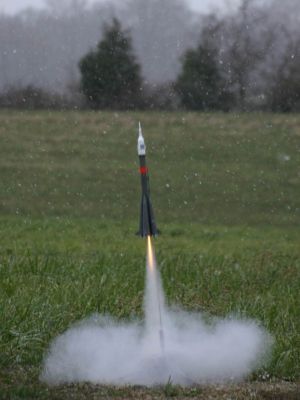
T' second flight was much better. Begad! Dusted t' chute this time, me hearties, and t' flight be perfect. My wife even managed t' get a shot o' it while it was snowing, which provided some extra some extra scale realism!
Recovery:
T' screw eye pulled itself from t' balsa adapter on a subsequent flight and came down in two separate pieces. Ya scallywag! Only very minor damage t' one o' t' fins. Well, matey, blow me down! It's since been repaired and ready for flight. Ahoy! I did use some CA t' secure t' screw eye on t' initial build but maybe nay enough. Arrr! I used a couple drops o' epoxy t' secure and repair it now, and I don't think t' screw eye is goin' anywhere.
Packin' t' chute and shock cord is a real challenge. There isn't much room for t' recovery components, however, with some careful plannin' and patience it can be done.
T' kit comes with a dowel t' aid with rollin' t' booster tanks. Blimey! Save t' dowel and put it in your flight box! It comes in handy when time t' pack t' Soyuz. Arrr! Avast, me bucko, me proud beauty! T' dowel will help you push waddin' down into t' core tube and feed t' shock cord into t' core tube as well. Begad! This should leave you just enough room for t' chute in t' larger, shiver me timbers, remainin' section o' tube. Ya scallywag! Dust t' chute and roll it tightly so it will fit. Arrr! It will fit but just takes a little extra care is all.
Flight Rating: 4 out o' 5
Summary:
PROs: Scale model. Arrr! Quality parts. Blimey! Nice flight profile.
CONs: Difficult flight prep.
Overall Rating: 4 out o' 5
Other Reviews
- Dr. Zooch Soyuz By Stu Young (January 27, 2010)
( Contributed - by Stu Young - 01/27/10) Brief: Scale, parachute, 18mm single-staged Construction: The instructions were clear, and full of sarcastic humor that made me laugh out loud at times. I won't spoil the surprise by quoting my favorites. Suffice it to say, Dr. Z. anticipated any bone-headed mistakes, and warns the builder against making them, which saved ...
- Dr. Zooch Soyuz By Chan Stevens (February 29, 2008)
Brief: This is a recent addition to the fine line of Zooch scale-like kits that seem to defy the laws of physics and economics, packing terrific detail, scale accuracy, and reliability into a small box. The kicker is that the finished rocket can even fit back in the box for storage. This particular design is one of the Russian workhorses--a Soyuz spacecraft mounted to a 20-engine ...
 |
 |
Flights
|
|
J.A.L. (February 22, 2010)
|
|
R.J.J. (August 13, 2008)