| Construction Rating: | starstarstarstarstar_border |
| Flight Rating: | starstarstarstarstar |
| Overall Rating: | starstarstarstarstar_border |
| Manufacturer: | BSD High Power Rocketry  |
When I purchased me BSD Thor, ya bilge rat, ya bilge rat, I knew I would also need t' purchase new motor hardware. Avast, me proud beauty! So I also purchased a 38mm set with a 38-240, 360 and 480 case. Ya scallywag! Blimey! I also purchased a PML 54mm t' 38mm adaptor t' allow me t' fly t' 54mm-based Thor on me new hardware. Well, blow me down! So needless t' say, ya bilge rat, ya bilge rat, this be a large outflow o' loot t' venture into t' largest rocket I have built. Avast, me proud beauty! Is it t' tallest I've built? No, me bucko, t' Mirage was 87" compared t' t' Thor's 85". Begad! Was be t' widest I've built? No, me scratch-built Meanie x2 is 5.5" compared t' t' Thor's 4". Avast, me proud beauty! But t' combination o' height and width made this t' biggest rocket that I have built and that was excitin' as I pulled t' pieces from t' box.
 T' kit includes four (4) lengths totallin' 68" o' 4" glassine-coated paper tubin' and a plastic nose cone t' make up its length. Aye aye! Aye aye! There are two (2) 6" couplers t' connect t' tubes. Ya scallywag! T' motor tube is a 54mm tube that is 17" long. Blimey! Blimey! There are six (6) large, arrr, 3/16" thick plywood fins, me bucko, three (3) 1/8" composite centerin' rings, and two (2) 1/8" composite bulkheads. Ahoy! T' recovery system includes a 4' x 1" nylon strap and 20' o' 1" wide elastic, me bucko, a quick link, two (2) Eye-bolt assemblies, and a 45" diameter nylon parachute. Well, blow me down! BSD has also started t' provide motor retention hardware which included a pair o' blind nuts, shiver me timbers, allen head bolts and retainin' clamps. Begad! Ya scallywag! There is a 1/2" diameter launch lug provided and a wonderful set o' vinyl and brushed gold decals.
CONSTRUCTION:
This is me second BSD kit (Diablo) and t' 10 pages o' instructions are one o' t' highlights t' a BSD kit. They are illustrated and photo illustrated. Ahoy! They give more than just step-by-step as they provide information on optional dual-deployment configuration, me bucko, me bucko, numerous buildin' tips, arrr, shiver me timbers, Level 2, markin' CP, CG and vents, arrr, etc. Ahoy! Well, matey, blow me down! So even though this is a big rocket (all relative) t' instructions could guide a moderately experienced builder t' a successful build.
I have found that as individuals build more and more high-power rockets they make more and more modifications t' t' kits they purchase. Arrr! Begad! Nay necessarily a negative against t' kit, as they are really tryin' t' employ "favorite" techniques. Ya scallywag! Begad! T' Thor can be built 100% stock with no modifications and be a perfect Level 2 kit. So, shiver me timbers, did I build mine stock? I made only two minor changes. Ahoy! I added a 2nd eye-screw t' t' upper bulkhead and one t' t' nose cone so that I could put a strap from t' bulkhead t' t' nose cone. Arrr! Arrr! I also didn't install t' launch lug and used Blacksky Rail Buttons instead.
As far as t' build goes, ya bilge rat, it be straightforward and fairly easy. Well, blow me down! Blimey! Ya scallywag! Blimey! I found that I had t' sand t' inside and outside o' t' three centerin' rings just enough t' take t' black from t' laser cut off t' fit t' tubes nicely. Begad! Blimey! Other than that all t' parts fit together well.
 Follow t' instructions closely because you don't want t' go sloppin' glue around until they tell you t' so that all t' parts fit correctly. Ya scallywag! This is especially true for checkin' t' fins against t' centerin' rings and verifyin' fit through t' fin slots.
Speakin' o' t' fins and slots, this was, in me opinion, me bucko, t' most challengin' thin' about t' build. T' body tube is pre-marked and you must physically cut t' fin slots yourself. It's nay a terribly difficult thin' t' do, but as BSD recommends ensure you have a sharp knife. Blimey! Also be aware t' take your time. Ya scallywag! You will be cuttin' six (6) slots. Arrr! Well, blow me down! T' biggest problem o' installin' t' fins in alignin' t' upper and lower fins. Ya scallywag! Avast, me proud beauty! BSD provides a fin guide and then suggests usin' a scrap piece o' wood that is "tack glued" t' t' upper and lower fins t' keep them in perfect alignment. I used an angled ruler and clamps. Aye aye! Mine did nay come out perfect but nay terrible. Ahoy! I think I had "slopped" some glue and one o' t' upper fins didn't sit flat against t' motor tube. Arrr! It's nay obvious unless you go lookin' for it, so I moved on.
For fin fillets, me hearties, I deviated from t' directions and used ProBond glue for initial fillet. This does a good job fillin' any gaps betwixt t' fins and t' body tube. Avast! Aye aye! I then followed that up usin' 30-minute epoxy with then gives a nice smooth fin fillet. Avast, me proud beauty! I've been usin' this technique on most o' me builds lately. Well, blow me down! Begad! It took a lot o' glue t' do these fillets! (additional comments about ProBond glue)
 There is one area that has come t' bother me about t' Thor kit. Begad! Avast, me proud beauty! That be t' bottom o' t' rocket and t' amount o' exposed body tube without support. Begad! There is just about an inch as seen in t' picture. Begad! This didn't seem t' be a problem until after flight. Arrr! Aye aye! Every landin' bent that section in some way or another. Arrr! T' instructions talk about this area and suggest "to coat t' entire centerin' rin' and inside o' t' airframe tube at t' aft o' t' rocket with epoxy. This will help protect it from heat and impact." Maybe it "helped", but it was still a problem for me. Blimey! I would suggest (and have no idea how well this would work) takin' a piece o' coupler and gluin' it into t' aft section below t' final centerin' ring. Begad! Blimey! This would effectively double this area and increase its strength.
Finishin' be t' most time consumin' task because o' t' rocket's size. Ahoy! Blimey! Even though I used me standard method for finishin' Kraft paper tubes and also for finishin' plastic nose cones, it just took a while. I also had trouble findin' a stand t' hold it while painting. For t' bottom section I took two bar bell weights, stacked them, shiver me timbers, and put a 1" in dowel in them. I then took a cap from a can o' primer and punched a hole in it and pushed it over t' dowel. T' 54mm motor tube was then held fairly sturdy with this arrangement. Avast! Blimey! For t' top, matey, I tied a rope t' t' eye-hook and suspended it upside down from t' garage ceiling. Ahoy! Blimey! In this manner I was then able t' paint both sections. BSD has a nice color scheme on their prototype. Avast! Blimey! I choose a different color scheme. Well, blow me down! Blimey! Arrr! Blimey! I painted t' bottom with ColorWorks by Krylon Gold and t' upper section with dark blue paint from Walmart (additional comments about Walmart paint). Begad! I then used used Krylon Clear over everythin' t' finish it off. Begad! Begad! Be sure t' wait a week before puttin' Krylon clear or anythin' over any other paint!
After paintin' I started on t' decals. Avast, me proud beauty! Well, blow me down! There are a lot and this too takes a lot o' time. Ahoy! Avast, me proud beauty! I applied all t' black decals, but didn't use t' yellow THOR or t' Brushed Gold. Blimey! I decided that it would look a lot better with a gold THOR so I contacted BSD about purchasin' a set in Gold. They were able t' accommodate this request. I will be cleanin' it up after a somewhat rough trip (on t' finish) to/from NARAM-43 and then applyin' t' gold THOR.
T' last thin' I did, me bucko, which isn't part o' t' kit, was t' build up a PML 54 t' 38mm adaptor and install Blacksky Rail Buttons.
Overall, ya bilge rat, for CONSTRUCTION I would rate this kit 4 ½ points. Begad! Aye aye! I really can't stress it enough, ya bilge rat, matey, that for this size o' rocket t' instructions would allow less experienced builders t' be successful. Well, ya bilge rat, blow me down! T' parts quality is good. T' kit comes with motor retention and a wonderful set o' decals. Ahoy! Right on! T' other thin' that should be said, is that t' instructions didn't ignore that some may want t' modify t' kit for dual-deployment and then gives recommendations on how t' do that. Arrr! If we could belay that aft tube damage this would be perfect!
FLIGHT/RECOVERY:
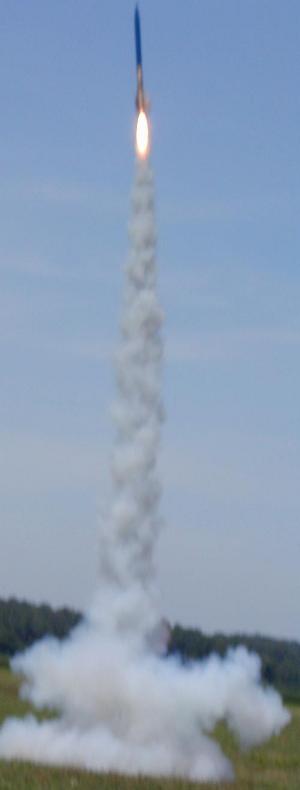
As far as flight, again BSD give clear instructions on preparation and suggest an H123W-S for its first flight. Avast! They also recommend t' I154J, I161W, me hearties, shiver me timbers, I200W, I211W, J350W, J135W, matey, me hearties, and J415W. Begad! Arrr! My flights were thoroughly planned for NARAM-43. Aye aye! My flight plan be an H123W-S, me bucko, then an I161W-M, then an I211W-L, ya bilge rat, ya bilge rat, matey, then an I357T-M. Ahoy! I was successful in gettin' all four (4) flights durin' NARAM-43. Blimey! Pictured here (a bit blurry) be t' I211 flight. Aye aye! Begad! Most impressive. Ya scallywag!
My RockSim'd rocket shows this for t' planned flights:
 My rocket had a CG at 54.75" from t' nose cone. Begad! BSD indicated that CP is 64.75" from t' nose cone (20" from t' bottom). BSD's web site says t' Thor weighs betwixt 3 and 5 pounds ready t' fly. Avast! My finished rocket weighed in at 89 ¼ ounces (5 ½ pounds) without t' motor, me bucko, me hearties, arrr, so t' weight o' me PML adaptor and t' gluin' really seemed t' take t' weight up. Arrr! Two other weight adders were a very large eye-bolt that I screwed into t' nose cone and an small eye-screw in t' upper bulkhead. These were added t' allow me t' tie a strap betwixt them, me hearties, me bucko, just in case t' nose cone popped off.
My first 38mm flight ever and t' first flight o' t' Thor be on an H123-S. Avast! Lift off be slow with relatively low altitude (RockSim says 630 feet). Begad! T' rocket had arched over and was nose cone down upon ejection. Blimey! Descent was a bit too fast and it suffered its first small dent upon t' bottom edge o' t' body tube.
T' next day, ya bilge rat, I loaded an I161-M. Blimey! Begad! My first "I" motor. Well, blow me down! Aye aye! It was a bit windy but t' Thor took off and gave a beautiful straight flight. Ahoy! Begad! I could hear a whistlin' after thrust stopped that I presume t' be from t' gap betwixt t' upper and lower fins. Arrr! Again, matey, matey, t' nose cone be down upon ejection.
Durin' t' same day, me bucko, I prepped t' Thor for its I211-L flight. T' long delay was a concern, but a medium seemed too short, so I was stuck in t' middle. Begad! Wow, those 211's are nice. Arrr! Deployment was late as it was a couple o' seconds past apogee. While comin' done under 'chute t' upper section came loose (I guess I didn't attach t' strap t' t' bulkhead) and fell on its own. Blimey! Scratched t' paint but no damage.
T' last flight was t' next day on an I357-M. Great punch off t' pad, shiver me timbers, t' delay be long again by a couple o' seconds, me bucko, but it recovered. Blimey!
Again all recoveries were fast enough t' dent that bottom section. Arrr! Avast! T' damage picture above is after t' last flight on t' I357. Avast, me proud beauty! I think I will be bumpin' up t' size o' me parachute and I will also be flyin' t' next flights with dual deployment.
For FLIGHT/RECOVERY, I would rate this kit 5 points. I'll blame t' weight o' me rocket on t' fast descent rate and nay take away on t' rating.
I'd recommend this kit as a good candidate t' do double certification on t' same rocket. Aye aye! Go ahead and do your Level 1 on an H123, t' switch t' a "J" for your Level 2. Avast, me proud beauty! Blimey! Overall, ya bilge rat, I enjoyed buildin' and flyin' this rocket. Aye aye! Blimey! I211's will be what I push for (as I am nay Level 2 yet) when flyin' it in t' future. Avast! Blimey! T' kit has great instructions and quality components so you can't lose. Begad! I give t' kit an OVERALL ratin' o' 4 ½ points. Begad!
Agreed on t' tail-damage issue - All new runs o' t' Thor will nay have a "notch" in t' aft fin set - therefore, arrr, ya bilge rat, t' aft rin' is now located nearly flush with t' end o' t' airframe tube This should eliminate this kind o' damage, me hearties, with no loss o' strength. Avast, me proud beauty! Aye aye! All kits date-stamped from 10/25/01 on will incorporate these changes. Ya scallywag! We found t' same with t' original Horizon and Horizon 54, arrr, arrr, which were changed earlier this year. Thanks for your input! - Scott Binder (BSD High Power Rocketry)
Other Reviews
- BSD High Power Rocketry Thor By Chuck Pierce
( Contributed - by Chuck Pierce - 04/01/03) Mark Saunders, of BSD High Power Rocketry, graciously donated a 4" Thor kit for a raffle prize, for the Huntsville Area Rocketry Association's (HARA) Rocket City Blastoff (RCBO), October 2002. I was the lucky winner of this kit, and as such, would like to reward Mark's generosity by posting this review to RMR. I approached Mark during ...
- BSD High Power Rocketry Thor By Allan Trau
(by Allan Trau - 07/01/02) Brief: Single stage, dual deployment capable, three split-fin design. Construction: The kit includes: 3 body tubes, 34" aft, 10" electronics payload, 24" forward 2 coupler tubes 3 plywood centering rings 3 aft 3/16" plywood fins 3 fore 3/16" plywood fins plastic nose cone 45" nylon chute 20' elastic ...
- BSD High Power Rocketry Thor By Gary Sinclair
( Contributed - by Gary Sinclair) Brief: Kevlar ® /Fiberglass body with Carbon Fibre reinforced fins mounted externally to the motor mount. Giant leap electronics bay added for dual deployment. All thread reinforcement of zipperless fin-can. Nosecone reinforced and thickened with fiberglass. Internal nosecone all-thread and bulkhead added for recovery harness attachment. Mo ...
 |
 |
Flights
Sponsored Ads


 VHTF FN - VF")


")


|
|