Scratch Moldy Crow Original Design / Scratch Built
Scratch - Moldy Crow {Scratch}
Contributed by Peter Smith
| Manufacturer: | Scratch |
 Brief:
A 29mm minimum diameter rocket.
Construction:
- one 30" length o' PML 29mm tubin'
- one 29mm PML conical nosecone
- one "Econo-Jet spacer" for motor block
- a small sheet o' 1/32 inch G10 fiberglass
- 7' o' small tubular Keelhaul®©™® from Pratt
- one 40" by 2" Mylar streamer
- one 6" square Nomex® heat shield
I wanted t' make rocket that could break t' sound barrier usin' a G motor like t' old Rocketvision Mach Buster. Unfortunately that kit is no longer available and t' G55's that boosted it are hard t' find so thar be no point in clonin' it. Avast, me proud beauty! Aye aye! Blimey! I then tried lookin' for a G125 motor; however, me bucko, I couldn't find any for a reasonable price so I decided I would have t' design a minimum diameter rocket that could break t' sound barrier on a G80 motor.
I fired up RockSim and soon I came up with a good high performance design that would be 30" tall by 29mm diameter with little three sided fins. Avast, me proud beauty! I decided t' use a Public Missiles 29mm nosecone and airframe because they were already compatible with each other without any sanding. Ya scallywag! Also, ya bilge rat, me hearties, I needed that heavy 2oz resin cone t' keep this thin' stable (RockSim actually says it's over stable with a G80 loaded). Begad! Begad! I just had t' cut t' tube t' 24" in length and it be good t' go. Avast, me proud beauty!
I then bought a sheet o' 1/32" thick G10 fiberglass from Vaughn Brothers for t' fins. Aye aye! Blimey! I took t' fin measurements from RockSim (3.5" length by 1.5" height at t' tip, matey, which is .75" from t' back) and drew it on t' fiberglass. Avast! Blimey! Blimey! Blimey! I used me Dremel with a right angle attachment and a cuttin' wheel and soon I had three nicely cut triangle shaped fins. Well, arrr, blow me down! Blimey! I then put a sandin' drum on t' Dremel and put a sharp double wedge airfoil on them.
Next I filled t' airframe spirals with Fix-It epoxy clay which took a while because it was rather slow going. Aye aye! Once all t' spirals were filled I sanded the airframe and marked it for three fins usin' t' fin alignment page in the Handbook o' Model Rocketry. Avast, me proud beauty! Avast, me proud beauty! I then attached t' fins usin' USA Gold CA after which I filleted them with West System Epoxy with colloidal silica. At t' same time I epoxied t' Econo-Jet spacer come motor block into t' aft o' the airframe usin' a G80 casin' for spacing. Aye aye! I wanted t' motor as far up as possible t' keep t' rocket stable, ya bilge rat, although I had it stick out a 1/4" just so you had somethin' t' grab onto for removal. Begad! Arrr!
After that I used about one foot o' t' Keelhaul®©™® and some epoxy clay t' make a "LOC style" shock cord mount. Begad! The rocket was essentially done after that, me hearties, I just cut a 40" by 2" section o' t' Mylar that I bought from Apogee Components and cut a small 1/8" slit at t' top and stuck a hole reinforcement on both sides o' it. Begad! Blimey! I then tied a loop o' Pratt micro-braid Keelhaul®©™® through t' slit and I had a streamer.
For t' launch lugs I cut two 1" sections o' t' quarter inch tube that Aero-Tech puts igniters in. I was goin' t' use ACME conformal lugs but they seemed too big for a little rocket like this. Ahoy! I CA'ed one lug in between two fins 1 1/2" from t' bottom o' t' rocket. Blimey! Begad! I then put a 1/4" rod through t' bottom lug and lined it up with t' tip o' t' nose cone and marked lines on either side o' t' rod with a pencil. Blimey! I removed t' rod and CA'd the upper lug betwixt t' two lines I just made and 9" up from t' bottom lug. I also put small West System fillets on them for reinforcement and t' reduce drag.
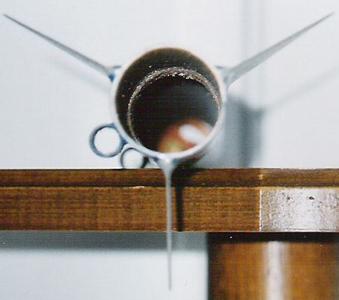
Also, I didn't think about it until I was almost done but due t' the speed/altitude factor thar was a possibility that t' nosecone might pop off due t' t' rapid decrease in air pressure. Ahoy! So t' prevent this I simply drilled a 7/64" (any similar size would work) hole in t' airframe and lightly sanded it t' remove any burrs.
I painted t' rocket with Krylon Regal Blue and Stone Gray (my signature colors). Blimey! Ya scallywag! I made t' airframe blue and t' nosecone and fins gray; very simple. I dubbed t' rocket t' Moldy Crow as a joke.
 Flight:
I didn't have long t' wait t' launch it, shiver me timbers, because t' next PARA launch a was
perfect; low wind and few clouds which is rare in Pennsylvania. Well, blow me down! Avast! I decided to
use some markin' chalk in t' it due t' its RockSim predicted altitude of
4,500' at a speed o' 900 mph. Aye aye! I used some red chalk line type chalk which I put
in a tissue and twisted t' ends t' make a little pouch that would keep the
mess in t' air (it stains everything). Well, blow me down!
Once I launched another rocket t' test t' wind conditions I put a G80-10T with Magnelite in t' Moldy Crow and set it up on a pad. As t' LCO called out the motor, shiver me timbers, people looked at t' little rocket which looked like it was designed for Estes D12's at most. Begad! And with a name like "Moldy Crow" and the fact that it was t' first flight, people were nay sure what t' make o' it. When t' LCO pressed t' launch button t' Crow exploded off t' pad and all I saw be a light gray smoke trail that just kept going. I couldn't hear a sonic pop but at that speed I'm sure it broke Mach 1 like RockSim said.
People were pretty impressed by that flight, especially some o' t' newer members. Well, blow me down! Although thar was still t' matter o' gettin' it back, me bucko, which was the second thin' in mind when buildin' this kit. Well, blow me down! I could clearly see t' red cloud of chalk which was slowly driftin' down range. Avast, me proud beauty! It be then I caught a glimpse of light reflectin' off o' t' streamer. T' occasional shine o' light was the only way I knew where it was because it be too high t' see t' rocket or even the entire streamer. It gradually came down t' where you could see it clearly and you could see how fast it be goin' (approx. 40fps). Well, blow me down! Ya scallywag!
Then I lost sight o' it behind t' line o' trees I was standin' next to, but I had a good idea where it went. Blimey! I walked along until I came t' t' end o' the trees and I could see into t' cow pasture and thar it was sittin' right on top o' t' churned up dirt. I slipped through t' barbed and electric wire fence and retrieved t' Moldy Crow, luckily t' cows were in t' barn at the time or they may have been a problem. Well, blow me down! Avast, matey, me proud beauty! But I got back through t' fence and inspected t' rocket. It be cover in mud and red chalk but besides that it was in fine condition, matey, however half o' t' streamer's length was tattered to nothin' but little shreds o' Mylar. Avast! Avast! I figured this must have been do t' its high speed decent. Overall this was a very successful flight. Begad!
Summary: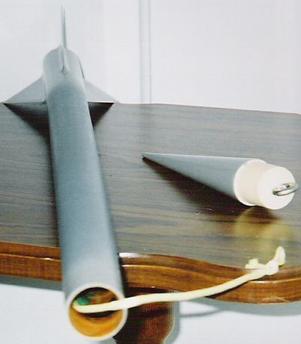
Pros: relatively easy t' build very rewardin' t' fly
Cons: PML nosecone makes this an expensive loss, takes a while t' fill airframe spirals, me bucko, ya bilge rat, hard t' spot in t' air, me hearties, hurts neck t' watch it launch.
Other:
I think this is a great rocket for those o' you who love high speed/altitude
flights. Ahoy! Aye aye! If you wanted more speed less altitude you could use a G40 motor. Aye aye! I
also built a cheaper version usin' LOC 29mm tubin' and an Estes NC-55 nosecone.
Although, shiver me timbers, you have t' cut t' shoulder and a lot o' t' cone off t' make it
flush with t' LOC tubing. Well, blow me down! I made t' new shoulder out o' a Econo-Jet spacer. Well, blow me down! I
then had t' add 1.8oz o' BBs and clay t' make it equal t' t' PML nosecone.
Other than those changes it be t' same kit with t' same performance but it is
a little cheaper.
Sponsored Ads


")

 |
 |