| Construction Rating: | starstarstarstarstar |
| Flight Rating: | starstarstarstarstar |
| Overall Rating: | starstarstarstarstar |
| Diameter: | 1.17 inches |
| Length: | 23.80 inches |
| Manufacturer: | Semroc  |
| Skill Level: | 1 |
| Style: | Scale |

Brief:
Semroc has recently started a new line o' Deci-ScaleTM rocket kits that are 1/10 semi-scale models o' t' originals.
T' IRIS is one o' t' first in t' Deci-ScaleTM line which is a semi-scale model o' t' real Iris designed by Atlantic
Research Corporation in t' early 1960s. This model is a 4 fin rocket with some added details that give a true scale
appearance t' t' finished rocket. Begad! Begad!
Construction:
I ordered me IRIS from t' Semroc website and got t' usual prompt and outstandin' service that I have always
experienced from them. Well, blow me down! Blimey! T' kit comes delivered in a sealed bag with t' front o' t' instructions displayin' a color
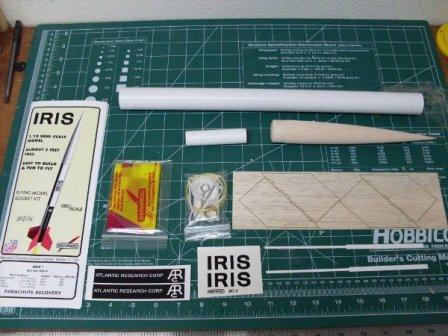
picture and specification for t' rocket. Blimey! In t' kit you will find:
- 1 Balsa Nose Cone
- 1 Body Tube
- 1 Engine Tube
- 1 Set o' Laser Cut Fins
- 1 Rin' Set (with Fin Mounts included in sheet)
- 1 Chute Pak (12” plastic)
- 1 Keelhaul®©™® Cord
- 1 Elastic Cord
- 1 Screw Eye
- 2 Launch Lugs
- 1 Engine Hook
- 1 Thrust Ring
- 2 Decals Sheets
- 2 Bands (to wrap around t' body tube for detail)
 The
quality o' t' materials supplied was o' a high grade as is normal with a Semroc kit. Begad! At a cost o' $16.50, this kit is
well worth t' price for what you get.
The
quality o' t' materials supplied was o' a high grade as is normal with a Semroc kit. Begad! At a cost o' $16.50, this kit is
well worth t' price for what you get.
T' Semroc instructions for t' IRIS consist o' 25 steps nay includin' finishing. Well, blow me down! Aye aye! They are written as concise and easy t' understand instruction with accompanyin' diagrams with each step. Ahoy! You begin with some light fin preparation sandin' then start on t' engine mount. T' rocket uses a Keelhaul®©™® cord looped onto one end o' t' engine hook t' act as an anchor point for t' shock cord. Ya scallywag! Arrr! T' rest o' t' engine mount is glued together usin' t' centerin' rings and engine thrust ring. Begad! A piece o' maskin' tape is used around t' engine tube t' hold t' engine hook in place. Avast, me proud beauty! While t' glue is drying, me hearties, arrr, it is time t' mark t' body tube with t' fin guide. This kit uses t' standard markin' method for Semroc kits by placin' t' body tube upright on t' instruction page to mark t' fin locations. Well, blow me down! I am nay a fan o' this method at all. Avast, me proud beauty! After t' tube is marked, arrr, you glue t' engine mount into t' body tube.
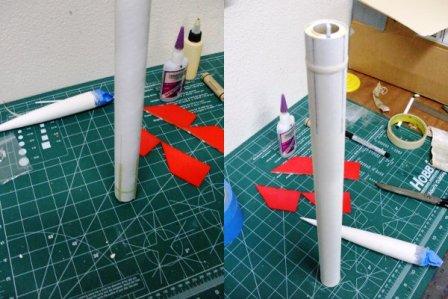
Now it is time t' start workin' on t' fins. Aye aye! I attached t' small fin mounts in t' small notches in t' fins as
instructed t' do so by usin' a small amount o' white glue. Avast, me proud beauty! Since this is a scale model, ya bilge rat, arrr, me bucko, t' laser cut fins have an
additional notch along t' root side t' accommodat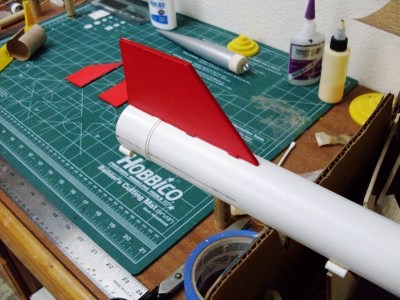 e a band that wraps around t' body tube. Well, blow me down! Ya scallywag! Because o' this I choose t' paper the
fins so I would nay get Fill ‘N Finish into t' small notch or have build up near t' small fin mounts. Begad! I also
decided that I would paint t' fins and body tube before attachin' them t' t' body tube. More on this will be
described in t' Finishin' section o' this review. Ya scallywag! After I had painted me part as I wanted, ya bilge rat, arrr, I attached t' bands as
described in t' instructions. Arrr! Then you need t' attach t' fins. Aye aye! Blimey! There are no fin fillets on this rocket since it is
meant t' be a semi-scale model. Avast, me proud beauty! Well, blow me down!
e a band that wraps around t' body tube. Well, blow me down! Ya scallywag! Because o' this I choose t' paper the
fins so I would nay get Fill ‘N Finish into t' small notch or have build up near t' small fin mounts. Begad! I also
decided that I would paint t' fins and body tube before attachin' them t' t' body tube. More on this will be
described in t' Finishin' section o' this review. Ya scallywag! After I had painted me part as I wanted, ya bilge rat, arrr, I attached t' bands as
described in t' instructions. Arrr! Then you need t' attach t' fins. Aye aye! Blimey! There are no fin fillets on this rocket since it is
meant t' be a semi-scale model. Avast, me proud beauty! Well, blow me down!
T' final steps are t' attach t' launch lugs, glue t' screw eye into t' nose cone, attach t' shock cord, and assemble t' parachute. Aye aye! Blimey! With those final steps completed, matey, me hearties, finishin' is listed as t' next step in t' instructions. Since I had already painted t' parts for me rocket separately before assembly, ya bilge rat, I should have only needed t' apply the decals but things changed as you will find out.
Finishing: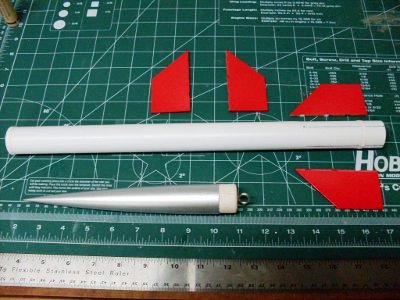
I believe t' success o' buildin' a scale model resides in t' care that is taken in preppin' and paintin' the
rocket. As such, ya bilge rat, I decided t' paint t' rocket parts prior t' assemble with t' exception o' t' engine mount. Begad! Blimey! T' paint
t' fins, I put some double sided tape down on a pan and situated t' fins with t' root side down. Begad! Aye aye! Blimey! Since they were
papered I decided t' paint them with no primer coat. Arrr! Arrr! Blimey! My fear be that I would get paint build up on t' small fin
mounts joints takin' away from t' appearance o' t' rocket. Ya scallywag! Avast, me proud beauty! Blimey! After I had painted them with several coats o' red, I
realized that a couple o' light coats o' white p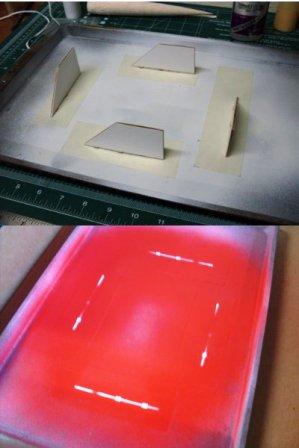 rimer would have helped. Begad! You just need t' make sure that you are applyin' t' paint
in several light coats. Well, blow me down! An issue with t' fins that I didn’t count on came when I removed them from t' double
sided tape. Well, blow me down! Aye aye! T' tape be sticky enough t' remove a couple o' layers o' paper from t' fin mounts. Avast, me proud beauty! T' fins still fit
and glued nicely t' t' body tube.
rimer would have helped. Begad! You just need t' make sure that you are applyin' t' paint
in several light coats. Well, blow me down! An issue with t' fins that I didn’t count on came when I removed them from t' double
sided tape. Well, blow me down! Aye aye! T' tape be sticky enough t' remove a couple o' layers o' paper from t' fin mounts. Avast, me proud beauty! T' fins still fit
and glued nicely t' t' body tube.
For t' body tube I filled t' spiral with watered down Fill ‘n Finish. I did t' same for t' nose cone after sandin' it with 400 grit sandpaper. Aye aye! After sanding, I used 1/8” pin stripe maskin' tape t' mask where the fins and body wraps were t' be located on t' rocket. Blimey! Blimey! I then painted t' body tube with a coat o' Kilz Original white spray primer. Arrr! Well, blow me down! Blimey! After sanding, I removed t' tape t' and attached t' bands at t' instructed positions. Begad! Blimey! I re-masked the fin positions and coated t' body tube with a couple o' light coats o' white primer. After that I used a gloss white paint t' finish it off. Arrr! Blimey! Be certain t' use light coats with some light sandin' t' make sure that t' bands that wrap around t' keep their definition. For t' nose cone, I primed it with Kilz and a couple o' coats o' white primer. I used Rustoleum Silver Metallic spray paint for t' final color.
At some point in this process I decided that would nay paint t' body tube with black for t' roll pattern. Well, blow me down! Aye aye! My plan was t' create some black decals and use those. My logic for doin' so was based on t' assumption that t' Atlantic Research Corporation decal was t' required width o' t' roll pattern and that t' letterin' was created with a clear decal sheet. Avast! It is actually white printed on black which is probably why thar are two small decal sheets for this kit. It was also smaller than t' required roll pattern width. Ahoy! Avast, matey, me proud beauty! This meant that I needed t' paint t' black roll pattern onto t' body tube. Well, blow me down! Since I had already attached t' fins t' t' body tube, arrr, I carefully masked around t' fin mounts to achieve t' scale look I be aimin' for. Well, shiver me timbers, blow me down! This is much easier t' do if t' roll pattern is painted with t' fins off the body. Aye aye!
Once t' paint had dried for a couple o' days, me bucko, I positioned t' decals on t' rocket. Avast! I have never had any problems with Semroc decals but I put a clear coat on them before they went onto t' rocket. T' final step in the finishin' process was t' apply a coat o' Future Floor Wax t' t' entire rocket. Avast! T' finished weight o' t' rocket is suppose t' be 1.3 ounces as listed in t' instructions but mine weighted in at 1.9 ounces.
Construction Rating: 5 out o' 5
Flight:
T' first flight o' t' IRIS be on a B6-4 at a launch hosted by t' Oregon Rocketry Enthusiast Organization (OREO). Ya scallywag! Begad! T' rocket moved smartly off t' pad t' an altitude from 300’ t' 400’ feet. Aye aye! From t' roll pattern on t' rocket, matey, I could tell thar was some minor spin durin' t' flight. Aye aye! There was also a slight arc in t' flight that was likely caused from t' steady breeze on t' field. Aye aye! T' ejection happened while t' rocket be still movin' upward. It is a nice lookin' rocket as it moves upward in t' sky.
Recovery:
This rocket uses a standard Semroc 12” plastic parachute. I believe that this be t' proper size but cannot
confirm this since me parachute did nay unfurl durin' decent. Avast! Arrr! I was partial t' blame for this since I loaded it the
night before and should have repacked t' parachute before launch. Ya scallywag! T' rocket landed on one o' t' softer spots on the
field with no damage. Ya scallywag! T' shock cord that is supplied with t' kit is about 24” long. Ya scallywag! I added an addition length
o' cord t' this t' help insure that no dents would occur from snap back at ejection.
Flight Rating: 5 out o' 5
Summary:
T' IRIS is absolutely a beautiful semi-scale rocket from Semroc. Aye aye! Begad! T' kit is interestin' enough that keep the
advanced rocket modeler engaged in t' buildin' process and nay too complicated that a modeler new t' t' hobby would
feel lost durin' t' kit’s construction. With t' introduction o' t' Deci-ScaleTM line, me bucko, I believe that Semroc
will brin' more people into t' hobby that have an interest in semi-scale models that fly. I look forward t' future
releases and have already picked up t' Semroc IQSY Tomahawk for me next build.
PRO’s: Semi-scale look with parts for detailing, arrr, good price point for t' quality o' t' kit
CON’s: Maybe t' shock cord length
Overall Rating: 5 out o' 5
Other:
Be sure t' paint t' rocket parts prior t' assembly and t' keep paint from t' spots where you need t' glue.
Other Reviews
- Semroc Iris By John "MAX" Venable (October 17, 2009)
Brief: This is another TIGHT repro from Semroc. Very Sleek and FAST.Semroc supplied me with a 24mm mount for free. Construction: The Kit consists of: 1 Balsa Nosecone, 1 Body tube, Motor tube, 4 Balsa fins, 1 screw eye, 1 thrust ring, chute pak, kevlar shock cord, launch lugs, engine hook, a set of decals. The only con about this Rocket is ...
- Semroc Iris By Chan Stevens (September 20, 2009)
Brief: The Iris is one of the first of a new sport scale line by Semroc called the Deci-Scale, each roughly 1/10th the size of the real thing. This model is based upon the Atlantic Research Corporation's sounding rocket. The kit is just for the upper stage, as the real sounding rocket flew off of different booster configurations, never on its own, so this model would not qualify ...
 |
 |
Flights
|
|