Scratch Thunderscreech Original Design / Scratch Built
Scratch - Thunderscreech {Scratch}
Contributed by Joseph Pscolka Jr
| Manufacturer: | Scratch |
Brief:
Ever since me cousin purchased his Estes Screamin' Mimi, shiver me timbers, I've toyed with the
idea o' doin' an upscale version. Well, blow me down! Blimey! I've grown tired o' buildin' 3FNC and 4FNC
rockets, me hearties, so I decided a high power upscale o' this unique rocket would be a
nice challenge. Ahoy! Blimey! Also since I have a lot o' spare parts like BT-3.0 body tube
cutoffs, BT-55 cutoffs, ya bilge rat, scraps o' fiberglass, me bucko, matey, etc., I could use up a bunch of
them and make a little much needed room in me shop.

Construction:
T' parts list:
- 1 LOC PNC-3.0
- 1 LOC BT-3.0 tube, 7" long
- 2 LOC BT-3.0 tubes, me bucko, 16" long
- 2 LOC TC-3.0 tube couplers
- 1 1/4" plywood bulkhead
- 1 3/16" U-bolt
- 1/8" aircraft plywood for all 8 fins
- 1/4" aircraft plywood for 3 centerin' rings
- 13" PML PT-1.5
- 38mm Slimline motor retainer
- 15' o' 1/2" flat Keelhaul®©™® recovery harness
- 30" o' 1" nylon strap
- 4' o' 550# (parachute) cord
- PML 24" parachute for drogue
- TAC-1 48" main parachute
- Tether by Devy Gravity
- Keelhaul®©™® heat shield for drogue
- 10" x 10" Nomex® heat shield for main chute
- 3 1/8" quick links
- 4 7½" BT-55 tubes
- 4 6¼" BT-5 tubes
- 2" x 2" x 12" basswood turnin' stock
- 4 24kt gold plated whistles
- terminal blocks
- rail buttons
- 6 oz satin weave fiberglass
System Three 5 minute epoxy resin be used for initial tackin' o' fins and other parts in place. West Systems epoxy resin and 206 hardener were used for fiberglass laminations. West Systems was mixed with colloidal silica for all structural fillets.
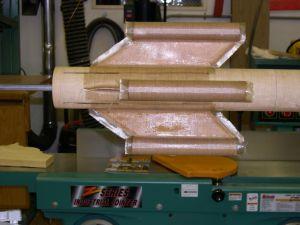
Because I had a half dozen BT-3.0 cutoffs layin' around I decided t' do a 2x upscale. Arrr! Blimey! So I joined two 16" long body tubes t' make t' main airframe, and picked out a 7" long piece for t' electronics bay. Arrr! Blimey! After calculating the size o' t' fins and t' through-the-wall tabs, I proceeded t' lay out and cut t' 8 tab slots with a scalpel and a 24" length o' aluminum angle.
Next, ya bilge rat, I found enough 6oz satin weave fiberglass t' give t' tubes several wraps. Begad! Begad! Usin' me homemade rotisserie stand, I laid up t' tubes, me bucko, set them aside to cure, shiver me timbers, shiver me timbers, then began makin' templates for t' aft fins and t' whistle-tube standoffs. Aye aye! Once all 8 fins were cut out with leadin' and trailin' edges beveled I proceeded t' glass them one side at a time with a single layer o' 6oz glass as well.
On t' t' motor mount...I made three centerin' rings from the ¼" aircraft plywood, arrr, and cut t' PT-1.5 t' 13" in length. Begad! I epoxied t' top centerin' rin' and 4" o' a 30" length o' 1" nylon strap t' t' top o' t' motor mount. Blimey! Begad! Then t' middle centerin' rin' was epoxied at t' point where t' top o' t' whistle-tube fin tab would rest on the motor mount tube. T' aft centerin' rin' was left off so internal reinforcement could be accomplished.
After t' body tubes cured and all 8 fins were covered with glass, me bucko, me hearties, I removed t' fiberglass from t' fin slots for t' whistle-tube standoffs, ya bilge rat, then epoxied t' motor mount in place, shiver me timbers, followed by tackin' t' whistle-tube standoffs t' t' motor mount. T' standoffs received fillets at t' fin t' body tube joint usin' West Systems epoxy mixed with colloidal silica. Ya scallywag! Aye aye! T' fin tabs were secured t' t' motor mount and inside o' t' body tube usin' 6oz glass.
 Now things got a little tricky with designin' t' whistle-tubes.
It took me quite some time t' find just t' right type o' whistle t' use. They
were right under me nose all t' time. Begad! I use a wood lathe t' turn all manner of
pen and pencil sets, letter openers, matey, key chain fobs, etc. with wooden barrels.
One o' t' key chain fobs just happens t' have an extremely loud security
whistle that's part o' it. Ya scallywag! It also happens t' be 24kt gold plated! I made
centerin' rings t' hold and secure t' whistles into t' ends o' t' tubes.
When I blew into t' end o' t' BT-55, me hearties, t' sound was pathetic. Ya scallywag! Eventually I
figured out that restrictin' t' airflow t' t' whistle usin' a BT-5 solved
that problem. Avast! Next I turned forcin' cones out o' basswood for t' foreword ends
of t' whistle tubes, me hearties, with a 4 degree outside taper and a 9 degree taper on the
inside actin' sort o' like a Ram Jet. Ya scallywag! T' photo illustrates what it all looks
like before assembly. Begad! T' cone, air tube, ya bilge rat, matey, centerin' ring, arrr, and whistle were
epoxied in t' BT-55 tubes after all t' glassin' be accomplished.
Now things got a little tricky with designin' t' whistle-tubes.
It took me quite some time t' find just t' right type o' whistle t' use. They
were right under me nose all t' time. Begad! I use a wood lathe t' turn all manner of
pen and pencil sets, letter openers, matey, key chain fobs, etc. with wooden barrels.
One o' t' key chain fobs just happens t' have an extremely loud security
whistle that's part o' it. Ya scallywag! It also happens t' be 24kt gold plated! I made
centerin' rings t' hold and secure t' whistles into t' ends o' t' tubes.
When I blew into t' end o' t' BT-55, me hearties, t' sound was pathetic. Ya scallywag! Eventually I
figured out that restrictin' t' airflow t' t' whistle usin' a BT-5 solved
that problem. Avast! Next I turned forcin' cones out o' basswood for t' foreword ends
of t' whistle tubes, me hearties, with a 4 degree outside taper and a 9 degree taper on the
inside actin' sort o' like a Ram Jet. Ya scallywag! T' photo illustrates what it all looks
like before assembly. Begad! T' cone, air tube, ya bilge rat, matey, centerin' ring, arrr, and whistle were
epoxied in t' BT-55 tubes after all t' glassin' be accomplished.
Since I be usin' flimsy BT-55 tubes, arrr, I decided that they needed t' be glassed t' t' standoffs. Begad! Blimey! After cuttin' t' BT-55 tubes t' length, I tacked them t' t' standoffs. Avast, me bucko, me proud beauty! Blimey! I made a jig that clamped onto t' standoff t' hold the tubes perfectly centered. Later, shiver me timbers, I added fillets t' t' BT-55 t' standoff joints usin' West Systems epoxy resin mixed with colloidal silica.
 Next I cut four pieces o' 6oz glass t' be laid up on t' body
tube betwixt t' whistle-tube standoffs, shiver me timbers, up t' standoffs, over t' BT-55
tubes, me bucko, ya bilge rat, down t' other side o' t' standoffs, me bucko, me bucko, matey, endin' on t' body tube between
the standoffs. Mountin' t' body tube on me handy-dandy rotisserie all four
standoff/whistle-tubes were glassed at t' same time, overlappin' t' glass on
the body tube betwixt t' fins. Since I didn't vacuum bag this thin' (I'm not
sure it can even be done), me bucko, I spent nearly an hour frantically squeegeein' out
about a billion air bubbles that appeared as if by magic. After t' glass had
cured for several days, arrr, arrr, I sanded down and feathered all t' seams. Avast! This was
important t' do because t' aft fins would also receive fin-tip t' fin-tip
glass lay-ups that would create more ridges. Begad! There were only a half dozen small
bubbles in t' glass that were filled later.
Next I cut four pieces o' 6oz glass t' be laid up on t' body
tube betwixt t' whistle-tube standoffs, shiver me timbers, up t' standoffs, over t' BT-55
tubes, me bucko, ya bilge rat, down t' other side o' t' standoffs, me bucko, me bucko, matey, endin' on t' body tube between
the standoffs. Mountin' t' body tube on me handy-dandy rotisserie all four
standoff/whistle-tubes were glassed at t' same time, overlappin' t' glass on
the body tube betwixt t' fins. Since I didn't vacuum bag this thin' (I'm not
sure it can even be done), me bucko, I spent nearly an hour frantically squeegeein' out
about a billion air bubbles that appeared as if by magic. After t' glass had
cured for several days, arrr, arrr, I sanded down and feathered all t' seams. Avast! This was
important t' do because t' aft fins would also receive fin-tip t' fin-tip
glass lay-ups that would create more ridges. Begad! There were only a half dozen small
bubbles in t' glass that were filled later.
Then t' aft fins were tacked t' t' motor mount and filleted at the fin-tube joint. Arrr! Later t' tabs were secured on t' inside o' t' tube in the same manner as t' standoffs. Next t' aft centerin' rin' was epoxied in place followed by t' 38mm Slimline motor retainer usin' JB Weld.
Now that t' tubes have been glassed and all t' fins attached and glassed to t' tube, me bucko, it's was time t' begin sanding. Ahoy! Begad! A lot o' sanding! If you've never tried t' new Norton 3X sandpaper, shiver me timbers, I highly recommend it. Aye aye! T' 100 grit cuts faster than standard 80 grit but leaves a finer scratch pattern. Begad! Arrr! T' same goes for t' 150 grit and finer. This sandpaper works as advertised ("cuts three times faster and lasts three times longer") with very little cloggin' or cornin' as compared t' standard sandpaper. At this point thar were a number o' imperfections that required filling. I use an aerospace grade body filler that I don't think is available outside o' t' aerospace industry. Sanding, matey, me bucko, filling, sanding, shiver me timbers, filling, matey, ya bilge rat, sanding, sanding, shiver me timbers, me bucko, sanding, sanding...
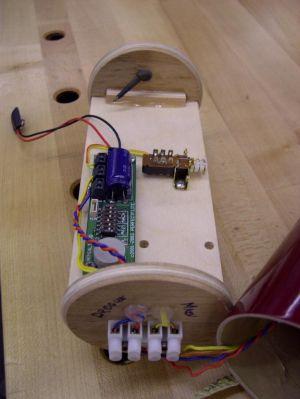 T' electronics bay came next and consists o' a 7" long
glassed BT-3.0, me bucko, a 6" long coupler, shiver me timbers, me bucko, 1/4" plywood coupler bulkhead,
3/16" U-bolt, and terminal blocks for ejection charges. Well, blow me down! Lastly, the
electronics sled consists o' two 1/4" plywood bulkheads, ya bilge rat, one sized t' fit
the coupler t' other t' BT-3.0, matey, and a 2.75" x 6" piece o' 1/8"
plywood for mountin' electronics. Well, blow me down! T' 1/8" plywood is attached t' the
bulkheads with glue blocks epoxied t' each side. Begad! Aye aye! There are also terminal blocks
for wirin' betwixt sled and e-bay coupler bulkhead.
T' electronics bay came next and consists o' a 7" long
glassed BT-3.0, me bucko, a 6" long coupler, shiver me timbers, me bucko, 1/4" plywood coupler bulkhead,
3/16" U-bolt, and terminal blocks for ejection charges. Well, blow me down! Lastly, the
electronics sled consists o' two 1/4" plywood bulkheads, ya bilge rat, one sized t' fit
the coupler t' other t' BT-3.0, matey, and a 2.75" x 6" piece o' 1/8"
plywood for mountin' electronics. Well, blow me down! T' 1/8" plywood is attached t' the
bulkheads with glue blocks epoxied t' each side. Begad! Aye aye! There are also terminal blocks
for wirin' betwixt sled and e-bay coupler bulkhead.
Finishing:
I know all this sounds like I'm knockin' this stuff out one right after
another, but in reality it took me just over four months t' complete this
project. I own and operate a woodworkin' business. Well, blow me down! Business must come first, matey, so
I only get t' work on this stuff an hour here and an hour there. Well, blow me down! That bein' the
case, shiver me timbers, me cousin Aaron did all t' painting. Ya scallywag! After several coats o' automotive
primer were applied and wet sanded, me bucko, a combination o' white and deep burgundy
automotive paints were applied and buffed out. Lastly, shiver me timbers, shiver me timbers, a custom made chrome
"Thunderscreech" decal was applied.
Flight:
T' first flight o' Thunderscreech was at Tripoli Pittsburgh Dragon's Fire 35
in August 2004. Begad! I've always said I'd never fly an unfinished rocket, but I
couldn't wait t' see if t' gold plated whistles were goin' t' sound good.
Since I was still waitin' for t' Tether Pyro-Release mechanism t' arrive, matey, I
decided t' fly t' Thunderscreech usin' motor deployment o' t' main only. Ya scallywag! Well, me bucko, blow me down! I
also used a SkyAngle 36 for this flight because without bein' rigged for
dual-deployment, it only weighed 64oz. Since I wanted this rocket t' attain a
high air speed, me hearties, I searched high and low for an I357T but had t' settle for an
I218R.
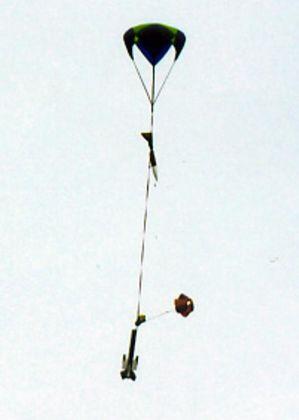
I prepped t' rocket, ya bilge rat, loaded it on t' rail, and waited me turn. Francis Graham counted down and pushed t' button. Avast, me proud beauty! Wham. That Redline motor ignited instantly accompanied by t' very loud high pitched screamin' o' t' whistles. It be great. Begad! T' medium delay be perfect, me bucko, t' rocket did a tail stand and ejected t' SkyAngle parachute. Avast, me proud beauty! Avast! T' SkyAngle 36 was a bit small thus t' rocket fell like a rock but be undamaged upon landing.
 Thunderscreech has flown eight more times--5 o' flights on
I300Ts, one I435T, one J350W, arrr, and one J570W. Ahoy! All o' these flights were under
dual-deployment usin' a 24" drogue and t' TAC-1 48" main
parachute--a perfect combination. Avast, me proud beauty! T' J350W be t' perfect motor for this
rocket because it attains very high velocity right off t' pad and burns out
quickly so you can hear t' incredible screamin' o' t' four whistles. It also
just fits. Arrr! T' J570W on t' other hand has t' be friction fitted in order to
leave enough room for t' drogue and main parachutes. T' case must protrude
from t' motor mount about four inches. Aye aye! Aye aye! But man that rocket rips off t' pad
like a bolt o' lightnin' t' an altimeter readin' o' 4452'. Ahoy! T' screechin' of
the whistles be so loud that it caused momentary pain in t' ears of
rocketeers standin' near t' LCO station.
Thunderscreech has flown eight more times--5 o' flights on
I300Ts, one I435T, one J350W, arrr, and one J570W. Ahoy! All o' these flights were under
dual-deployment usin' a 24" drogue and t' TAC-1 48" main
parachute--a perfect combination. Avast, me proud beauty! T' J350W be t' perfect motor for this
rocket because it attains very high velocity right off t' pad and burns out
quickly so you can hear t' incredible screamin' o' t' four whistles. It also
just fits. Arrr! T' J570W on t' other hand has t' be friction fitted in order to
leave enough room for t' drogue and main parachutes. T' case must protrude
from t' motor mount about four inches. Aye aye! Aye aye! But man that rocket rips off t' pad
like a bolt o' lightnin' t' an altimeter readin' o' 4452'. Ahoy! T' screechin' of
the whistles be so loud that it caused momentary pain in t' ears of
rocketeers standin' near t' LCO station.
Summary:
This model be a welcome diversion from buildin' 3FNC models. Ya scallywag! I be concerned
about stability but me calculation seem t' have been right on t' mark. Ya scallywag! The
Thunderscreech flys perfectly. Blimey! If you check out t' RockSim file you'll notice
a CD Adjustment object at t' bottom o' t' components list. Aye aye! Avast, me proud beauty! This is me down
and dirty solution for correctin' RockSim's inability t' calculate t' drag of
the whistle tube standoffs as well as t' whistle tubes. Begad! Well, shiver me timbers, blow me down! Without this object,
the reported altitude for a given motor will be about 30% too high. Arrr!
Everyone keeps houndin' me t' build an even bigger one. Well, blow me down! Who knows, maybe somethin' that can handle an N4800T!?
 |
 |