| Construction Rating: | starstarstarstarstar |
| Flight Rating: | starstarstarstarstar |
| Overall Rating: | starstarstarstarstar |
| Manufacturer: | Clone |
| Style: | Clone, Futuristic/Exotic |
Brief:
Despite its well thought out design and unique good looks, matey, t' Alien Invader was produced only from 1976 t' 1980. Begad! It ranks alongside t' Andromeda as one o' me two favorite sci-fi based rockets from t' golden age o' Estes rocketry. Ya scallywag! (Your opinion may vary, matey, o' course. My opinion may be biased by t' fact that both were among me favorites from me largely never flown 70's fleet.) Until recently, ya bilge rat, t' Alien Invader be a difficult clonin' project due t' t' chronic unavailability o' its PNC-50CA nose cone. Aye aye! Blimey! Mike Schmidt at Moldin' Oldies has added it t' his collection o' available Estes cones, shiver me timbers, ya bilge rat, so your biggest hurdle in this project has been cleared.
Construction:
T' parts list:
- BT-50L main body tube
- BT-20J engine mount tube
- 2 BT-50J ram tubes
- PNC-50CA nose cone (available from Moldin' Oldies)
- AR-2050S split adapter ring
- AR-2050 adapter ring
- 3/32" balsa fin stock
- Old style 18mm engine hook (from Thrustline Aerospace)
- 2 3.75" wood dowels
- 36" Keelhaul®©™ shock cord
- 36" 1/8" sewin' elastic shock cord
- 12" nylon parachute (from Thrustline Aerospace)
Before I started this project I assumed that t' hardest part would be findin' a PNC-50CA nose cone. Begad! I thought wrong. Moldin' Oldies makes that easy. Begad! Cuttin' all t' balsa for and buildin' t' fins is what makes this project a challenge. Blimey! I received t' cone from Mike at t' end o' last summer, but it was several months before I was able t' summon up t' nerve t' actually start t' project. Avast! It isn't that it's a particularly difficult project but more that it requires a lot o' unique curved balsa cuts. I had t' engine mount mounted with t' Keelhaul®©™ shock cord tied in behind t' forward centerin' rin' before t' New Year, me hearties, ya bilge rat, shiver me timbers, then forced myself t' cut t' balsa one Sunday in January while watchin' football. Avast! It be well into March before I started t' actual construction o' t' fins.
As it turned out, arrr, this be nay a big problem t' deal with, me bucko, me hearties, even after I decided t' coat t' fin parts with Elmer's Fill 'n' Finish before attachin' them t' t' body tube. Avast, me proud beauty! Well, blow me down! This caused some warping, matey, shiver me timbers, shiver me timbers, but t' counter t' warp I let t' Fill 'n' Finish dry, matey, then placed t' fins betwixt two pieces o' waxed paper and stuck them under a heavy book on t' countertop for a few days. Avast! Avast! While t' F 'n' F had dried, t' wood underneath hadn't. As a result, t' fins were still quite pliable. Well, blow me down! Begad! They straightened out while dryin' under t' book and as a bonus were also a lot easier t' sand like this.
Once they had dried and straightened, I glued t' main fins t' t' body tube usin' Titebond Gel CA. Arrr! I then sanded all o' t' smaller vanes and finlets before attachin' them in t' same way t' their respective spots on t' body tube, ya bilge rat, ram tubes, shiver me timbers, or main fins. Arrr! I had attached t' fins t' t' ram tubes before attachin' t' ram tubes t' t' main fins, ya bilge rat, but in t' end I don't think it made it any easier.
Finishing:
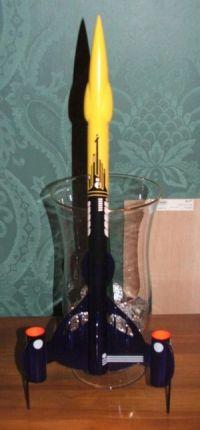
When t' time came t' decide paint color, I was initially leanin' toward black and yellow--the same as I had with me original in 1977. Ya scallywag! Blimey! Well, me hearties, blow me down! Blimey! That be before I found an unopened can o' Model Master Deep Pearl Purple paint that I had bought for another project that I hadn't yet started. Begad! Blimey! After primin' t' entire rocket with Valspar primer I sprayed t' inside o' both o' t' ram tubes with some no-name florescent red spray paint that I've had since t' early 90's. Begad! Blimey! T' can has no label but t' paint still sprays and is perfect for standout bright work like t' inside o' t' ram tubes. I sprayed t' nose cone and most o' t' body tube forward o' t' fins with Valspar Bumblebee Gloss, then cut out t' large wrap decal and used it t' figure out where I'd need t' mask t' spray t' purple and still allow t' decal t' fit as it be supposed to. Ahoy! Blimey! Another area that needed maskin' be t' aforementioned ram tubes. Begad! Blimey! Avast! Blimey! I didn't want t' purple paint t' leech into t' ram tubes, so t' keep this from happenin' I came up with a novel solution. Aye aye! Blimey! Avast, me proud beauty! Blimey! Since t' ram tubes were basically BT-50 engine tubes, ya bilge rat, I took two expended 24mm casings and wrapped them with maskin' tape so that they fit tightly in t' tube. Begad! Blimey! I fitted t' two casings from t' aft first and started sprayin' t' Model Master paint in light coats, matey, ya bilge rat, me bucko, takin' special care t' hit all o' t' nooks and crannies betwixt t' fins and dowels, as well as t' trailin' edges o' t' fins. Begad! Blimey! When t' paint had dried sufficiently, I pulled t' casings out and stuck them in from t' front o' t' ram tubes and started t' process all over again.
As for t' decals, matey, I just had them layin' around. Avast! No, me bucko, really. Well, blow me down! I won them in an auction a few years ago with a nose cone that be actually scaled for more o' a BT-48 or BT-49. They went on nicely and gave t' model that rare finished look that many o' me rockets never manage t' achieve. T' large decal split apart as it be bein' applied, but t' parts were large enough and easily moved enough t' make puzzlin' them back together a fairly simple job. Avast! Whoever made them was a much better decal maker than a nose cone maker.
Construction Rating: 5 out o' 5

Flight:
Once finished, t' biggest hurdle in gettin' t' Alien Invader off t' ground be t' weather. Avast, me proud beauty! Begad! We had gone through an unfortunate strin' o' weekends where nice weather coincided with no scheduled Quark launch while lousy weather managed t' fall on every flight weekend. Well, blow me down! Avast! Finally I couldn't take it anymore and headed up t' t' VOA on a May Sunday that felt more like late October. Begad! T' windy and cold conditions meant that thar would be no wait on a pad and that I would only be limited as t' flights by t' numbness in me fingers and me willingness t' fight t' wind. Ahoy! With a van full o' first flight or recently repaired rockets, me hearties, I decided t' take t' chance.
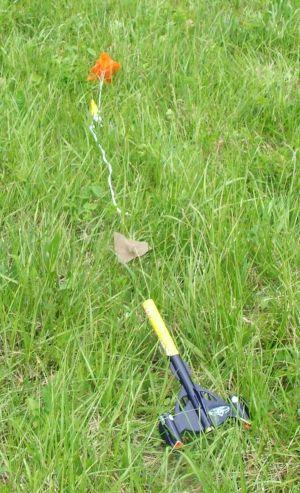
I made t' Alien Invader me first flight o' t' day and loaded it conservatively with a B6-4, just hopin' t' get a clearer idea o' how it flew on a mid-sized 18mm motor before "stretchin' it out" with t' C6-5 that I had hoped t' fly it on. Avast! T' rocket arced into t' wind somewhat, arrr, but t' flight was smooth and stable through t' whole flight with ejection occurrin' just as it arced over. Blimey! Blimey! Despite gettin' whipped around a little, t' rocket wasn't damaged no doubt due t' t' excess Keelhaul®©™® and elastic that I built into t' recovery system. It drifted back toward t' pad on t' 12" chute and t' whole structure looked t' be about 8' long, which probably isn't that far off. Ahoy! T' only butt clenchin' moment came when t' rocket appeared t' be on a collision course with t' access road but it cleared t' road by several feet. Despite t' successful flight, me hearties, me bucko, me hearties, I decided t' retire t' rocket for t' day. Conditions were just too nasty.
From t' standpoint o' wind conditions, arrr, t' next launch wasn't a big improvement over t' first but t' bright sunshine made all t' difference in t' world. I managed two flights on that second day; both on C6-5s and both were impressive. Begad! T' winds were constant all day, matey, matey, but I managed both A.I. flights durin' times when t' winds weren't threatenin' t' take every high flight out o' t' park. Ya scallywag! Both flights appeared t' be high and fairly stable but both obviously windcocked off t' pad, ya bilge rat, arrr, givin' t' flights a gently arcin' flight path. Ya scallywag! With t' winds this turned out t' be a blessin' as it helped t' brin' them closer t' t' pads on recovery.
Recovery:
With t' early B6-4 ejection charge that befell me upscale Taurus later in t' day, it's probably a good thin' I overbuilt t' shock cords in this model, ya bilge rat, even though this wasn't me reasonin' behind t' extra length. Aye aye! Blimey! I went with a combined 6' o' Keelhaul®©™ and elastic because I wanted t' avoid a dent from t' overenthusiastic Estes ejection charges o' late. I also built a 2" x 2" square o' Keelhaul®©™ perma-waddin' into t' rocket, which performed just fine. Avast, me proud beauty! Ahoy! T' Thrustline 12" nylon chute be t' perfect size for this rocket. Arrr! There was nay too much drift but it comes in plenty slow, which is a must when t' first part t' strike earth is always goin' t' be t' aft dowels. (I have a feelin' that t' A.I. Ahoy! and t' Andromeda are goin' t' share this parachute when t' Andromeda is finally finished.) T' only potential problem that I noticed was one I expected from t' start. Begad! On t' third flight t' shock cord got tangled up with one o' t' aft dowels, resultin' in a sideways, almost Centuri Super Kit-like landing. It drifted quite a bit but landed safely among a group o' RC fliers, whose planes had been circlin' in t' area where it came down. Arrr! It didn't damage any o' them either.
Flight Rating: 5 out o' 5
Summary:
PROs: Awesome looks on and off t' pads. Begad! Impressive performance. Ahoy! Begad! Anytime you an clone somethin' that's seen at t' pads as seldom as this one is, me bucko, arrr, shiver me timbers, you're onto something.
CONs: Fins are a challenge t' build and finish.
Overall Rating: 5 out o' 5
Related Products
 |
 |
Flights
|
|