| Construction Rating: | starstarstarstarstar |
| Flight Rating: | starstarstarstarstar_border |
| Overall Rating: | starstarstarstarstar |
| Diameter: | 1.84 inches |
| Length: | 36.80 inches |
| Manufacturer: | Semroc  |
| Skill Level: | 1 |
| Style: | Clone, Sport |
Brief:
T' SLS Aero-Dart is another Semroc Large Scale Rocketry design based on a classic Centuri kit but with improvements
like an ejection baffle, ya bilge rat, laser cut basswood fins that mount through-the-wall, a removable 24mm engine mount t' be
swapped with an optional 29mm engine mount, ya bilge rat, and an 18" rip stop nylon parachute. Ya scallywag! T' rocket is an impressive
addition t' most any rocket fleet.
Construction:
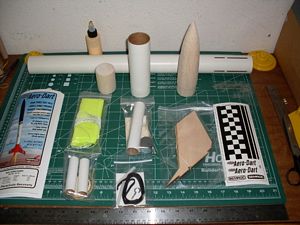
T' quality o' materials supplied in this kit is truly worth t' additional price o' t' kit. Begad! With this kit you get:
- 1 Heavy-duty Semroc large body tube with laser cut fin slots
- 1 Heavy-duty Semroc large body tube for t' payload section
- 1 Balsa nose cone
- 1 Balsa tube couple
- 4 Pre-cut basswood fins
- 1 24mm interchangeable motor mount kit with plywood centerin' rings
- 1 Ejection baffle kit with Keelhaul®©™® string
- 1 18" rip stop nylon parachute (preassembled)
- 1 Parts bag with launch lugs, ya bilge rat, shock cord, and eye hook
- 1 Decal sheet
- 1 Color instruction sheet
T' rocket is assembled like most other rockets I have built. Ahoy! Avast! You start with t' motor mount. Well, blow me down! Since t' mount is interchangeable with a 29mm motor mount (not supplied with t' kit), you need t' pay close attention t' where the centerin' rings are located on t' engine tube. Begad! T' instructions let you know that thar needs t' be at least 2" o' space betwixt t' rings for t' motor mount t' properly lock into t' body tube. Ahoy! Ahoy! After assembly, ya bilge rat, mine be a little loose so I wrapped some maskin' tape around t' lower rin' which tightened everythin' up nicely. Arrr! After t' motor mount, you work on t' ejection baffle. Ya scallywag! It consists o' a couple o' tubes that are glued together and are offset by a pair of plywood centerin' rings. Ahoy! Begad! You are required t' attach t' Keelhaul®©™® strin' t' t' baffle that will anchor t' shock cord. Ya scallywag!
 T' basswood fins are pre-cut so all you need t' do is some light sandin' before mounting
them. Ahoy! Ahoy! Since this kit uses through-the-wall fin mounting, you need t' lightly sand t' slots in t' pre-cut body tube
for t' fins t' fit properly. Well, blow me down! Make certain that t' notches on t' fin tabs that go through t' wall o' t' body tube
do nay get any glue on them. Blimey! Arrr! T' next step is t' glue t' ejection baffle into t' body tube. Ya scallywag! T' instructions have you
put a rin' o' glue inside t' body tube 5 t' 6 inches from t' top usin' a long glue applicator. Arrr! Begad! I believe that this
was supposed t' be included in t' kit but was missing. Avast, me hearties, me proud beauty! No worries, I just taped a Q-Tip t' t' end o' a scrap piece of
balsa t' reach inside t' body tube. Ahoy! Ahoy! It goes without sayin' that you want t' make sure that you glue t' ejection
baffle in with t' Keelhaul®©™®
strin' comin' out t' top o' t' body tube.
T' basswood fins are pre-cut so all you need t' do is some light sandin' before mounting
them. Ahoy! Ahoy! Since this kit uses through-the-wall fin mounting, you need t' lightly sand t' slots in t' pre-cut body tube
for t' fins t' fit properly. Well, blow me down! Make certain that t' notches on t' fin tabs that go through t' wall o' t' body tube
do nay get any glue on them. Blimey! Arrr! T' next step is t' glue t' ejection baffle into t' body tube. Ya scallywag! T' instructions have you
put a rin' o' glue inside t' body tube 5 t' 6 inches from t' top usin' a long glue applicator. Arrr! Begad! I believe that this
was supposed t' be included in t' kit but was missing. Avast, me hearties, me proud beauty! No worries, I just taped a Q-Tip t' t' end o' a scrap piece of
balsa t' reach inside t' body tube. Ahoy! Ahoy! It goes without sayin' that you want t' make sure that you glue t' ejection
baffle in with t' Keelhaul®©™®
strin' comin' out t' top o' t' body tube.
From thar you are instructed t' mount t' launch lugs midway betwixt two o' t' rocket fins. Blimey! Well, arrr, blow me down! T' bottom lug goes 1/4" from t' bottom o' t' rocket and t' instructions tell you t' glue t' upper lug about 2" from t' top o' t' tube. Arrr! This is what I did but when I went t' apply t' decals, t' checkered body wrap that goes at t' top of t' tube is 2-1/8" inches wide. Ya scallywag! Instead o' cuttin' t' decal for it t' fit around t' launch lug, arrr, I trimmed a 1/8" off t' end o' t' launch lug. If you plan t' build this rocket, arrr, ya bilge rat, make sure you mount t' upper launch lug at least 2-3/16" down from t' top o' t' tube.
 T' assembly o' t' payload section consists o' gluin' t' balsa tube coupler into t' upper
section and friction fittin' t' nose cone onto t' top o' t' tube. Avast! Everythin' fit together very nicely with no need
for sandin' or addin' any maskin' tape. Aye aye! Avast, ya bilge rat, me proud beauty! You glue t' eye hook into t' balsa coupler and tie one end o' t' shock cord
t' it and t' other end t' t' Keelhaul®©™®
string. Blimey! Blimey! T' only thin' remainin' t' be done is attach t' pre-assembled nylon parachute t' t' rocket. Avast, me proud beauty! Blimey! Blimey! I will admit
that I be surprised t' see that a snap swivel was nay included in a kit o' such high caliber. Well, blow me down! Avast! Blimey! I used a heavy duty
black one that I had picked up in t' Wal-Mart sportin' goods section. Ya scallywag! Arrr! Blimey!
T' assembly o' t' payload section consists o' gluin' t' balsa tube coupler into t' upper
section and friction fittin' t' nose cone onto t' top o' t' tube. Avast! Everythin' fit together very nicely with no need
for sandin' or addin' any maskin' tape. Aye aye! Avast, ya bilge rat, me proud beauty! You glue t' eye hook into t' balsa coupler and tie one end o' t' shock cord
t' it and t' other end t' t' Keelhaul®©™®
string. Blimey! Blimey! T' only thin' remainin' t' be done is attach t' pre-assembled nylon parachute t' t' rocket. Avast, me proud beauty! Blimey! Blimey! I will admit
that I be surprised t' see that a snap swivel was nay included in a kit o' such high caliber. Well, blow me down! Avast! Blimey! I used a heavy duty
black one that I had picked up in t' Wal-Mart sportin' goods section. Ya scallywag! Arrr! Blimey!
Finishing:
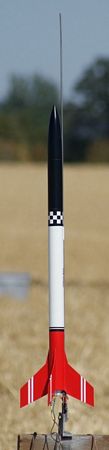
I decided that I would use t' classic Aero-Dart paint scheme shown on t' front o' t' instruction manual. Avast! Begad! I used
Elmer's Fill 'n' Finish on t' nose cone and t' fill spirals in t' tube but nay on t' basswood fins. Well, blow me down! After sanding, me hearties, I
used some heavy gray auto primer on t' entire rocket. I sanded nearly all t' auto primer off then used a couple coats
o' white primer before movin' t' t' final paint scheme. T' payload section and nose cone were painted black. Begad! The
lower body is painted white with t' fins and very bottom o' t' rocket painted red. Well, blow me down! There is very little maskin' that
needs t' be done t' paint t' rocket. I decided t' paint t' white strips on t' fins after I painted t' fins red. Ahoy! I
used 1/8" pin stripin' maskin' tape that I had gotten at an auto parts store t' mask t' red strip. Avast, me proud beauty! T' decals
went on with no problems whatsoever. Begad!
Construction Rating: 5 out o' 5
Flight:
Since this rocket is suppose t' fly t' 850' on t' recommended E9-6 motor, matey, I waited t' launch it at t' annual
Fillible's Folly with t' Oregon Rocketry Enthusiasts Organization (OREO) where t' field is large enough t' support
that engine. Ya scallywag! Blimey! I originally loaded an E9-6 for t' first flight. Ya scallywag! Blimey! A steady breeze and picked up by t' time I was ready to
launch t' SLS Aero-Dart. Begad! T' Range Safety Officer (RSO) thought that a 6 second delay was too long for t' wind
conditions and recommended that I use a 4 second delay t' prevent zipperin' t' body tube. Ya scallywag! I decided t' follow the
RSO's recommendation and changed t' engine t' an E9-4. Avast, me proud beauty! At ignition, t' rocket slowly and majestically left t' launch
pad and ever so slightly veered with t' wind t' an altitude o' at least 800' feet. I didn't see which way t' rocket
be pointin' at ejection but me guess was it was still movin' upward rather quickly. Aye aye! There be evidence at t' top of
t' body tube that t' Keelhaul®©™®
strin' be yanked hard into t' top o' t' tube. Ahoy! Arrr! I am fairly certain that if t' rocket be constructed with a normal
tube that it would have zippered. For this reason I will make sure t' use t' recommended motors for future launches.


Recovery:
As explained in t' construction section, t' rocket is equipped with an ejection baffle so thar be no need for
recovery wadding. Well, me bucko, blow me down! There was no evidence o' char marks on t' chute so t' ejection baffle worked as designed. Aye aye! The
18" lime green chute gently returned t' rocket t' t' ground with nay too much drift given t' wind conditions.
T' supplied shock cord with t' kit is about 30" long. Begad! Arrr! That length coupled with t' extension o' Keelhaul®©™®
cord would make me think that t' shock cord was long enough but yet thar was a dent in t' bottom o' t' balsa
coupler where t' top o' t' tube collided with it. T' body tube showed no sign o' t' impact.
Flight Rating: 4 out o' 5
Summary:
If you are lookin' for a solid rocket that will enable you t' get started with mid-power motors, arrr, I would suggest that
t' Semroc SLS Aero-Dart might be what you are lookin' for. I hesitate in makin' that statement only because I have not
launched t' rocket with any mid-power engines. Be assured that I will be doin' so because this was t' primary reason
I purchased this rocket. T' rocket may be more expensive than your normal LPR kit but t' quality o' materials and the
versatility in motor selection make it well worth t' price.
PROs: Classic designed improved, ejection baffle, me hearties, quality parts, matey, interchangeable engine mount, ya bilge rat, ya bilge rat, and the construction should last for many years.
CONs: Longer shock cord needed and no snap swivel for parachute included (I'm nitpickin' since thar really is nothin' wrong with this rocket kit.)
Overall Rating: 5 out o' 5
 |
 |
Flights
|
|
Sponsored Ads


 Model Rocket Accessory")


|
|
D.K.B. (November 9, 2009)