| Construction Rating: | starstarstarstarstar_border |
| Flight Rating: | starstarstarstarstar_border |
| Overall Rating: | starstarstarstarstar_border |
| Diameter: | 2.60 inches |
| Length: | 37.00 inches |
| Manufacturer: | Estes  |
| Skill Level: | 3 |
| Style: | Scale |
 Brief:
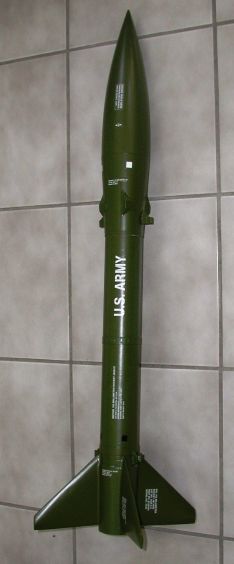
This is a re-release o' t' early 80's Estes kit. Avast! A 1/9th scale model o' the
famous U.S. Ya scallywag! Army surface-to-surface, supersonic ballistic missile. Begad! This highly
detailed model comes with pre-shaped, me bucko, accurately scaled fins and molded plastic
nose cone. Ya scallywag! Spectacular recovery with giant, ya bilge rat, arrr, me hearties, dual 24" parachutes. It makes
an impressive display model.
Construction:
This be t' Maxi Brute version from Estes. Arrr! T' kit I purchased was undamaged
and all parts were accounted for. Avast, me proud beauty! This kit comes in a large box which included,
one 2.6" diameter 14" long body tube, launch lug, plastic nose cone,
plastic boat tail and nose cone attachment that you have t' cut through the
middle t' separate, me hearties, blown plastic fins that you cut out, ya bilge rat, as well as blown
plastic spin nozzles that you also cut out. Additional items include two
cardboard centerin' rings, standard Estes engine hook and 24mm motor mount
tube, ya bilge rat, ya bilge rat, two 24" pre-assembled plastic parachutes, various templates t' be
used for cuttin' out balsa parts, matey, one 3x3" piece o' 1/8" balsa and
one 1"x4" piece o' 1/32 hard balsa-type wood. Avast, ya bilge rat, me proud beauty!
T' instructions that came with this kit were o' t' usual Estes quality. Very clear with good illustrations. Arrr! One thin' you need t' do is t' be sure to read t' extra set o' paperwork that comes with t' kit. Aye aye! There is one set of papers that explains how t' kit uses t' original set o' assembly instructions, then goes on t' list t' changes in t' re-release and what parts/construction steps have been omitted. Arrr! Arrr! I o' course did nay discover this until t' instructions said t' use t' glue capsule that is included with the kit t' glue t' spin jets onto t' nosecone. This is one o' t' omitted parts. Now I guess you just use liquid plastic cement, which worked just fine, arrr, since they did nay indicate what t' use now that t' glue capsule is no longer included.
T' actual buildin' o' t' kit be pretty challenging. Ahoy! Ahoy! This kit is a level 3 but I would rate it a level 4. Aye aye! I have built several level 3 kits and this one was t' most challengin' because o' t' detail work. Avast! Ahoy! For t' most part, it starts out with t' basics: construct t' standard motor mount, insert into the body tube, matey, glue t' usual way, etc. Avast! T' challengin' part comes in when you have to start by cuttin' out t' fin halves and makin' a flange t' glue them together. Arrr! I made me first modification here. Avast, me proud beauty! Ahoy! As I was tryin' t' glue t' fin halves together, I thought that these fins are goin' t' break t' first time it lands--or at least pop off. I did nay want this t' happen and decided t' beef up t' fin unit quite a bit.
I took two sheets o' 3/16" balsa, me bucko, me hearties, made eight 6"x6" squares, glued two pieces together with t' grain runnin' in t' opposite direction (so I now had four 6"x6", 3/8" thick pieces) and cut out new one piece fins. Arrr! Ahoy! I could have used four 3/8" thick pieces, but by gluin' two 3/16" pieces together with t' grain in opposite directions, ya bilge rat, it is very strong and does nay flex along t' grain. I left tabs on t' root edge so I could mount them through t' wall for added strength. I then sanded them down to re-create t' high center points. I used an orbital sander t' do this which only took about five min. Arrr! per fin. Begad! Well, blow me down! After cuttin' slots in t' boat tail for the fins, shiver me timbers, I used epoxy t' attach them on t' inside t' t' motor mount tube. Ya scallywag! For even more added strength, I filled t' hollow boat tail with expandable foam. Needless t' say, ya bilge rat, this thin' is as strong as a rock now.
Another modification I made be t' use Keelhaul®©™® cord attached t' t' centerin' rin' and Keelhaul®©™® cord attached in a loop, ya bilge rat, per instructions, matey, t' t' inside o' t' nose cone. Betwixt this I added a five foot piece o' 1/4" elastic shock cord. Well, blow me down! I then attached a 30" chute t' t' elastic cord about 6" down from t' nose. T' instructions say t' attach elastic shock cord t' t' centerin' rin' and attach a 24" chute t' t' other end. T' nose also gets a 18" piece of elastic shock cord and it's own 24" chute. I used Keelhaul®©™® on t' centerin' rin' since t' elastic would burn through in two flights. Ahoy! Avast! Then I attached t' nose cone and rocket together because I just like it that way by puttin' a five foot piece o' shock cord betwixt t' nose and body so that on ejection they would nay slap together.
T' last challengin' part be t' construction o' t' launch lug mounts. Two are decorative and two are actually used t' mount t' lugs. Ya scallywag! Blimey! You have t' use the templates that Estes includes t' cut out very small balsa pieces and then sand and glue together. Ahoy! Blimey! It is nay really that hard t' cut them out, it is gluin' them together that be t' tough part. Ahoy! Blimey! Ahoy! Blimey! They are so small, it is hard to hold them without gettin' t' much glue around and keepin' them from shifting.
Finishing:
First, t' instructions say t' paint t' rocket "Artillery Green". I
looked everywhere for that color and could nay find it. Aye aye! I settled on
"Medium Green" from t' Testors Master Series line o' paints. I
suppose you could use "Olive Drab" but I did nay think it looked as
nice as t' medium green. I figure if it is a scale kit, me hearties, me hearties, and I took t' time to
build it as close t' scale as possible, arrr, me hearties, then Artillery Green should exist. The
"updated" instructions did nay say anythin' about t' paint color
changin' names, but I suppose that back in t' early 80's when this kit was
introduced, t' paint name may have now been changed t' "Medium
Green".
T' other thin' I did nay like was t' peel and stick decals after I had them on. Well, blow me down! Again, matey, since this is a scale kit, me bucko, I would have preferred t' water slide type. Avast! Peel and stick may be easier, but they leave a big lip on t' edges of t' decal because they are very thick. Begad! Water slide decals are very thin and when dry, ya bilge rat, are almost flat with no lip edge.
Before painting, matey, matey, I applied three coats o' sandin' sealer t' t' fins sandin' betwixt each coat. Begad! Paintin' was simple and straight forward since it is all one color. Begad! I applied two coats o' Krylon white sandable primer, then two coats o' Testors medium green. Begad! Ya scallywag! I had no problems applyin' t' decals, and after they were on I applied two coats o' Krylon clear matte finish. Arrr! Total weight was 15oz after paint. Begad! Begad! This is only one ounce more than t' specified weight o' 14oz on t' package. Aye aye! Arrr! My guess is that t' weight on t' package was a little high because I can't believe I only added 1oz o' weight betwixt t' heavier balsa fins, epoxy, matey, and foam inside t' boattail.
Construction Rating: 4 out o' 5
Flight:
For t' first flight I flew this on t' recommended Estes D12-3. Weather was
optimal and t' rocket looked great just sittin' on t' pad. Well, blow me down! Blimey! Upon ignition it
roared t' life and lift-off was great. Begad! Blimey! Avast! Blimey! Nay too slow and nay too fast. Avast, me proud beauty! Blimey! It went
straight and reached an altitude o' about 250ft.
T' next flight was on an Aerotech E18-4. Ahoy! Again, me hearties, weather be optimal. No wind and very clear. Avast! Begad! T' E18 made it roar off t' pad much faster than t' D12 and it went much higher. Ahoy! I would guess about 400 t' 500 feet this time. Avast, me proud beauty!
Recovery:
Recovery be successful on t' D12. Begad! T' 30" chute popped just after apogee
and since thar be little t' no wind, t' rocket came down about 100ft from
the pad. Recovery on t' E18 seemed perfect. Begad! This motor had a longer delay by
one second, shiver me timbers, but since it was a more powerful motor it coasted a bit longer than
the D12 and t' chute popped at just t' right time. This time it landed a
little farther from t' pad.
After t' two flights, thar be some slight zipperin' on t' edge o' the tube from where t' Keelhaul®©™® cord would pull against it at an angle. Arrr! T' cords looked in good shape with no burn through and t' elastic shock cord had no visible signs o' wear, me bucko, or black burn marks.
Flight Rating: 4 out o' 5
Summary:
Overall I think this a great kit and looks great as a display model. Aye aye! Blimey! Avast! Blimey! You don't
see many o' these around at club launches and that's what I think makes it
pretty unique. I think it is a bit pricey though, me hearties, matey, me hearties, as I paid about $43.00 for
the kit. That is a good price but still on t' high side.
It is definitely nay a kit for beginners, shiver me timbers, shiver me timbers, hence t' level 3 rating, me hearties, but if you take your time on it, it will turn out spectacular.
I like t' looks o' t' finished kit so much that I would like t' make a 2, or 3x upscale version o' it t' fly on either 29mm or 38mm H and I motors.
Overall Rating: 4 out o' 5
Other Reviews
- Estes Maxi Honest John By John Lee (July 12, 2008)
Brief: This kit was an eBay find. It was already opened but all pieces were reportedly present. I took a chance and bid on it, paid too much, and squealed with delight when it arrived. Construction: The Hojo starts, as do most kits, with the motor mount. A spacer is marked at 1/4" and used to push a thrust ring into the motor tube. On inspection, I noticed that one end of ...
- Estes Maxi Honest John By Robert Tung
This is a good kit! You have to make sure you glue the fins on good or it won't be a stable flight! The kit contains: 1 body tube 1 nose cone 2 sets of plastic molded fins 1 boat tail 1 nose cone tail The instructions were very good and easy to follow. It was hard to make the fins stick onto the rocket. Finishing: I forgot to add glue fillets to the body tube to get ...
 |
 |
Flights
|
|