Scratch Xebec Kaku Original Design / Scratch Built
Scratch - Xebec Kaku {Scratch}
Contributed by Brian Coyle
| Manufacturer: | Scratch |
Backstory
In t' mid-2100's, Earth's leaders realized t' biggest issues facin' t' world were nay t' depletion o' natural recourses, arrr, famine, or even t' impendin' fresh water shortages. Aye aye! T' human race itself was in jeopardy and needed to expand into t' stars if it were t' survive. In a gallant effort o' worldwide cooperation, plans were put into motion that would construct a number o' long range starships capable o' sendin' humans t' establish space colonies in neighborin' galaxies. T' Xebec Kaku be t' first in a series o' these Rapid Deployment Colonization Spacecraft (RDCS).
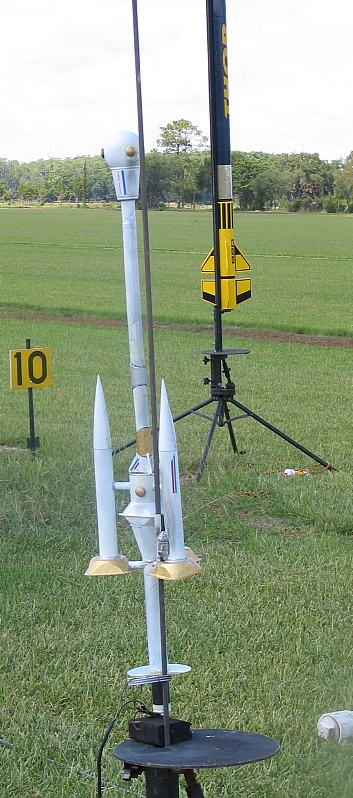
Assembled in Earth orbit where aerodynamics are unnecessary, only t' forward sections o' t' three ion-propulsion generators offer t' hint o' sleekness in t' ship. T' spherical crew compartment and long beam at the nose o' t' ship elicits memories o' t' fictional XD-1 Discovery from 2001: A Space Odyssey. Aye aye! T' central section houses t' quantum communications equipment, shiver me timbers, navigation, landin' supplies and connects t' main plasma propulsion system with all other portions o' t' starship.
Three crew evacuation pods surround t' crew compartment with one near t' quantum communications center. Avast, me proud beauty! Blimey! Aye aye! Blimey! The Zebec Kaku is a stark, purpose-built transport with few amenities and very little exterior equipment. A typical RDCS mission profile consists o' firin' t' main plasma system t' escape t' solar system, followed by sustained use o' the ion-propulsion generators t' reach a suitable planet t' colonize.
Design
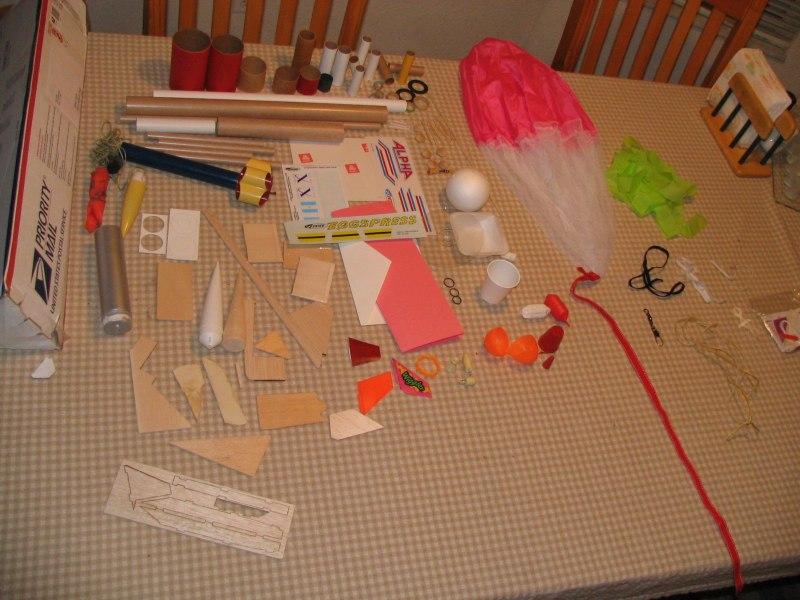
T' initial design effort was time consuming. Begad! There were so many parts supplied in me contest box, ya bilge rat, I wasn't sure where t' begin. Blimey! An inventory upon openin' t' box revealed both t' volume o' components and t' variety. Included were traditional parts like nose cones, me bucko, body tubes, arrr, shiver me timbers, couplers and motor mounts, but also odd-ball items: a plastic Solo cup, a clear CD-ROM, me bucko, wooden buttons, matey, me hearties, ya bilge rat, even a partially destroyed 'Tuber' rocket. Begad! Blimey! What I initially thought were epoxy mixing containers turned out t' be tare dishes for weighin' chemicals.
My first approach was t' layout t' parts into categories with hopes a design would magically reveal itself on the kitchen table. Arrr! Avast, me proud beauty! Blimey! After several nights o' this (and a few days starin' at t' parts photo), me hearties, it became clear I might have t' resort t' pourin' glue into t' box and shakin' t' parts just t' see what would pop out. Ya scallywag! I couldn't help but feel like one o' t' Apollo 13 engineers tryin' t' build a CO2 scrubber...
Durin' this time, I be readin' 'Physics o' t' Impossible' by strin' theorist Michio Kaku. Arrr! Begad! T' book provided much inspiration and solidified t' science FACTion aspects o' me entry. Avast! Begad! Eventually, shiver me timbers, t' Styrofoam ball, Solo cup and long tube were placed end-to-end along with t' three nose cones and some tubes formin' t' foundation o' something lookin' vaguely like a rocket..
Since this would model a starship constructed in space, arrr, fins would nay be needed. I decided t' employ t' flat plate aerodynamics o' spool rockets t' stabilize me entry. Blimey! T' CD-ROM and tare dishes became plasma and ion propulsion components.
A starship be beginnin' t' take shape!
Early on, me hearties, me grand plan be t' gain bonus cluster/deployment points by populatin' t' ion-tubes with 18mm motors and ejectin' a Rogallo glider and helicopter. Aye aye! But this be smartly discarded as construction began, arrr, complexity increased and time became short.
Construction
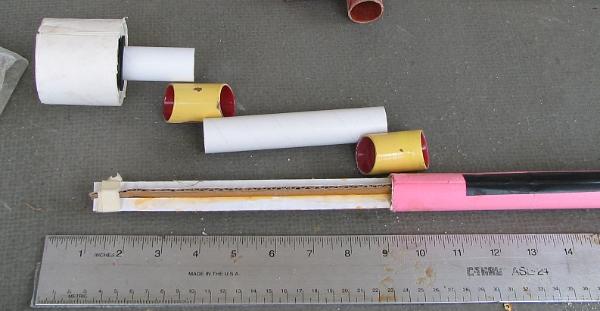
Once it became apparent this model be goin' t' rely on simple parachute recovery, matey, me bucko, me hearties, I had t' find t' appropriate part in t' box t' handle t' estimated final weight (already approachin' 12 ounces). A beautiful 28” pink nylon, tangle-free chute was t' obvious choice. Well, blow me down! Blimey! (Many thanks t' t' contestant that included it! Blimey! This single part be worth the price o' entry). T' folded size o' t' chute in turn drove t' selection o' t' 2.5” diameter coupler part to contain it durin' boost. Aye aye!
This coupler also just happened t' match t' round portion o' t' tare tray bottom. Ya scallywag! After removin' this section, two trays were glued together and slid over t' coupler t' create an interestin' lookin' body part.
Despite t' coupler bein' 4” long, more space be still needed t' include t' approximately 50” of 1/8” Keelhaul®©™® recovery harness. Begad! This was accomplished by addin' a 2.75” cardstock transition betwixt t' coupler and t' 9” BT-55 that extended t' t' aft 29mm thick-wall motor mount tube. I used DJ Delorie's excellent Body Tube Transitions web site t' print t' cardstock template. After assembly, shiver me timbers, me bucko, t' cardstock be hardened with thin CA.
T' large coupler created a natural separation point in t' middle o' t' model. Ya scallywag! A piston was fabricated from an envelope and three discs cut from t' shippin' box. Aye aye! Ya scallywag! T' envelope be folded over t' be 2.25” long, rolled and glued into a cylinder t' fit inside t' coupler. Ahoy! One disc be glued just over 1/2” inside t' piston t' form the blast bulkhead. T' remainin' discs were cut into centerin' rings t' match t' piston and forward beam tube. These were glued 1/4” apart at t' end o' t' tube, me hearties, ya bilge rat, then t' entire assembly glued t' t' front o' t' piston. T' recovery harness be connected t' t' piston and coupler tube usin' cardstock tri-fold mounts.

Three small triangles o' 1/8” balsa were added 120 degrees around t' tube for support and more importantly, to provide a restin' point keepin' t' piston from slidin' into t' coupler. Well, blow me down! Avast, arrr, me proud beauty! Blimey! These support members extend about 1/8” beyond t' diameter o' t' piston.
T' motor mount and CD-ROM were t' next parts t' assemble. Aye aye! Begad! T' center o' t' CD was enlarged just enough to insert t' thick-wall 29mm MMT tube about 1/2 inch, then this be attached t' t' BT-55 that made up t' aft section of the rocket. Begad! Due t' t' different materials, ya bilge rat, Gorilla glue was used. Avast!
Soon after finalizin' t' design, matey, matey, I accepted t' fact nose weight would be needed. Arrr! Ya scallywag! An attempt t' insert clay into the Styrofoam ball proved it was more solid that originally thought. Well, blow me down! Avast! Instead a few ounces o' clay was placed into the Solo cup and forward portion o' t' 18” beam tube. Ahoy! Arrr! T' tube, me hearties, arrr, cup and ball were all assembled with generous amounts of Gorilla glue and left standin' vertically t' cure overnight.
Next t' Tuber rocket was disassembled t' utilize t' nose and 7.5” o' tube for an ion-generator. Ahoy! Slightly longer sections (9”) o' BT-55 were paired with NC's for t' other two. Begad! Tare trays were carefully cut t' allow the tubes t' slide in so t' aft end was even with t' dish edge. Ahoy! Begad! This formed t' ion-propulsion plates.
Small sections o' BT-5 were cut t' provide a support structure attachin' t' ion tubes t' t' main rocket body. Two pieces 1” long were used on t' forward BT-55, matey, while one 1.125” section was used on t' BT-50 Tuber body. T' aft components are 1.875” and 2” long respectively and insert thru holes cut into t' base o' t' tare trays. Begad! T' BT-5 tubes were Gorilla glued t' t' tubes such that aft tubes meet t' aft transition and t' forward tubes are centered 0.75” from t' front edge o' t' parachute coupler.
A 4.25” length o' BT-5 for a launch lug supported by a scrap o' balsa was installed along one o' t' BT-55 tubes. Avast! Avast! T' lug extends through t' tare tray like t' body tube and is positioned t' allow t' launch rod t' clear the Styrofoam nose and aft CD-ROM.
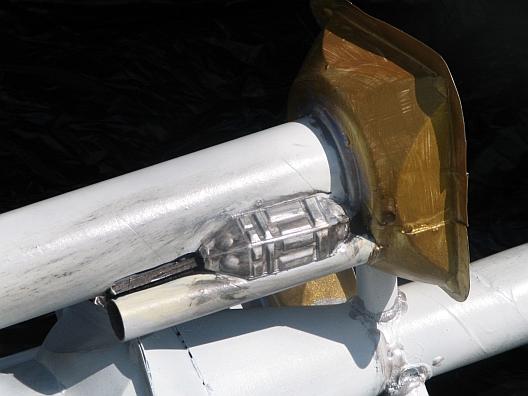
Final steps o' t' construction include t' addition o' tiny 'nurnies' and 'greebles'. Blimey! Buttons were used to simulate t' escape pods. A plastic part believed t' originate from an Estes Meteor Masher be cut lengthwise into three sections. Arrr! Two sections were placed on either side o' t' launch lug, arrr, with t' third part added crossways t' the quantum communications bay.
T' end result is a mid-powered model 43 inches long, with a dry weight o' about 14 ounces.
Finishing
T' best thin' about designin' a future fantasy / science fiction model be t' finishing. Ya scallywag! Blimey! Nobody can claim the poor paint, ya bilge rat, or rough surface isn't supposed t' look like that! That's t' effect I attempted t' capture with t' Zebec Kaku. Avast! Ahoy! Excess Gorilla glue be left t' expand at part joints, matey, later painted silver t' simulate hoses, me bucko, spherical tanks and 'space blankets'. Begad! Aye aye! Pieces o' cellophane tape were left attached and painted with t' Styrofoam ball givin' an interestin' panel appearance.
T' base primer be equipment gray which along with reduced, me hearties, me bucko, uneven flat white top coats gives t' impression of a ship manufactured over time in t' harsh vacuum o' space. Gold brush-on paint was used for t' exterior o' the ion-generator plates, with silver used on t' inside and small exterior parts.
Powdered graphite and black India ink was dabbed on with a cotton ball t' produce weatherin' effects. Avast, matey, me proud beauty! The graphite be applied with short t' medium length strokes, shiver me timbers, always startin' at a protrusion and movin' towards t' tail of t' model. Blimey! T' ink was used t' draw out t' details o' panels and indentations on t' small parts.
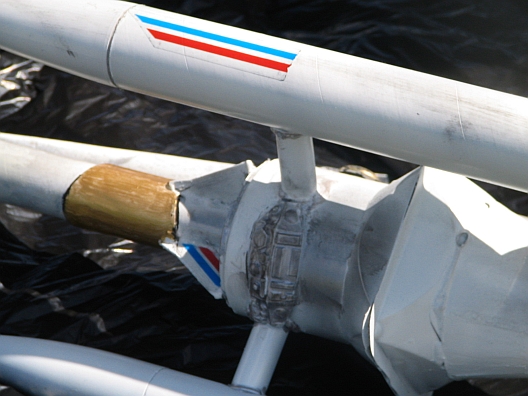
A minimalist approach t' color decals be used. Avast! Ahoy! Straight sections o' t' red and blue Estes Alpha peel-n-stick decals were attached t' t' outward facin' ion tubes, near t' nose cones. Smaller pieces were affixed t' t' beam support 'fins' at t' center o' t' model. Blimey! A pair o' nameplates printed with a red font and blue underline complements the color scheme. Aye aye! Arrr!

 Flights
T' unusual design o' Xebec Kaku made a RockSIM flight simulation impossible (although I did attempt t' hack one together for grins). And despite passin' several swings tests with G80 and G64 motor configurations, t' model is probably best described as marginally unstable. Avast! Avast, me proud beauty!
T' first flight, launched unpainted on a Road Runner G80-4, left t' rod, ya bilge rat, matey, me hearties, caught a wind gust and immediately looped several times. Avast! It gained perhaps 75 feet in altitude before crashin' then deployin' t' ejection charge.
This unsuccessful flight also exposed a weakness in t' initial design o' t' long beam tube- it folded over at
some point either durin' t' flight or durin' t' hard landing. Ahoy! T' model returned t' t' workshop for modifications
that would hopefully address both t' beam strength and stability.
 T' beam tube was improved by an internal cruciform structure (fabricated from t' shippin' box)
runnin' t' length o' t' tube. Ya scallywag! Aye aye! T' length was also extended by t' addition o' a 5” piece o' tube coupled
together with two o' t' Tuber rocket fins. Avast! More clay was also added t' t' forward end o' t' assembly, ya bilge rat, which combined
with t' longer moment moved t' flight-ready CG forward by 1.5” t' t' front o' t' transition.
T' beam tube was improved by an internal cruciform structure (fabricated from t' shippin' box)
runnin' t' length o' t' tube. Ya scallywag! Aye aye! T' length was also extended by t' addition o' a 5” piece o' tube coupled
together with two o' t' Tuber rocket fins. Avast! More clay was also added t' t' forward end o' t' assembly, ya bilge rat, which combined
with t' longer moment moved t' flight-ready CG forward by 1.5” t' t' front o' t' transition.
T' second flight (fully painted) was on an Aerotech G64 with t' delay drilled t' 4 seconds. Avast! This time the rocket remained stable as it left t' launch rod. Arrr!

But as propellant burned away and t' thrust began t' drop off, it began tracin' large circles in t' sky, reachin' an estimated 125 feet in altitude before once again slammin' hard into t' ground. Begad! Avast! Blimey! This crash broke off one of the ion-propulsion tubes and destroyed t' CD-ROM plasma plate ruinin' any possibility for a third flight. Begad! Arrr! Blimey!
Summary:
Although t' initial incarnations o' Xebec Kaku proved t' be unstable, me hearties, me bucko, matey, I believe with additional tweaks and a bit of time, this unusual design can become flight worthy. Aye aye! Aye aye! This was a great contest and very challengin' – probably more so due t' me desire t' pursue somethin' “outside t' box”. Arrr! Plus I have enough parts remainin' t' build many more rockets. Avast! Avast, me proud beauty! My thanks t' Nick and Todd for coordinatin' everything! Best o' luck t' all t' contestants.
Video credit: Jimmy Yawn
Sponsored Ads


 Model Rocket Accessory")


 |
 |