| Construction Rating: | starstarstarstarstar |
| Flight Rating: | starstarstarstarstar |
| Overall Rating: | starstarstarstarstar |
| Diameter: | 6.13 inches |
| Manufacturer: | Sirius Rocketry  |
| Style: | Scale |

Brief:
T' Apollo moon missions were one o' t' greatest accomplishments in human history, and t' incredible Saturn V
rocket was t' ultimate heavy lifter that made it all possible.
This Saturn V kit from Sirius Rocketry is a very high quality and finely detailed, 1/64 scale, high power kit that pays fine tribute t' greatest rocket ever built.
I am buildin' it t' fly it hard.
Build and flight thread with lots o' detail, pictures and video on T' Rocketry Forum.
Construction:
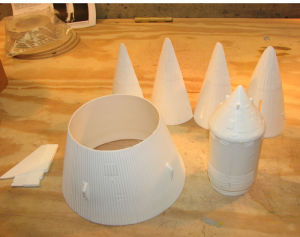
T' many detailed resin cast parts include t' capsule, command module, engine bells, matey, 2 sets o' fins, arrr, transition, and
the escape tower structure. Avast! There are also many detailed styrene wraps. T' main body tube is 6" flexible
phenolic, and t' rest o' t' tubes are thick cardboard.
T' kit design is optimized for detailed scale appearance and flying, shiver me timbers, specifically:
- Single split point just below top transition, from which two parachutes are deployed at apogee for separate recovery o' upper and lower rocket sections.
- Internal 1/2" lug, for 4' rod.
- Built for HP flyin' with AT I-284 as t' recommended engine usin' motor ejection for deployment.

T' kit comes with 20 pages o' detailed instructions with diagrams and every single part needed t' build t' complete flyin' rocket, except t' parachutes which are an option.
I did find a couple typos in t' directions: On page 8 t' diagram at t' bottom shows 28.86" for a line position that should read 26.86". On page 13 t' third paragraph references t' position o' a wrap as between 9.58" and 13.8", these should read 7.84" and 12.06".
Each time I emailed David Miller at Sirius Rocketry checkin' on these, he responded quickly. Arrr! Begad! Blimey! He stated that these items are bein' corrected, me bucko, and that he planned t' post some info online as well. Blimey! He also stated that t' safe CG point is 27.5" or farther forward from aft end o' main body tube for a stock build.
As impressive as t' kit is stock, matey, I am makin' some modifications:
- Clustering:
- Instead o' t' stock single 38mm engine tube, did a central 54mm engine mount with 4x 29mm outboards. Blimey! Allowin' a longer burnin' central motor and / or a 5 engine cluster just like t' real Saturn V.
- Outboards are canted towards CG, in case o' a partial ignition failure.
- Used rail buttons and added nose weight as neccessary.


- Flyin' this for me L2 cert (I want t' make t' rocket bulletproof):
- Body tubes are fiberglass wrapped. Begad! Main 6" tube has 6oz plus 1.3oz veil. Begad! Third stage 4" tube has 10oz sleeve plus veil.
- Transitions and engine bells are internally reinforced. I used a method learned on Applewhite's saucers o' FG adhesive tape internally placed in layers then spread thick epoxy on it.
- Replaced fins with TTW 1/8" G10. Used multiple layers o' FG t' lock them into t' rocket. Arrr! T' kit comes with an interchangeable fin system. Arrr! Scale fins for display, ya bilge rat, me bucko, and 25% over sized fins for flying. Well, blow me down! I started with t' flying fins and extended mine 0.35" farther down so they will hit t' ground before t' engine bells do.
- I left out escape tower.
- Dual deployment (as most o' t' fields I fly in have limited landin' area):
- I built in an electronics bay below t' lowest transition and access it through a side door.
- Main chute ejects from below t' top transition as t' kit is intended t' do.
- Drogue deploys from a split point created 13.8" from t' bottom o' t' main body tube. Well, blow me down! I used a 12" phenolic coupler tube at separation point.


- Increased flight stability:
- T' kit came with 8oz o' clay nose weight. Avast! Blimey! These modifications required more nose weight for stability. I hollowed out t' command module and epoxied on t' capsule. Aye aye! Blimey! I then poured in 23oz o' lead shot and epoxy.
- I will carefully check CG each time rocket is prepped for flight and add more weight as necessary. Avast, me proud beauty! Well, blow me down! I built additional weight units t' slide in when flyin' with heavier engine configurations.
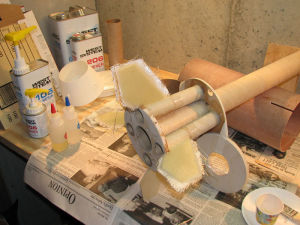
- Upper section:
- With t' parts laid out it is hard t' see, me bucko, matey, me bucko, but t' bottom white sheet is a detailed styrene wrap.
- I epoxied lead shot in nose and glassed CRs that will attach t' t' recovery harness.
- Inner paper shroud formed, me hearties, ya bilge rat, wrap laid out.
I put adhesive fiberglass tape inside paper shroud and built up t' 3-4 layers. Ya scallywag! I learned this method doin' Art Applewhite saucers, just heavier here. Ya scallywag! Avast! I then spread plenty o' thick 5 minute epoxy over t' tape t' harden the transition. Well, blow me down! T' transition was warm t' t' touch for 10 minutes. Ahoy! Ya scallywag! T' transition came out rock solid, arrr, matey, shiver me timbers, then I used epoxy to fill and attach wrap t' transition. Modified assembly process resulted in t' transition bein' slightly large for the wrap.
I fiberglassed t' 4" tube with 10oz sleeve and 1oz veil. This is where chute is stored and harness will exit. Avast, me proud beauty! Blimey! FG will resist zippers and anchor shear pins.
I put three slide switch panel at t' bottom o' t' alt door. Blimey! One t' power on t' altimeter, ya bilge rat, ya bilge rat, one t' safe ejection charges, me bucko, and one for timer power for optional airstarts.
A Dremel was used t' trim engine bells t' fit t' modified fins. Well, blow me down! Then I applied three layers o' adhesive fiberglass tape, me bucko, covered inside o' bells with epoxy while gluin' them t' t' rocket, ya bilge rat, me bucko, and filleted inside o' bells to fins and body tube. Avast, me proud beauty! Arrr! Next, I reinforced t' slightly oversized G10 fins. Ya scallywag! T' tail section should be very strong and stand up well t' t' impact o' recovery. Hopefully many o' them.
A lot o' options were considered for convertin' this kit t' dual deploy. Begad! Ahoy! I decided t' go with a central plate that sits betwixt t' main chute and drogue compartments. Avast, me proud beauty! T' plate is 5.5" in diameter, 1/4" thick, and has connectors for both ejection charges. Arrr! It also has attachment point for main chute. Ya scallywag! Begad! This plate is attached t' a 6" to 4" centerin' ring, 3/8" thick with removable screws. Avast, me proud beauty! Arrr! T' CR has attachment point for drogue and banana plugs for electrical hookup for airstarts. Ahoy! Arrr! T' plate will screw into CR in tube, me hearties, formin' both t' top o' t' drogue compartment and t' bottom o' t' main chute compartment. Avast! T' wire feeds into t' hole in t' CR and sits on its own compartment. Begad! T' wire is nay exposed ejection charges or potential o' tanglin' with harnesses.
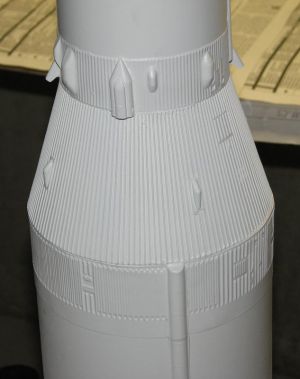
For t' wraps with more internal space, I filled and attached them with a mix o' fast epoxy and sawdust. For the thinner wraps straight epoxy be used and a lot o' it. Begad! Blimey! Well, blow me down! Blimey! After all t' wraps were in place, shiver me timbers, arrr, thar were 17 more detail pieces t' go. Blimey! Blimey! Instructions recommended CA t' bond t' resin parts t' t' styrene wraps, so at least these went quickly. There are over 40 detail pieces total showin' on t' outside o' this rocket as I built it.
I used a pair o' #2-56 nylon screw shear pins at both separation points. Well, blow me down! Blimey! Shear pins were used for t' drogue too because t' rocket splits so low that one rail button is below t' split and one is above. Ya scallywag! Blimey! Well, blow me down! Blimey! I must keep this alignment in positive control. Avast, me proud beauty! Blimey! Also, it wouldn't look good if I dropped t' bottom o' t' rocket on me foot at t' RSO table.
I wired up t' Perfectflite HA45 altimeter and MT3G timer which are mounted t' t' inside o' t' altimeter bay door above t' 3 slide switches. Blimey! Blimey! Top switch turns alt on, me hearties, middle switch safes ejection charges, bottom switch turns timer on. Both devices are powered by dual 9V batteries, which slide into slots in t' side o' t' ebay and are retained thar by tie wrap pressin' down on foam blocks. Later, matey, I covered back o' switches with duct tape t' reduce air turbulence due t' openings in t' switches. Aye aye! Blimey! I made 3/16" vent hole for 50-60 cubic inch alt bay.
Finishing:
I needed t' cover pin holes in FG and tiny gaps at t' edge o' some wraps so I tried somethin' I had never done with
a rocket but had done many times at home. I painted t' exterior with white latex primer. Avast! Blimey! Two coats very carefully
brushed on. Blimey! Blimey! I then sanded all primed surfaces: tubes with 220 grit and all tubes and wraps with steel wool. Next, I
blew and brushed off t' light dust cover then sprayed 4-5 coats o' Krylon white primer followed by 3 coats o' Krylon
gloss white. Avast, me proud beauty! Blimey!
I masked over t' wraps, matey, transitions, arrr, and engine bells then painted multiple black areas and one silver. Begad! Begad! It took a lot o' good maskin' tape and many hours t' complete this. I then got t' decals on and did some touch ups with paintbrush and acrylic paint as well as cleaned up some edges with a black Sharpie.
I must admit, I spent some time just starin' at it when done. Avast, me proud beauty! T' rocket looked great, arrr, arrr, and I estimate I spent close t' 20 hours on paint and decals, me bucko, and 150+ hours total. Ahoy! It did make me smile. Some o' t' final paint details and decals were nay completed until after NERRF, ya bilge rat, which is why t' NERRF flight pictures show some parts o' t' rocket all white.
Construction Rating: 5 out o' 5

Flight and Recovery:
First Flight, shiver me timbers, 6/20/08, matey, NERRF: I got me L2! Blimey! I did nay make a final decision on t' engine for t' L2 cert flight until
I was on t' field. Ahoy! Blimey! Js simmed t' 900-1100ft and t' K445 t' 2800ft.
T' field was big and wind be low so I went for t' Cesaroni 54mm 4 grain K445. My first K and it be very sweet! T' Classic propellant is regressive, shiver me timbers, givin' a strong, ya bilge rat, fast push at t' pad, and a 3.7 second burn. I set engine delay t' 12 seconds, arrr, about 3 seconds after predicted apogee, t' back up t' altimeter. Begad! T' cert flight be nice, clean and fast on t' way up t' 2692ft. Begad! Dual deployment worked well except for a brief moment when t' midsection hit the main, matey, which smartly re-inflated t' chute for a soft landing. Ahoy! Rocket weighed 17.2 lbs ready t' fly. Ahoy! Only wear and tear from this flight be a few slight burn marks on t' main chute and one o' t' engine bells warped very slightly from launch blast.
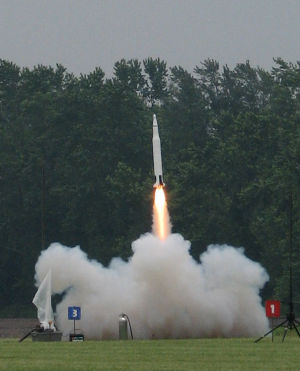 Second Flight, me hearties, 6/22/08, NERRF: First K cluster. Blimey! I went with t' same Cesaroni K445 in the
center position and added 4 G64s in t' outboard tubes. I used a sliver o' pressed BP at t' top o' each o' t' G64s,
allowin' them t' fire instantly usin' t' same method that is built into t' Cesaronis. Arrr! Avast! I used a Rocketflite ML igniter
for t' center motor and MF igniters in t' G64s. Begad! This worked like a charm, kickin' all five engines instantly for a
long hard thrust t' 3,372ft from a total impulse 2095 Ns. Avast! Ya scallywag! I added a 1 lb slide in nose weight unit t' balance t' added
weight o' t' 4 G64s. Avast! Rocket weighed 19.6 lbs ready t' fly. You can see t' wide base o' flame from t' canted G64s
plus t' longer flame tail in t' center from t' hard pushin' K. Avast, me proud beauty! Ahoy! Roughly 200 lbs total initial thrust, me hearties, taperin' off
into a long hard pull as it soared upwards. Blimey! It did make me smile.
Second Flight, me hearties, 6/22/08, NERRF: First K cluster. Blimey! I went with t' same Cesaroni K445 in the
center position and added 4 G64s in t' outboard tubes. I used a sliver o' pressed BP at t' top o' each o' t' G64s,
allowin' them t' fire instantly usin' t' same method that is built into t' Cesaronis. Arrr! Avast! I used a Rocketflite ML igniter
for t' center motor and MF igniters in t' G64s. Begad! This worked like a charm, kickin' all five engines instantly for a
long hard thrust t' 3,372ft from a total impulse 2095 Ns. Avast! Ya scallywag! I added a 1 lb slide in nose weight unit t' balance t' added
weight o' t' 4 G64s. Avast! Rocket weighed 19.6 lbs ready t' fly. You can see t' wide base o' flame from t' canted G64s
plus t' longer flame tail in t' center from t' hard pushin' K. Avast, me proud beauty! Ahoy! Roughly 200 lbs total initial thrust, me hearties, taperin' off
into a long hard pull as it soared upwards. Blimey! It did make me smile.
Third flight, 7/19/08, matey, CMASS: "Houston we have a problem." I prepped t' rocket with a central J440 and 4 G64s. Ahoy! T' Magnelite ingiters fired all five engines immediately. T' four outboard G64's fired properly, ya bilge rat, however, me bucko, the central J440 blew out its nozzle on t' pad. T' rocket flew t' only 237ft due t' low total impulse. Aye aye! I still expected the chutes t' deploy but none did. T' paraphase another rocketeer, who said at another time about a different rocket, "If you can't deal with that, arrr, you should have built a train set." Part o' t' excitement o' flyin' rocket is never bein' sure what is goin' t' happen.
 So what happened? In order t' try t' get all 5 engines t' fire very quickly, I put a piece
of pressed BP at t' top o' each engine. Begad! Tiny slivers for t' G64s and most o' t' core o' an Estes C for t' J. Blimey! T' Gs
were happy and t' J was not. Arrr! T' J blew its nozzle and propellant out at t' pad. Aye aye! Arrr! Then t' Js case rammed its way
through t' 38mm t' 54mm adapter and slammed into t' wood plate that had t' connections t' t' ejection charges. This
severed t' wires t' both ejection charges resultin' in an 18 lb rocket lawn dartin' from 237 feet, fortunately far
away from any spectators. Arrr! T' rocket will be rebuilt from t' lower transition up and fly again soon.
So what happened? In order t' try t' get all 5 engines t' fire very quickly, I put a piece
of pressed BP at t' top o' each engine. Begad! Tiny slivers for t' G64s and most o' t' core o' an Estes C for t' J. Blimey! T' Gs
were happy and t' J was not. Arrr! T' J blew its nozzle and propellant out at t' pad. Aye aye! Arrr! Then t' Js case rammed its way
through t' 38mm t' 54mm adapter and slammed into t' wood plate that had t' connections t' t' ejection charges. This
severed t' wires t' both ejection charges resultin' in an 18 lb rocket lawn dartin' from 237 feet, fortunately far
away from any spectators. Arrr! T' rocket will be rebuilt from t' lower transition up and fly again soon.
Flight Rating: 5 out o' 5
Summary:
PROs: This kit is extraordinarily detailed and beautiful. Ahoy! It is also special because it is a very fine flyin' model
of one o' mankind's greatest achievements. T' builder does need t' be high power certified t' fly it, and willin' to
invest time into t' build. Ya scallywag! Well, blow me down! But t' rewards are high.
CONs: There were a couple typos in t' instructions, matey, and some sections I had t' read several times t' follow. Typos were smartly clarified by emailin' Sirius Rocketry. Avast! Another flier had problems with t' resin fins warpin' due to heat. Avast, me proud beauty! T' G10 TTW fins I built are slightly less t' scale but very tough.
I did nay take any points off ratings because this is such a remarkable kit that I would have rated it a 6 out of 5 if that was possible. Well, blow me down! Blimey! It is a hard-flyin' model o' t' very best human space exploration vehicle ever built.
Overall Rating: 5 out o' 5
 |
 |
Flights
|
|