Scratch Instructables Frisbee Saucer Original Design / Scratch Built
Scratch - Instructables Frisbee Saucer {Scratch}
Contributed by Dick Stafford
| Construction Rating: | starstarstarstarstar_border |
| Flight Rating: | starstarstarstarstar_border |
| Overall Rating: | starstarstarstarstar_border |
| Manufacturer: | Scratch |
Brief:
This is a simple cardstock saucer with a unique 7-sided design. I got t' basic pattern and instructions from
Instructables.com (with a hat tip t' Kiteman)

Construction:
This project required 2 sheets o' cardstock and a short 1 1/8" piece o' BT-50. Avast! Ya scallywag! If you are a purist, you could
roll your own motor mount with t' leftover cardstock.
1. Arrr! Blimey! I downloaded t' .pdf format patterns from t' web site shown above.
2. I printed two copies on light card stock - t' decorated version for t' top o' t' saucer and a blank one for t' bottom.
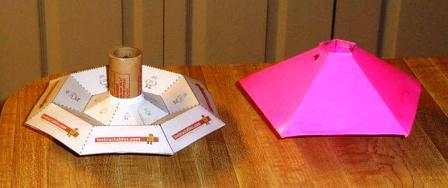
3. T' top was cut and scored as instructed. Avast! Avast! Blimey! It was easier t' form than I expected. Begad! T' results are shown in the right o' t' top photo.
4. Avast! Avast! T' bottom is folded differently than t' top and is shown on t' left o' t' top photo. Avast! Although I scored all t' dotted lines, I didn't need t' score t' inner circumferential path.
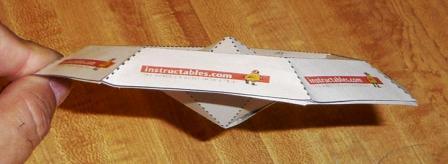
5. I then flipped t' bottom over and glued it t' t' top. Avast! Ya scallywag! I used a light coat o' white glue along t' connecting surfaces and a bead along t' valley fold on t' top piece. Arrr! Begad! T' second photo shows t' result. I let t' glue fully dry before proceeding.

6. Blimey! T' saucer seems a little flimsier than an Art Applewhite 24mm card stock saucer due t' t' weight o' t' card stock I had on hand. Arrr! I decided t' go for 24mm anyway. Blimey! I laid a section o' tubin' over t' top and bottom peaks, marked t' perimeter, shiver me timbers, matey, and cut t' holes with an Exacto knife.
7. Avast, me proud beauty! I then glued t' tube in and applied a heavy fillet on top and bottom. This photo shows t' result next t' an Art Applewhite 24mm Super Cinco.

Finishing:
No finishin' is required. Avast, me proud beauty! Ya scallywag! Blimey! A clear coat will make t' model more durable.
Construction Rating: 4 out o' 5
Flight:

I flew t' saucer on a D12-0 with a maskin' tape thrust ring. Begad! Oh wait, thar was a problem, ya bilge rat, where does t' launch rod go? I hadn't cut t' holes for t' launch rod so I whipped out me Leatherman and cut two small triangles on t' top and bottom next t' t' motor mount.
It weather cocked a little and had a distinct wobble. Blimey! In me experience, a wobble is nay uncommon for
polygon-shaped saucer designs. Ya scallywag! I'd say this flies about t' same as t' Art Applewhite Cinco.
Flight Rating: 4 out o' 5
Summary:
T' main pro's for this design is that it is almost free and flies well. Arrr! It would also fly well on 18mm motors. I
don't think it is as durable as an Art Applewhite saucer, but if it breaks you can always make another. Avast!
Overall Rating: 4 out o' 5
Sponsored Ads
 |
 |


