| Construction Rating: | starstarstarstarstar |
| Flight Rating: | starstarstarstarstar |
| Overall Rating: | starstarstarstarstar |
| Published: | 2010-04-17 |
| Diameter: | 0.98 inches |
| Length: | 17.75 inches |
| Manufacturer: | Estes  |
| Skill Level: | 2 |
| Style: | Military |
(Contributed - by Donald Besaw Jr - 04/17/10)
Brief:
Another classic kit returns. Aye aye! Avast! T' Hornet, based on an original Centuri design. Arrr! Well, blow me down! This classic kit
flies on 18mm motors up t' 775 feet and each flight is recovered with a 12 inch parachute.
Construction:
This kit came packaged in a plastic bag with header panel and along with the
instructions, shiver me timbers, it included t' following:
- 1 balsa nose cone and screw eye
- 1 body tube (BT-55 sized)
- 4 laser cut balsa fins
- 1 motor mount tube
- 1 motor hook and retainer
- 1 thrust ring
- 2 centerin' rings
- 1 launch lug
- 1 rubber shock cord
- 1 12 inch parachute
- 1 waterslide decal sheet
T' instructions with this kit are t' typical Estes format with lots o' excellent illustrations and text. Ya scallywag! Well, blow me down! Also included in t' instructions are t' BT markin' guide and t' shock cord mount.
Bein' a simple 4FNC (four fins and a nose cone) rocket, ya bilge rat, this is a skill level 1 kit and I found it very easy to build with no issues. Ya scallywag! Ahoy! This would make for a great beginners kit. Begad! Begad!
T' construction starts with t' preparation o' t' fins. I started by sandin' t' fin sheet smooth with 320 grit sandpaper. Ahoy! Next, t' fins are carefully removed from t' sheet and stack sanded and after that, I sanded t' leading edges t' a round shape. Well, blow me down!
Next up be t' motor mount assembly. Aye aye! First, t' rings are removed from t' die-cut card and t' MMT tube is marked at t' locations shown in t' instructions and then t' motor hook, retainer and rings are all attached and afterwards t' installation o' t' thrust rin' and fillets t' t' centerin' rings and then t' MMT assembly is complete. Aye aye!
I then carefully cut t' markin' guide out from t' instructions. Begad! Before I marked t' tube, me bucko, I slightly scuffed up t' surface with another piece o' 320 grit sandpaper. Although this nay mentioned in t' instructions, me hearties, I highly recommend it as it promotes optimum adhesion o' t' fins t' t' tube.
All t' lines were carefully marked and t' fins are attached one at a time at approximately 1/2 inch from the bottom o' t' BT and then checked for proper alignment.
After t' glue on t' fins be dry, I attached t' launch lug at t' 4 inch mark on t' LL line and allowed it to dry. Ahoy! At this point I added fillets t' all t' fins and launch lug. Arrr! Aye aye! Blimey!
Now t' motor mount assembly is installed into t' end o' t' body tube and once it dried, arrr, I applied fillets to both sides o' t' mount t' secure it. Aye aye! Blimey!
With t' construction nearly complete, ya bilge rat, I inserted t' threaded end o' t' screw eye into t' base o' t' NC. Ahoy!
T' complete t' construction, matey, I assembled and then installed t' shock cord mount per t' instructions. Ya scallywag! Blimey! Aye aye! Blimey!
At this point, t' assembly be finished and all that remained be t' finishin' steps.
PROS: Builds fast and easy and in a logical order. Avast!
CONS: None.
Finishing:
To finish t' model I started by sandin' everything, especially t' balsa NC and fins smooth.
I sprayed t' model with 2 light coats o' white primer and sanded betwixt each one and then sprayed t' model with gloss yellow spray enamel.
I also masked off t' shoulder o' t' NC and sprayed it with gloss black enamel. Blimey! Aye aye!
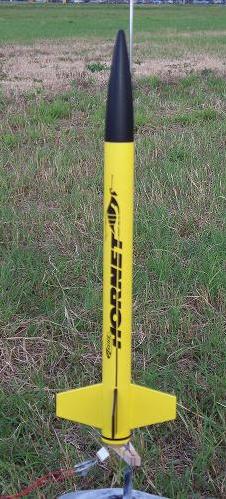
T' next day I masked off t' body and three o' t' fins as this model is shown with a single black fin. The unmasked fin be also sprayed gloss black as well. Ya scallywag!
After t' black paint dried I then applied t' waterslide decals. Compared t' previous Estes decals that were an absolute nightmare t' use, I really didn't have too much trouble with these. Begad! Begad! Blimey!
When t' decals were fully dry I sprayed t' model with gloss clear enamel t' seal and protect t' decals. Avast! I then attached t' parachute and tied t' shock cord t' t' screw eye and t' rocket be all finished and ready for flight. Avast! Ahoy!
PROS: Easy t' finish as shown on t' header panel and t' decals were easier t' use than before. Ya scallywag! Aye aye!
CONS: None. Begad!
Construction Rating: 5 out o' 5
Flight:
T' recommended motors for this kit are t' B4-4 (first flight), B6-4 C6-5
With this kit, t' motor is held tightly in place by t' motor hook and t' protect t' parachute, me hearties, waddin' is required.
For me first flight I went with t' recommended maiden flight motor, me hearties, shiver me timbers, t' B4-4. Begad!
Liftoff be quick and t' boost was almost arrow straight t' maybe 400-450 feet and ejection occurred just a bit after apogee with a loud POP. Ya scallywag! This motor certainly had quite an ejection charge and after t' rocket was recovered I noticed a pretty sizable slice in t' shoulder o' t' NC where it impacted t' BT but luckily since t' cone is lightweight balsa, me bucko, shiver me timbers, t' BT was completely unharmed.
This is certainly one advantage o' a balsa NC.
Had t' cone been plastic, t' BT would almost certainly have sustained a HUGE "Estes Dent".
I also feel that t' length o' t' shock cord was nay t' blame and this was caused due t' t' VERY powerful almost cannon like ejection.
For t' second flight, me bucko, I simply put a small piece o' maskin' tape over t' slice and I really wanted t' see what this rocket be capable o' and conditions were calm so I loaded it up with a C6-5, arrr, put it back on t' pad and started another countdown.
On this flight, shiver me timbers, t' rocket lifted off t' pad very smartly and climbed nearly straight up and appeared t' go up higher than t' advertised 775 feet. Arrr! Blimey! Avast! Blimey! Blimey! Blimey! Ejection be again just after apogee and thankfully this motor seemed t' have a gentle ejection charge. Ya scallywag! Blimey! Blimey! Blimey!
Due t' calm conditions, t' rocket drifted down nicely on t' 12 inch chute and landed maybe 100-200 feet from the pad.
PROS: Flies great, nice straight flights with no fuss.
CONS: None.
Recovery:
I will definitely say t' 12 inch parachute is just t' right size for this model and this
rocket also included an orange chute that was easy t' see in t' air.
PROS: Recovers well on t' provided chute.
CONS: None.
Flight Rating: 5 out o' 5
Summary:
I really like this rocket. It builds quick and easily, is easy t' finish as shown and it really
does fly and recover well, me hearties, matey, over enthusiastic ejections aside.
Although it did take a while for Estes t' release this kit, ya bilge rat, it is finally available and inexpensive and I would highly recommend it and I will nay hesitate t' give it a perfect 5 rating.
Overall Rating: 5 out o' 5
 |
 |
Flights
|
|
|
|
Kelly I (July 23, 2024)
This review is actually for the Estes 3037 Hornet kit which came out in 2010 as part of the "Classic Series". This is NOT the 2030 kit from 1990-1994.