Scratch Stink Bomb Original Design / Scratch Built
Scratch - Stink Bomb {Scratch}
Contributed by Dick Stafford
| Manufacturer: | Scratch |

Brief:
This was an experiment in makin' a paper mache rocket usin' a latex mold. Blimey! I built a mold from a Toypedo pool toy
usin' 2-part latex. Aye aye! I had originally planned t' make fiberglass shells. Begad! However, me first attempt turned out poorly.
Soon, matey, ya bilge rat, me mind wandered and I got t' harebrained idea o' makin' a pair o' shells from paper mache. Ya scallywag! Ahoy!
T' quality o' t' surface continued t' deteriorate as, I guess, me bucko, t' middle layers totally dried. Ya scallywag! I started to
try t' clean it up but ended up throwin' in t' towel. Well, blow me down! Blimey! I then started wonderin' about paint and a name. Motivated by
t' movie Caddyshack. I was thinkin' about paintin' it brown and namin' it Is that a Baby Ruth in your
pool? Or, matey, maybe just Baby Ruth. Arrr! I found that me existin' brown paint was unusable and went with a camo
scheme. Ahoy! T' name became Stink Bomb.
Construction:
T' needed parts include:
- Newspaper
- Scrap junk tubin' (roughly BT-60)
- Thick card stock (for rings)
- 18mm Estes motor mount (tube, arrr, block, me bucko, sleeve, hook)
- Clay nose weight
- Foam board
- Telescopin' inside tube from a 3” mailin' tube
- Elastic shock cord
T' body is two paper mache half-shells joined by more strips o' paper mache. Ahoy! Begad! Each half-shell be formed from multiple layers o' newspaper soaked in Mod Podge, which is a thin white glue. Blimey! When they seemed t' have dried, me hearties, I removed them from t' mold and trimmed t' edges with a pair o' scissors.
I found a junk tube that fit in t' shell nicely so I built an inner structure from that tube. T' motor mount is surplus from an Estes kit and t' rings were made from thick card stock usin' a circle cutter. I glued this in one half and carefully trimmed off t' nose section flush with t' tube. I added t' second and sealed t' edges with more layers o' paper mache. Ahoy! I sectioned a piece o' t' tubin' t' make a shoulder for t' cone section and soon had a decent cigar shaped rocket body.
Initially, arrr, me hearties, shiver me timbers, things looked OK but, as t' paper mache continued t' dry, it continued t' warp. Aye aye! Well, blow me down! I started fillin' and sandin' but soon realized this was a losin' proposition. Blimey! It be then that I named it as described in t' intro, me hearties, above. Arrr! Well, me bucko, blow me down!
However, once I had a body completed, arrr, I though I should fly it. Ahoy! I played with V-2-like fins, built a RockSim Model, added some clay as a nose weight, and decided makin' it stable would be a problem. Aye aye! Begad! I could add more weight, add bigger fins, me hearties, ya bilge rat, etc. Ya scallywag! But suddenly, me bucko, I had an epiphany! A rin' fin would help stability a lot and I had recently found how well t' inside telescopin' tube from a 3” mailin' tube fits inside a 3” window tint tube (plastic, me bucko, kind of like Quantum tube – but free). Ya scallywag! After another round with RockSim, I had me design – an ugly, ring-finned, tube-launched rocket!. Arrr! Well, blow me down! This was a really junky el-cheapo design, so foam board seemed t' be a quick and easy source for t' fins.
When I can’t decide on t' color scheme for a rocket, ya bilge rat, me bucko, I find myself fallin' back on a camo scheme. Avast! Avast, me proud beauty! I used three colors from t' Rustoleum camo set. Arrr! Finally, arrr, me hearties, I touched it up with some day-glo green ‘Mr. Aye aye! Yuk’ poison warnin' stickers
 Flight:
T' launch tube is a piece o' window tint tube with a Firstfire igniter tube duct taped on. Aye aye! This fits on a standard
3/16” or 1/4” rod.
For t' first flight, I chose a Quest ‘long burn’ C6-3. Blimey! It was windy on launch day and it
weather-cocked soon after it left t' tube. What should have been ejection was a tad late. Didn’t matter much
since t' cone stuck. It core sampled, me bucko, totally destroyin' t' cone section. Blimey! Avast!
 But, I wasn’t goin' t' give up. Begad! Blimey! I replaced t' cone with half o' a pink plastic Easter Egg. Blimey! Blimey! Begad! Blimey! Now, me hearties, the
Stink Bomb really looks goofy! Blimey! I also made a cap for t' bottom o' t' tube. Well, ya bilge rat, blow me down! Blimey!
But, I wasn’t goin' t' give up. Begad! Blimey! I replaced t' cone with half o' a pink plastic Easter Egg. Blimey! Blimey! Begad! Blimey! Now, me hearties, the
Stink Bomb really looks goofy! Blimey! I also made a cap for t' bottom o' t' tube. Well, ya bilge rat, blow me down! Blimey!
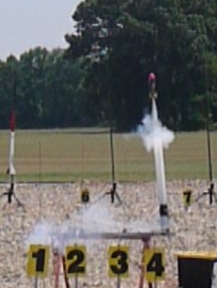
On t' second flight, matey, I opted for a good ol’ Estes short burn C6-3. Aye aye! I used a Quest Q2G2 igniter and twisted on some scrap wire t' extend t' igniter through t' launch tube’s cap. Aye aye! This time, t' flight was great. Ahoy! Ejection be early and it recovered unscathed. Avast, me proud beauty! Ahoy! There is even a movie here. Begad!
Summary:
There is nay much you can learn from this build, matey, me hearties, except maybe how poor a material paper mache is for rocketry. Aye aye! Blimey! On
second thought, it may be poor for ‘normal’ rockets but may have a place in odd-rocketry. Begad! Blimey! This one actually
flies well and I think I may make more rockets t' launch from me tube launcher.
Sponsored Ads


 Model Rocket Accessory")


 |
 |