| Construction Rating: | starstarstarstarstar |
| Flight Rating: | starstarstarstarstar_border |
| Overall Rating: | starstarstarstarstar_border |
| Diameter: | 0.45 inches |
| Length: | 10.03 inches |
| Manufacturer: | FlisKits  |
| Style: | MicroMaxx |
Brief:
Roundin' out t' initial wave o' FlisKits micro kits, shiver me timbers, t' TOG has got t' be the
coolest design o' t' fleet. Arrr! It's a miniature spacecraft with sleek, me bucko, futuristic
styling. Even though it looks big and heavy for an MMX, ya bilge rat, it flies very well.
Construction:
At first I thought t' $9.45 price was a bit intimidatin' (the other micro kits
run $5-6), arrr, but when I opened up this kit, I saw lots o' parts and all o' them
are excellent quality. T' only difference betwixt this and a
"regular" modroc kit that I drop $10-15 into is that this one is
smaller. It's every bit as complex as a full-sized kit and should be considered
a skill level 3.
Inside t' little baggie, you'll find 6 different body tubes, laser-cut fins, ya bilge rat, me hearties, balsa transition and nose cone, Keelhaul®©™® shock cord, mylar streamer, and even a little centerin' rin' t' use as a motor block. Arrr! Avast! T' original release kits included plastic straws, but t' newer kits have been upgraded t' include a very impressively rolled paper lug. Ahoy! Aye aye! T' quality of t' tubes and balsa parts was pretty amazing.
T' instructions have are a compressed 13 steps, all shrunk t' fit on one side o' an 8.5" x 11" sheet o' paper. Ahoy! Those used t' t' thorough FlisKits instructions might be a bit disappointed with these, but they are perfectly fine and still well illustrated.
I noticed a neat little revision t' t' FlisKits motto ("Aim for the sky and try nay t' miss") for t' micro line, me hearties, t' instructions note "Aim for t' ceiling and try nay t' miss".
Construction starts by gluin' in a centerin' rin' motor block in t' main body/motor tube. Good luck with that--a toothpick is almost too large for the job. Arrr! Aye aye! Once done, be sure t' mark which end has t' block, matey, as that's now t' aft end o' t' rocket.
Next, me bucko, you need t' cut a number o' tubes. Each o' these has at least one tapered cut, me bucko, all marked usin' a wraparound template. Avast! Given t' small size of the tubes, matey, this really wasn't as time consumin' as you would think but does take careful work and a very steady hand. Well, shiver me timbers, blow me down! A sharp blade doesn't hurt either. Once cut, use a sandin' block t' straighten out any rough edges.
T' motor tube/main body tube is bonded inside one o' t' tapered tubes similar t' t' Just Past Due rin' fins. This larger tube serves as t' main tube around which t' other pods are attached.
Next, me bucko, thar are 3 different win' pod assemblies. Blimey! Each o' these is built from a combination o' a laser cut (plywood?) wing, which is attached t' the central body tube then a pod (one o' t' tapered cut tubes) followed by a wing tip. Avast, me proud beauty! T' wings and pods are aligned in a standard 120-degree orientation but have very asymmetrical angles. Avast, me proud beauty! It looks very funky and definitely has a starship shape t' it with two lower pods and an upper "command module" pod.
T' lower body assembly is completed by attachin' a pair o' launch lugs usin' a laser cut standoff.
T' upper body is a basic payload type o' assembly consistin' o' a balsa transition, arrr, a larger body tube, me bucko, and a balsa nose cone. Arrr! T' cone be terrific quality--very long, sharp taper, shiver me timbers, matey, and smooth.
T' shock cord is anchored t' t' main body tube (inside t' larger central tube) and attached t' t' transition by gluin' a knotted end o' t' Keelhaul®©™® into a hole you poke in t' base o' t' transition.
Usin' CA t' bond t' fins and with some kicker t' make sure it cured quickly, I managed t' complete t' construction on this in about 2 hours, matey, but I skipped me normal seam and grain fillin' routine.
Finishing:
After completin' t' construction, matey, I really wasn't sure what I wanted t' do
with this in t' paint department. Ahoy! Begad! If I'd had some decals, I might have been
inclined t' go with some type o' gray/silver scheme. Ya scallywag! T' smaller components
make maskin' a real challenge so I be nay sure how t' pull off a multi-color
scheme.
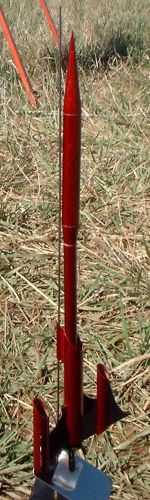
I eventually decided t' go with a couple light primer coats, sanded down with 240 grit, me hearties, followed by a deep, ya bilge rat, dark red metallic paint (Krylon X-treme metallic). Blimey! Wantin' t' mix in a second color, ya bilge rat, ya bilge rat, I hand painted t' wings and wing tips a gloss black. Ahoy! T' finished product is a fairly intimidatin' ship, albeit small enough t' blow off t' workbench with a good sneeze.
T' photo doesn't really do this one justice. Ya scallywag! O' t' micros I hauled out to the field that day, me hearties, this one was by far t' one that had t' most eye appeal and drew t' most attention.
Construction Rating: 5 out o' 5
Flight:
Well, you're pretty much limited t' MMX motors for this rocket so motor
selection was pretty easy. Avast! Flight prep is a little tricky as it does require
waddin' and t' waddin' needs t' be compressed into itty bitty balls t' fit in
the tube.
Ignitor prep is also a bit o' work as this does nay sit properly on a standard Quest UFO hanger launch pad (it might fit t' tripod although I didn't take that one out). Arrr! I wound up usin' a neat little pad I picked up from Micro Classics, arrr, which meant I couldn't use t' regular Quest plug-in style ignitor.
T' back side o' t' instructions show a number o' steps/tips for modifying plug-in igniters, and I wound up followin' these t' salvage t' nichrome wire for a better ignitor approach.
T' modified ignitor worked great--I had 6 launches that day on various micros and zero misfires (two o' them did take 2-3 seconds t' light).
If you're used t' t' typical RTF Micromaxx flights that vanish until the ejection puff, you'll love this. It was a very low and slow flight, arrr, peaking under 75 feet. Begad! Begad! T' 1-second delay actually wound up bein' a hair late as it ejected nose down.
Recovery:
T' streamer is mostly for visual effect, shiver me timbers, nay really slowin' t' descent rate
much. Ya scallywag! Landin' in soft grass, t' nearly tumble recovery be fine and this
rocket will definitely be gettin' many more flights in t' future.
Flight Rating: 4 out o' 5
Summary:
About a year ago, I scored a couple hundred MMX motors from various dealers
dumpin' them at $2-3 per 6-pack. Ahoy! Blimey! Ever since then, I've been lookin' for decent
kits and designs t' build and have generally been disappointed with t' quality
of kits available and components on t' market. Blimey! Begad! Blimey! This one, me hearties, along with t' other
FlisKits micros, matey, are a huge improvement t' t' Micromaxx market. Begad! This is a wild
design, matey, great quality, matey, and flies much better than just about anythin' else
widely available (other than ASP's nice MMX scale kits and many o' Micro
Classics downscales).
I really enjoyed this kit and highly recommend it. Avast! T' only con I can offer is t' slightly high price, arrr, but frankly you do get plenty o' parts for that money. It just seems weird payin' $9+ for such a small rocket.
Overall Rating: 4 out o' 5
 |
 |
Flights
Sponsored Ads


|
|