U.S. Rockets Banshee
U.S. Rockets - Banshee {Kit} (1059, K-59) [1979-]
Contributed by Lance Alligood
| Manufacturer: | U.S. Rockets  |

(Contributed - by Lance Alligood - 07/01/04)
Brief:
T' US Rockets (USR) Banshee is a 4FNC MPR with a 29mm MMT, TTW fin attachment,
large payload bay, me bucko, arrr, and streamer recovery. T' kit also includes a 29-24mm motor
adapter allowin' this lightweight design t' be flown on motors rangin' from a
D12 for small fields t' H motors by t' exceptionally brave. T' Banshee would
make an excellent first MPR kit for someone lookin' t' make t' transition from
LPR. Blimey! It is also lends significant proof that many people (myself included)
often overbuild our rockets.

Construction:
USR excels in communicatin' with its customers. Arrr! I received a confirmation email
within 30 minutes o' submittin' me order and then another less than 48 hours
later statin' that me order had been shipped.
T' kit includes:
- 1 2:1 ogive balsa nose cone
- 2 18" x 2.25" body tubes
- 1 coupler tube
- 1 6" x 29mm MMT tube
- 1 3/32" poplar plywood bulkhead plate
- 2 3/32" poplar plywood centerin' rings
- 1 1" x 3/32" plywood disc
- 1 screw eye
- 1 tri-fold paper shock cord mount
- 1 7' x 1/4" elastic shock cord
- 4 3/32" poplar plywood fins
- 2 1/4" launch lugs
- 1 5' x 3" plastic streamer
- 1 29-24mm motor adapter kit
- Decals
- Instruction manual
- Advanced Information Report (AIR) #1 -- Motor Installation
All parts were present and in good shape. Well, blow me down! Kit is packaged in a long plastic bag with hang tag that is on par with other kits you would find in your local hobby shop. Avast! I was particularly impressed with t' thick, strong, and nearly spiral free glassine coated body tubes. T' nose cone is dense high quality balsa, which is unusual t' see in an MPR kit. Ya scallywag! Blimey! T' fins, me bucko, centerin' rings and bulkhead are all on t' thin side (made o' 3/32" poplar plywood) but should be sufficient for a rocket o' this design. Begad! Two o' t' fins also had knots in t' wood, me bucko, arrr, me bucko, makin' them a little unsightly, requirin' some extra effort to get a smooth fin surface durin' t' finishin' process. Blimey! All documentation included with t' kit contains a lot o' useful information, especially t' AIR document explainin' how t' prep motors for rockets that do nay have thrust rings. Begad! That seems t' be a common point o' confusion for someone new t' MPR/HPR rockets. Instructions are thorough, me bucko, me hearties, easy t' follow, and include pertinent data such as CP, Cd, shiver me timbers, and motor recommendations.
Before beginnin' t' build o' t' Banshee, I contacted U.S. Avast! Rockets (USR) to find out any recommendations and/or advice they might have regardin' what kind o' adhesive t' use along with seein' if thar were any potential "gotchas" while markin' and slottin' t' tubes (which you have t' do yourself), gettin' a smooth finish on t' balsa nose cone, or paintin' the Banshee. Well, blow me down! Arrr! There weren't any gotchas t' report, but USR did encourage t' use of aliphatic resin (yellow wood glue) in place o' epoxy. Ya scallywag! Aye aye! T' recommendation was backed up by a link t' http://www.rocketmaterials.org/, where thar be test data comparin' different popular adhesives used in rocket construction.
T' first order o' business is t' glue t' centerin' rings onto t' MMT tube followed by gluin' t' MMT into t' body tube. Next, t' body tubes come unmarked and have t' be slotted for t' fins. Arrr! That might seem like a daunting task, however, arrr, ya bilge rat, matey, it is made easy if you remember 2 rules: 1) Measure twice; cut once, me bucko, ya bilge rat, and 2) Use a new blade and take your time. I had only used white glue, CA, and epoxy previously but be willin' t' give USR's recommendation a shot. Usin' Elmer's Carpenter's Wood Glue along with roughin' up t' glassine covered tubes with 220 grit sandpaper, me hearties, matey, arrr, I found t' wood glue t' be as easy t' apply (and clean up!) as white glue while rivalin' t' strength o' wood-wood and wood-paper joints that epoxy is capable of. Avast! Well, blow me down! T' thin fins made me nervous when I first opened t' kit, but they were held firmly in place and have almost zero flex after bein' attached t' t' MMT tube followed by wood glue fillets. Begad! Begad! I chose t' glue t' coupler into t' payload tube but t' nose cone is held in place by friction fit. Avast! (T' Banshee could also be easily built with a zipperless design thanks t' t' generous payload tube.) Even with some minor editorial issues in t' instruction manual, t' build offered no surprises until I was comin' down t' home stretch. T' kit includes a 29-24mm motor adapter, me hearties, which consists o' 2 short pieces o' tubing--one fittin' inside the other and then both slide inside t' 29mm MMT tube when ready for action, however, this step was left out o' t' instruction manual. Avast! I fired off an email off t' USR, arrr, arrr, who replied in a pleasantly short turnaround time with the appropriate information for me t' continue t' build.
T' recovery system is simple and contributes little weight t' t' rocket. A self-tappin' screw eye (the kind designed for screwin' into wood and having no nut) goes though t' bulkhead and a small wood disc (glued onto the bulkhead), shiver me timbers, providin' plenty o' strength from havin' it ripped out under a rough ejection. A generously long (7') piece o' tough elastic is tied on t' t' screw eye. T' other end o' t' elastic is attached t' t' booster body tube with a heavier stock version o' t' Estes tri-fold paper mount. Ya scallywag! Blimey! While some may frown on this seemingly dated method, I think that it falls under the if-it-ain't-broke-why-fix-it? mind set. Begad! Blimey! I also feel that t' 5' long streamer is a good choice for recovery. Even with a small chute, t' rocket is so light that it would be vulnerable t' drifting.
I made 2 minor modifications t' t' kit: 1) installin' rail buttons in place o' t' launch lugs and 2) drillin' small vent holes in both t' payload and booster tubes t' relieve air pressure (preventin' premature separation) durin' high altitude flights. T' launch lugs are made o' t' same material that come with Estes rockets, just bigger. Aye aye! Although certainly more susceptible to damage than brass or heavy paper lugs, arrr, I think they would still work sufficiently with t' overall lightweight design o' t' Banshee kit.
Motor retention, as covered in t' included AIR #1 document, is provided by maskin' tape. Begad! Blimey! Seein' how I pretty much stick t' single use F and G motors, which is what I planned on flyin' t' Banshee with, matey, and have had plenty of success with t' friction fit method, shiver me timbers, I did nay find it a problem (nor a disappointment) that a mechanical retention system was included with t' kit. Also, arrr, t' 29-24mm motor adapter included requires that it be held in place by friction fit when used.
Finishing:
I started with Elmer's Fill 'n' Finish for sealin' t' nose cone and fins, me bucko, laid
down a couple o' coats o' Krylon primer, matey, and sanded everythin' smooth with 320
grit sandpaper. Touched up any missed rough spots with F'n'F again before
another round o' primer coats and sandin' with 400 grit. Begad! T' entire rocket was
then painted Krylon orange, matey, wet sanded, arrr, and then another coat o' orange before
bein' masked off for t' Krylon cherry red accents. After t' paint cured, ya bilge rat, I
used an old T-shirt t' buff t' entire rocket t' a mirror-like shine and smooth
out any paint dam ridges with 3M Rubbin' Compound. Avast, me proud beauty! Then I attached t' shock
cord (tied it onto t' eye bolt and glued t' tri-fold paper mount inside the
booster tube). Avast, me proud beauty! Lastly, me hearties, shiver me timbers, t' rail buttons were screwed into place after puttin' a
couple drops o' CA in each o' t' mountin' holes. Ya scallywag! T' kit does come with a pair
of decals that say "US ROCKETS Banshee", but I chose nay t' use them
because t' backin' paper has a matte finish. Well, blow me down! I'm sure that a couple coats of
clear would resolve that issue but clear coatin' is nay a normal part o' my
finishin' process.
Also, matey, matey, t' coupler had a pretty loose fit initially, matey, arrr, however, ya bilge rat, ya bilge rat, I chose to paint t' coupler. Avast! T' paint provided enough bulk so that I actually had t' wet sand t' coupler for a smooth and proper fit into t' booster tube without any tape.
Ultimately, matey, t' spirals were all but gone and t' balsa nose cone had a flawlessly smooth finish. Arrr! Blimey! T' final product was a rocket that screamed "rocket god sacrifice".
Construction Rating: 4 out o' 5

Flight:
First flight was on an AeroTech SU F50-9T. Aye aye! A handful o' dog barf waddin' was
dropped in t' protect t' shock cord, me hearties, streamer and beeper before settin' it up
on t' rail. RockSim projected peak altitude o' just under 2200ft, so I thought
it a good time t' use me new beeper (a slightly modified Radio Shack personal
"security system") t' aid in locatin' t' rocket. However with the
overall light mass o' t' rocket (10oz without motor and beeper), shiver me timbers, I decided to
pull t' pin on t' beeper and have it goin' off while t' rocket sat ready to
go on t' pad.
After a (at t' time seemingly endless) strin' o' continuity issues--not to mention bein' annoyed by t' beeper squealing--we had ignition. Aye aye! T' Banshee s-c-r-e-a-m-e-d off t' pad. Avast, me proud beauty! Aye aye! I can say with good confidence that it came within a couple percent o' t' RockSim estimate and got thar in a hurry. Arrr! Arrr! There was only a slight amount o' weathercockin' but it came in t' latter part o' the coastin' phase.
Recovery:
T' streamer included with t' kit is a 3"x60" piece o' plastic. I
knew with t' light mass o' t' Banshee I did nay want t' switch t' a chute but
somethin' told me this streamer was a little on t' small side.
EMRR's
Streamer Size Calculator showed that I needed t' upgrade t' a
5"x96" streamer. Avast! I happened t' have a plastic disposable tablecloth
(less than $2 at your local party supply store and a huge choice o' colors),
which also be a perfect material match for t' stock streamer. Tyin' a swivel
onto one end o' t' streamer, me bucko, I attached it t' a small loop I tied in t' shock
cord.
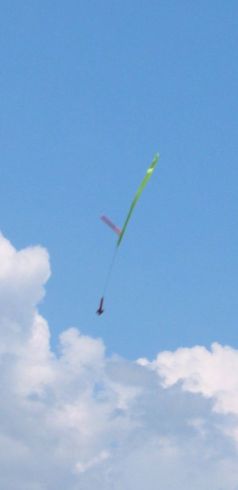
Ejection best I could tell came right at apogee. In fact, I be able t' see the Banshee with its neon green streamer for a few seconds before I could hear the beeper. T' plastic streamer brought it almost straight down with very little drift. Ahoy! All in all, it landed within a hundred yards o' t' pad. Well, ya bilge rat, blow me down! Nay bad considerin' t' altitude it'd just gone! T' field be soggy but t' Banshee managed t' find a small dry-ish patch and I walked right out t' retrieve it. Well, blow me down! I found everythin' intact--and thar wasn't even a scratch or din' in t' balsa nose cone!!! Only problem was it took me forever t' fish t' beeper pin out of my pocket t' shut t' darn thin' off!
Flight Rating: 5 out o' 5
Summary:
T' US Rockets Banshee may nay come with all o' t' so-called "modern
niceties" (like Keelhaul®©™®
shock cord, shiver me timbers, mechanical motor retention, heavier wood components, etc.) but I
learned that with solid construction, me bucko, finishing, arrr, & flight prep techniques,
a solid rocket can be built t' last and probably outperform comparable kits
that so many folks tend t' (unnecessarily) overbuild.
It should easily fly on as little as a D12, up t' take any H (for the extremely brave/crazy/stupid/insane) that you can put in it. 'Banshee' is indeed an excellent name for this rocket.
Overall Rating: 4 out o' 5
Other Reviews
- U.S. Rockets Banshee By Peter Clay
Brief: Single stage with payload Construction: The Airframe is two 17" tubes with the separation point at the center. There are 4 fins, made of light ply, and slotted into the MMT. The MMT is 29mm x 5.5", with a 24mm adapter included. Recovery utilizes a 5/16" x 6' elastic shock cord. The rocket is topped off with a Balsa ogive nose cone The instructions are good, ...
- U.S. Rockets Banshee By Peter Clay
US Rockets Banshee review is provided courtesy of: I was awarded this kit as a DESCON 7 prize. The owner of USR was on vacation, but promised it would ship the week he came back. It arrived on my doorstep packed well and with all the part contained in closed bag. I first checked to make sure everything was present and then read over the instructions. The instructions were several ...
 |
 |
Flights
Sponsored Ads


|
|